
Did you know that a simple floating bar on your website can skyrocket lead generation?
Cosmetic Capital, an eCommerce website offering beauty products, captured over 18,000 new leads with a floating bar campaign. With this 1 small addition to their website, they increased their lead generation by 300%!
If you want to replicate this success in your business, then you’re in the right place.
In this post, you’ll learn what floating bars are and how to use them to generate leads and drive sales.
What Is a Floating Bar?
A floating bar is a type of popup that “sticks” to the top or bottom of a web page and stays in place even as you scroll. Floating bars are sometimes called sticky bars, notification bars, or hello bars.
Floating bars can notify users of a special sale or promotion, encourage website visitors to sign up for your email newsletter, or highlight other important information.
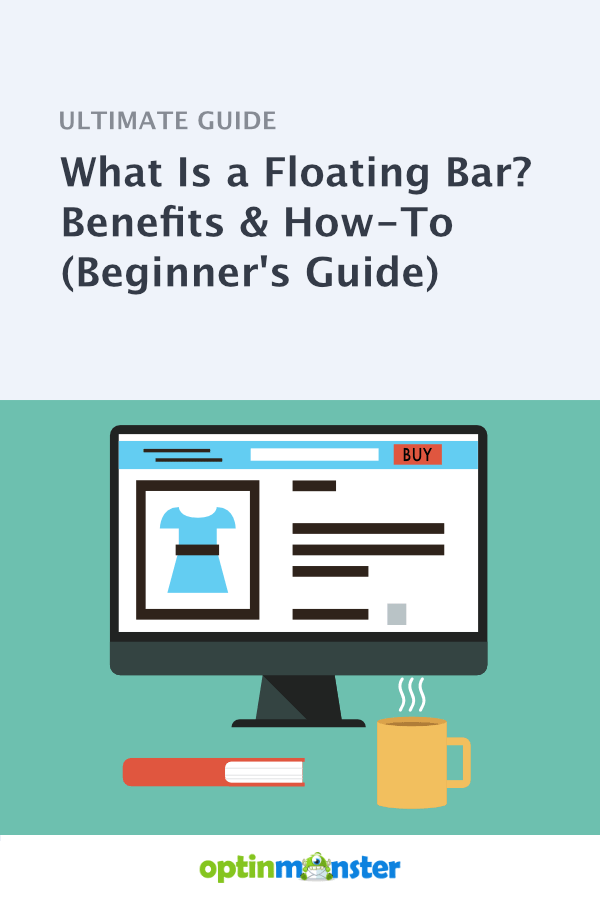
Below is a basic example of a floating bar header.

In the above example, the floating bar appears as soon as the visitor scrolls below the top fold. The blue floating bar remains visible at the top of the page as the user continues to browse the web page’s content.
While it’s most common for floating bars to be at the top of the page, you can also use footer bars. In other words, your sticky bar can float at the bottom of the page as your user scrolls.
5 Impressive Benefits of Floating Bars
A floating bar is an excellent alternative to a traditional lightbox popup. Just like standard optin popups, floating bars can include coupon codes, email entry fields, and other calls to action (CTAs).
But why should you consider a sticky bar over a lightbox?
- They draw the eye. Because a floating bar remains visible as the user scrolls, it catches your visitor’s attention. For even higher visibility, choose a background color that stands out and add bold CTA buttons.
- They don’t disrupt. We all know that poorly designed popups can be annoying. Especially if they interrupt your users as they try to learn about your company. Floating bars avoid this problem because they do not block content.
- They reduce campaign exits. Because sticky bars are not disruptive, users are less likely to close them immediately. And they’re more likely to read your message fully.
- They improve UX. As already mentioned, floating bars avoid interrupting users as they browse. But they also improve user experience by keeping your offer easy to access, even as visitors continue to read your content.
- They boost your conversions. With these benefits, sticky bars can increase your sales, email subscriptions, and overall conversion rates.
6 Genius Ways to Use a Floating Bar (And Increase Sales)
Now that you know what a floating bar is and its benefits, let’s discuss ideas for how to use it on your website.
When and why should you add a floating bar? Here are a few of the best ways to use one.
1. Build Your Email List
Strong email marketing starts with a great list of subscribers. Include an email optin in your floating bar and watch your newsletter list grow.
Then, your list will be full of subscribers who signed up because they enjoy your website. That means they’re more likely to open your emails, engage, and make purchases.
2. Offer a Lead Magnet
Lead magnets are a type of gated content that can also boost subscribers. With a lead magnet, users sign up to your email list for an exclusive offer or piece of content.
For instance, your floating bar can offer new email subscribers a free ebook or PDF guide. Or, you can provide an exclusive coupon code for people who opt into your newsletter.
3. Promote a Sale

Not all sticky bars ask users to sign up. They often just notify users about an offer.
For instance, a floating notification bar can let shoppers know that all drinkware is 25% off. Or it can remind them to use a specific coupon code at checkout.
Sticky bars allow eCommerce sites to make their sales promotions stand out.
4. Feature a Countdown Timer
Floating bars can include countdown timers for time-sensitive offers. For instance, you can add a timer that counts down to the end of a sale. Or, you can have a countdown to a specific holiday to remind customers that it’s time to order gifts.
Either way, countdowns create a sense of urgency and help your floating bars drive more sales.
5. Welcome Visitors
We mentioned that floating bars are sometimes called “hello bars.” That’s because they can also simply greet visitors or make announcements.
For instance, you can create a sticky bar to welcome visitors who are using your site for the first time. This strategy can establish a friendly voice for your brand.
6. Promote Your Social Media Channels
Want to increase your following on your social media channels? You can add social follow buttons to one of your floating bars.
People who follow your socials from your website have already shown a high interest in your brand. That means they’re likely to be engaged followers.
Here are 6 floating bar hacks to help you increase conversions.
4 Examples of Effective Floating Bars
Next, let’s see how a few popular companies and websites use floating bars to increase their email signups, sales, and conversions.
No matter your industry, these examples will give you ideas for using floating bars on your website.
1. Free Sample Offer With a Strong CTA
![]()
Kennedyblue.com is a wedding attire eCommerce site. They specialize in bridesmaid dresses, available in dozens of colors and fabrics.
Kennedy Blue used this floating bar campaign to offer visitors a free fabric swatch. The “Get Swatch” call to action button is in a bold, bright color to draw attention. Notice that it stands out from the rest of the bar. In this type of campaign, the button could lead to a request form or an email signup.
2. Lead Magnet Offer With an Email Optin Field
![]()
Theadvisorcoach.com provides training and education for financial advisors. With this floating bar, the website offered an exclusive PDF guide for new email subscribers. The email entry field is right there in the floating bar, making it quick and easy for users to sign up.
The PDF offered here is a list of 57 marketing ideas. An extensive list like this is an excellent lead magnet, especially if it’s more in-depth than the website’s standard content.
3. Sale Promotion With a Coupon Code
![]()
This campaign is an example of a notification bar for a coupon code. It comes from homebiotic.com, a company that sells probiotic sprays.
Notice that there is no direct CTA button or optin field. Instead, this floating bar’s purpose is just to drive sales. It ensures visitors know they can get a discount using this coupon code.
4. Free Shipping Promotion With a Countdown Timer

The floating bar above is from cosmeticcapital.com.au, which we discussed earlier. They’re the beauty company that gained 18,000 new leads with a floating bar. They accomplished this with a countdown timer.
In this example, Cosmetic Capital used a timer to count down to the end of a free shipping promotion. They combined the timer with an email signup form that promised an exclusive offer.
As already mentioned, countdown timers create a sense of urgency for your website visitors. Cosmetic Capital cleverly used this to their advantage, and they saw massive results.
Now that you’re familiar with floating bars, you can continue getting ideas from more sticky bar examples around the web.
How to Add a Floating Bar to Your Website
You may think you need in-depth HTML or CSS knowledge to use floating bars on your website. But with OptinMonster, you don’t need any coding skills to add floating bars. Even a beginner can create an effective campaign that will boost conversions.
Here is a step-by-step tutorial for creating a floating bar with OptinMonster.
Step 1. Create a Campaign
Log in to your OptinMonster account. If you don’t have one, you can sign up for OptinMonster here.
Once you’ve logged in, click the Create New Campaign button.

Next, you’ll see the Start Creating Your Campaign popup. If you want to design your campaign from scratch, you can choose Canvas. But for your first floating bar, we suggest choosing Templates.

Step 2. Choose a Floating Bar Template
Under Select a Campaign Type, choose Floating Bar.

Below the campaign types, you’ll see OptinMonster’s options for floating bar templates. There are plenty of designs and variations to choose from.
You can preview each template by hovering over it and choosing Preview. Click Use Template when you’ve found the perfect template for your website.
Step 3. Design Your Floating Bar Campaign
After choosing your floating bar template, you’ll create a name for your campaign. You’ll also specify the website you want it to display on. You’ll likely create multiple campaigns over time, so choose a descriptive name. This will allow you to find and edit your campaign easily in the future.

After you have chosen your campaign title and website, click Start Building.
You’ll then see OptinMonster’s drag-and-drop campaign builder. The first thing you should do is click the Cog Icon in the lower left corner.

Clicking the Cog Icon will bring up a settings sidebar. Under Floating Bar Settings, choose if you want your bar to stick to the top of the page. If you leave the toggle inactive, your bar will float at the bottom of the page.

Next, look at the bottom of the screen to see the Yes/No, Optin, and Success tabs.
By default, your floating campaign includes 3 views for users to click through:
- The Yes/No View will ask users if they want your offer. (optional)
- The Optin View will ask for an email address.
- The Success View confirms the user’s subscription and gives further instructions.
Our builder makes it easy to edit your floating bar template to suit your campaign. You can customize each view to match your website’s visual design and your brand’s voice.
Here are a few of the customization options:
- The message of your campaign
- Font style and size
- Text color
- Background color
- The fields shown in any form
- Button color and size
For more details on customizing your campaign, see our OptinMonster builder overview.
When you have edited all views to your liking, then your floating bar is designed!
Step 4. Set Your Display Rules
Now that you have created your floating bar campaign, it’s time to choose where and when to display it on your website.
First, click the Display Rules tab at the top of the page.

OptinMonster has dozens of options for displaying your campaigns. These triggers will determine when your floating bar shows up for users. The options include:
- Time spent on a page
- Percentage of the page scrolled
- How the visitor navigated to your site
- Whether the user is a first-time visitor
- When the user tries to exit the page
For this first campaign, we’ll use the 2 default Display Rules: Time on Page and Current URL Path.

Let’s set this campaign to display on the Homepage of our website. We’ll also choose for the bar to show up when a user has been on the page for 5 seconds. You can select these options from the dropdown menus.
These are great rule sets for your first floating bar campaign. As you advance, OptinMonster also offers a robust variety of triggering and targeting features you can explore.
Step 5. Publish Your Floating Bar Campaign
Now, your first floating bar campaign is ready to go live! Click the Publish tab in the top menu and choose the Publish button on the page.

If you run a WordPress website, then your floating bar campaign is live! For other sites, scroll down and follow the instructions listed under Platform.
Skyrocket Your Leads With a Floating Bar
With a few easy steps, you can add a website floating bar that will drive sales, email subscribers, and conversions.
For an in-depth example of the impact of sticky bars, check out the full case study on Cosmetic Capital. It explores how the beauty company captures over 770 new leads each week by using an OptinMonster floating bar.
Just imagine what your business can accomplish.
OptinMonster makes it easy for you to create beautiful and high-converting floating bar campaigns. You can improve your lead generation and increase revenue in just a few simple steps.
Give OptinMonster a try today.
Disclosure: Our content is reader-supported. This means if you click on some of our links, then we may earn a commission. We only recommend products that we believe will add value to our readers.
Thanks for reading this article – I hope you found it helpful.
I wanted to let you know about our powerful Exit Intent® technology that converts abandoning website visitors into email subscribers and customers. Typically 70% of the people who visit your website will leave and never return, meaning all those marketing efforts to reach them have gone to waste.
OptinMonster’s Exit Intent® technology detects user behavior and prompts them with a targeted campaign at the precise moment they are about to leave.
You can unlock this powerful technology 100% free when you purchase our OptinMonster Pro plan.
Get started with OptinMonster today and see why 1,000,000+ choose OptinMonster to get more subscribers and customers.
Thomas Griffin
President of OptinMonster
Great guide! Really made it easy to understand what a floating bar is!