
Litmus 101: How to Get Started with Email Previews & Pre-send Checks in 3 Easy Steps
In just 3 steps, we’ll help you say goodbye to send time anxiety with a bulletproof method to ensure your emails display beautifully in the email clients your subscribers use.
In this blog post, you’ll learn how to QA and monitor your email with Litmus—using email client previews, spam testing, and more—to ensure your email looks and works as perfectly as you intended.
Step 1: Create your email
Starting the email creation process in Litmus will give your emails a centralized home enabling everyone on your team to easily find an email they might need.
When you’re ready to build your first email in Litmus, select “Create New”, and you’re on your way.
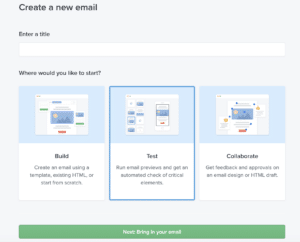
- When you hit “Create new,” on the homepage, you can enter a title for your email. We recommend picking a title you can easily find again or one that matches the name in your email service provider or marketing automation platform. Choose either the Build or Test, then select Next.
- Even if you don’t import your email right away, this will create an email project in your Litmus inbox. This can be a great way to add placeholder emails to plan for future work!
Pro tip: Develop a naming convention for your team to use within Litmus to organize work and avoid any confusion about emails in your account.
Alternatively, if you use another platform to create email you can import your emails into Litmus from a connected email service provider (ESP), importing or pasting HTML, coding from scratch, or using a template in Builder.
Here’s a deep-dive into each of those options to help you choose which one’s best for your team:
- Use your personal Litmus email address to send the email you want to preview directly into Litmus from your ESP. This ensures that you’re testing your email under the same conditions your subscribers would see it, including any extra code or changes introduced by your ESP. Using this method also generates a spam test (more on that later)! Copy the unique email address with the Litmus domain, then add as a test contact or paste in as a recipient in your ESP.
- ESP sync is the quickest way to import your email into Litmus for testing. It’s an instant connection to your ESP, and continues to update in Litmus and your ESP, even if you make edits to the email after your import. Select ‘Manage your ESPs’ in the right corner of the ESP dropdown to add a connection. After you’re connected, your ESPs will show up in the dropdown. Note: ESP sync is only available on certain plans, so double-check to make sure you have that capability if you don’t see it.
- Build your email in Litmus or paste pre-written code. Simply select the Build option shown above. You’ll then be able to select a blank email (to build from scratch or paste code) or one of the pre-made templates you have saved in your Design Library. Need some inspiration? Litmus has a selection of free email templates to get you started!
Step 2: Get your email test results
Once your email arrives in Litmus or you’ve pasted in your code, open the Previews & QA tab to see how your email displays and critical pre-send checks.
Pro tip: you can adjust your view to see all previews in full length to QA right here in Checklist instead of just seeing a cropped view. Select the Grid view to see them in thumbnail view and do a deep-dive into specific clients.
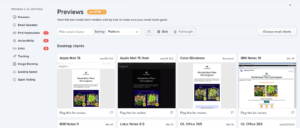
Scroll down to see all of your pre-send checks like email envelope previews, subject line testing, UTM checks, what your email looks like without images, and how long it takes to load. Quickly jump from section to section using the left navigation.
If you sent your email to your test address, you’ll have Spam Testing results with 8 essential spam checks to make sure your authentication records are set up properly. This includes DMARC, DKIM and more. In addition, it will ensure you’re not on any blocklists. We now also verify you have BIMI set up and configured correctly! If you didn’t use your test address, no worries—you’ll find a unique email address where you can send your email to update the Spam Testing section in that specific checklist.
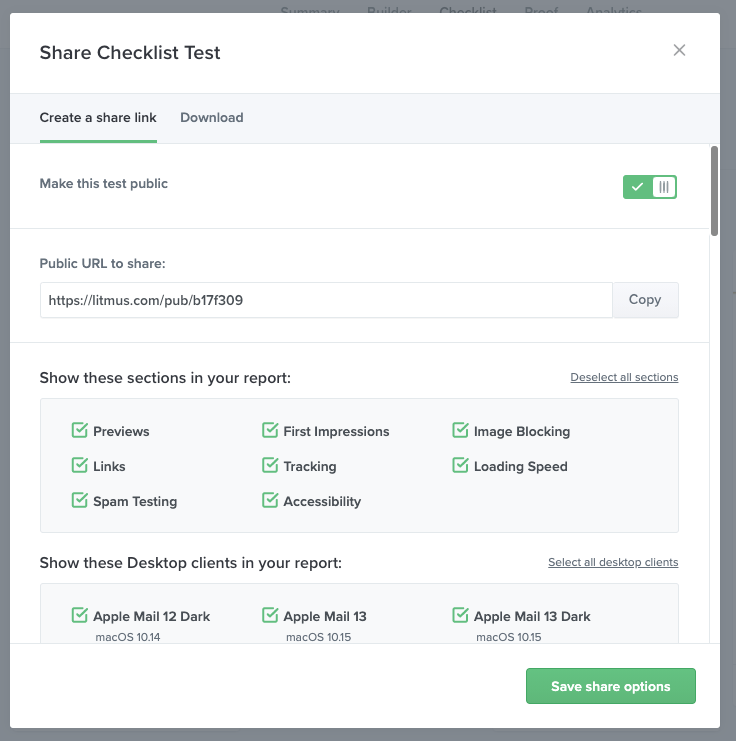
You can even share the results and previews with the rest of your team (or keep them on hand for your own records—and sanity!). Click “Share” to either generate a public link or download the results in a .zip file. Here’s how you can customize a public Checklist:
See? Nothing to it. In just three steps and a handful of clicks, you can see what your email looks like in 100+ email clients and devices to ensure it renders beautifully in your subscribers’ inboxes. And that’s not all you can do with Litmus. There’s so much more to email than how it looks and Litmus is here to help at every step in the process.
Step 3: Monitor your email with Email Guardian
You’ve tested your email in Litmus so you know it’s working perfectly before you send—but what about afterward? Catch any surprise post-send issues by monitoring your emails with Email Guardian.
We recommend monitoring emails with Email Guardian after the email has been fully tested and QA’d. It takes just one single-click to monitor your emails within the Previews & QA tab.

When Email Guardian detects a change in your email due to a broken or slow loading link or an unexpected email client update, you’ll receive a notification immediately so you can take action to fix the issue.
That’s all there is to it to get started with Email Previews and pre-send checks in Litmus. Hungry for more? Dive into these resources:
- Check out our getting started guide
- See what events we’ve got on the calendar (there’s always free training)
- Peruse the help documentation
- Read our blog on the basics of HTML
Chris Berg
Chris Berg is Sr. Customer Support Specialist at Litmus