
Do you want to learn how to create an ActiveCampaign popup so you can automatically grow your email list?
ActiveCampaign is one of the most popular email service providers on the market, and for good reason. It’s easy to use, has loads of tools, and has an excellent user interface (UI).
But that’s only when you’re in ActiveCampaign’s dashboard. How can you quickly get your new leads in your ActiveCampaign account with minimal effort?
For that, OptinMonster is the tool you need.
Don't Have an OptinMonster Account?: Get started with OptinMonster today, risk-free with our 14-day unconditional money-back guarantee!
So in today’s post, we’re going to teach you how to build a popup campaign that easily connects with your ActiveCampaign account.
Then, we’ll give you 5 expert tips on how you can use your campaign to grow your email list as fast as possible.
Let’s get started!
How to Create an ActiveCampaign Popup to Grow Your Email List
Step 1: Create Your Campaign
The first thing you need to do is log into your OptinMonster account:

You’re using OptinMonster for your ActiveCampaign popup for 2 reasons. First, ActiveCampaign is an email service provider and doesn’t allow users to create popups. And second, since you need to choose a separate popup service to use with ActiveCampaign, you might as well go with the best.
OptinMonster offers the most comprehensive targeting options on the market. That allows you to send highly personalized messages to your audience at the right moment in their customer journey.
In other words, OptinMonster is your best bet for using popups to get conversions!
Once you’re in your dashboard, go to the upper right-hand corner and click Create a New Campaign:

Now it’s time to choose your campaign type. With OptinMonster, you can integrate ActiveCampaign with every campaign type we offer. But for today’s tutorial, we’ll go with Popup:

Next comes choosing your template. We have over 50 pre-built templates that you can choose from. You can filter your template options on the left-hand side menu.
And even though all of our campaigns work on desktop, tablet, or mobile, you can specifically filter out campaigns by Device:

By your campaign’s Goals:

Or by Categories:

You can also choose to create your popup campaign from scratch with our Canvas template:

But remember, each of our campaigns can be totally customized to match your brand’s image and message, so our pre-built templates are an excellent way to save some time.
This is especially true if you’re just starting to learn how to create an ActiveCampaign popup for your marketing strategy.
Once you’ve settled on your campaign’s template, it’s time to customize your popup.
Step 2: Customize Your ActiveCampaign Popup
We won’t be getting into too much detail on how to customize your campaign. If you’ve never built a campaign before with OptinMonster, we recommend you start by reading this short introductory guide.
What’s most important to know, however, is that you can quickly and easily customize any aspect of your campaign by clicking on the elements in your editor.
This will bring up the editing tools on the left-hand side of your screen:

Again, you’ll be able to customize literally every aspect of your popup. You can change your campaign’s:
- Color
- Background image
- Optin fields
- Text
And so much more.
Plus, with our drag and drop builder, you’ll be able to add custom fields to your campaign such as:
- New columns
- Buttons
- ChatBot
- Countdown timers
- Images
- Video

You can also add additional fields like:
- Text areas
- Phone number fields
- Number fields
- Dropdowns
- Radio buttons
And other helpful options that have been tested and proven to enhance your conversion rates.
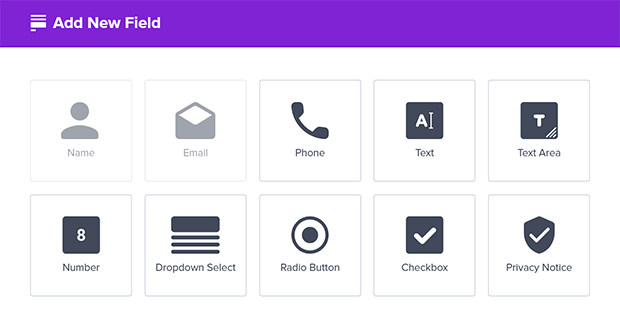
With the Field Mapping feature, you can easily map these fields to your ActiveCampaign popup without any coding or complicated processes.
You may also want to take advantage of our 2-step optin process. All of our templates can be turned in to a 2-step optin campaign with the click of a button.
2-step optin campaigns begin by asking users a simple Yes or No question rather than asking for contact information like a name and an email address.
This tactic is effective because it leverages a psychological marketing hack called the Zeigarnik effect, a data-backed technique that shows people are more likely to finish a process once they’ve started.
So when you ask users a simple Yes or No question and get them to simply click Yes, they’ll be more likely to finish the process by opting in.
This is the exact method Bonjour Lisbonne used to double their daily conversion rate and increase sales by 30%.
Again, activating your Yes/No optin campaign is simple. Just go to the top of your editor and click Yes/No:

Then activate the toggle switch to show your Yes/No form in the editor:

You can customize this form just as easily as your original optin form by using the editing tools on the left-hand side.
When you’re finished customizing your campaign, it’s time to set a few easy display rules.
Step 3: Decide When & Where Your Popup Appears
Once you’ve made your popup campaign match your brand and image, you can decide when and where your popup will appear on your site.
OptinMonster has the most comprehensive display rules on the market. We do this in 2 ways:
- Targeting
- Triggers
These are slightly different concepts, so let’s quickly cover the differences.
Targeting Your Audience
Targeting rules help display your campaign to certain segments of your audience. These include:
- Page-Level: What specific page your visitor lands on
- Device-Based: Whether your visitor is coming from desktop, tablet, or mobile
- Geo-Location: What region or physical area your visitor is coming from
- Referrer Detection: What website your visitor is coming from just before yours
And more.

Targeting rules can be set up to make sure you’re reaching the right segment of your audience with the right message at just the right time.
Triggers
Triggers have less to do with who your visitors are, and more to do with how they interact with your site.
Some of our more popular triggers include:
- Exit-Intent Technology®: Engage users as their leaving your site on both desktop ad mobile
- Scroll Triggers: Display your campaign after your visitor has scrolled a certain percentage of your page
- MonsterLinks™: Show your popup when users click on a specific link
- InactivitySensor™: Re-engage your visitors who have stopped interacting with your content (you can add MonsterEffects™ and sound cues to catch your visitor’s attention)
And much more.
In fact, the list of targets and triggers above is far from exhaustive. OptinMonster offers more focused and targeted campaigns than any other conversion optimization toolkit in the world.
Plus, setting them up doesn’t require any technical knowledge. Under Display Rules in your editor, you can create rulesets to make sure that you’re showing each campaign to the right people.

Now that you have your popup campaign designed and targeted to your buyer persona, it’s time to link your campaigns to your ActiveCampaign account.
Step 4: Integrate Your Popup With Active Campaign
ActiveCampaign is a native email integration for OptinMonster. That means you can link your popup campaign with your ActiveCampaign account in a matter of seconds.
At the top of your campaign editor, click Integrations:

In the left-hand side menu, click + Add New Integration:

Under Email Provider, click the drop-down menu. ActiveCampaign will be the first option on the list:

Once you’ve selected ActiveCampaign, you’ll need to assign it an ActiveCampaign Account Label:
 - OptinMonster")
Note that this is just to keep you organized. If you work with multiple accounts, labeling each integration is a helpful way to stay on top of things.
If you only need to know how to create an ActiveCampaign popup and won’t use any other email lists, you can use a generic label like My Personal ActiveCampaign Email.
Now you need to find 2 things in your ActiveCampaign account:
- ActiveCampaign Account URL
- ActiveCampaign API key

For that, head over to your ActiveAccount dashboard:

Scroll down and click Settings in the left-hand side menu:

In your Settings list, locate and click the Developer category:

Here you’ll have your URL and your API Key:

Copy and paste your ActiveCampaign Account URL from your ActiveCampaign dashboard and insert it into your OptinMonster integration menu:

Then do the same with your ActiveCampaign API Key:

Then click Connect to Active Campaign:

And that’s it! Now you can select which list you want your specific campaign to enter:
 - OptinMonster")
This is helpful as you segment your leads for each individual campaign you create with OptinMonster.
All that’s left now is to Save and Publish your campaign. You now know exactly how to create an ActiveCampaign campaign popup.
And all the leads that you get with your OptinMonster popup will go to their assigned email list in your ActiveCampaign account.
Once you’ve set up a few automated email series with ActiveCampaign, your marketing system will be on autopilot as you watch your email list grow.
5 Ways to Grow Your Email List Fast
One of the biggest questions we get here at OptinMonster is how to grow your email list fast. Fortunately, that’s our wheelhouse. 😉
Here are 5 easy ways you can grow your email list fast:
1) Use a Lead Magnet
If you want to collect email addresses, you need to offer something in return. This could be something like an ebook, a newsletter, a cheat sheet, and so on.
Make sure that your lead magnet is something your audience will find valuable and that they can’t get anywhere else on your site (at least not in such an easily digestible format).
For more information on how to create and use lead magnets, read this resource that has 69 high effective lead magnets to grow your email list.
2) Add an Exit-Intent® Trigger
We’ve already discussed how effective exit-intent campaigns can be at reducing site abandonment. If you want the most conversions from your campaign, you should definitely be using this trigger.
Exit-intent popups show your users that you still have more value to offer and can be just the thing you need to turn a leaving visitor into a lifelong customer.
Check out how the website Rich Page was able to use exit-intent campaigns to increase conversions by 225% (and over 300% when they combined that with split-testing!)
Did You Know?: Exit-intent used to be for desktop only. But now you can use this powerful tool for mobile devices, too! Read this article on how to create a mobile exit-intent popup that converts.
3) Lock Exclusive Parts of Your Content
You can use OptinMonster’s ContentLock campaign to lock certain VIP sections of your content. This allows you to repurpose any of your existing content into a powerful lead magnet or content upgrades.
In fact, Whole Whale used this strategy to get a 62% lift in conversions and double their email signups.

Content Locks can be an excellent resource for quickly growing your email list.
4) Rely on Social Proof
Social proof can be one of the best things you can do to boost your website’s credibility. The fact is that there are so many scammy sites on the web, your new visitors won’t ever be sure if they can trust you with their email address.
To get around this obstacle, you can simply add trust badges to your site.
Trust badges are things like SSL certificates, reviews or testimonials, free money-back guarantees, or other icons that let users know your content and products are secure.
If you want to know more about making your site more trustworthy, check out this article on 12 trust badges you can start using today!
5) Split Test Your Campaigns
The only way to know if you’re getting the most conversions as you can is to create a split test of your campaign.
Even for professional copywriters, it would be rare to nail your campaign’s copy the first time around.
That’s why you should be setting up a split test to change different elements in your campaign and see which version performs better.
Over time, you can create a high-converting campaign that is backed by OptinMonster’s detailed analytics reports.
Need some help running your first split test? Read this post on how to create a split test (and why you should).
For more killer tips like these, check out this article on how to get more email subscribers in less than 5 minutes.
And there you have it! You now know how to create an ActiveCampaign popup to automatically sync your campaigns with your email provider.
Plus, you’ve got 5 actionable strategies to start using to grow your email list even faster. And if you really want to take your marketing to the next level, read this comprehensive guide on email marketing.
We hope you found this article helpful and if you have friends or colleagues who need to learn how to create an ActiveCampaign popup for their business, feel free to pass this resource along.
Got any tips for using OptinMonster and Active campaign to build a bigger email list? Tell us about it on Facebook, Twitter, or in the comments section below.
And if you really want to master your email marketing strategy, head over to our YouTube channel. We’ve got loads of tutorials to make you a marketing pro in no time.
But here’s the real question: Are you ready to start taking your conversions more seriously and maximizing your sales?
Join OptinMonster today, risk-free with our 14-day money-back guarantee to drive more traffic, get more leads, and make more money. We promise you’ll be glad you did!

Disclosure: Our content is reader-supported. This means if you click on some of our links, then we may earn a commission. We only recommend products that we believe will add value to our readers.
Thanks for reading this article – I hope you found it helpful.
I wanted to let you know about our powerful Exit Intent® technology that converts abandoning website visitors into email subscribers and customers. Typically 70% of the people who visit your website will leave and never return, meaning all those marketing efforts to reach them have gone to waste.
OptinMonster’s Exit Intent® technology detects user behavior and prompts them with a targeted campaign at the precise moment they are about to leave.
You can unlock this powerful technology 100% free when you purchase our OptinMonster Pro plan.
Get started with OptinMonster today and see why 1,000,000+ choose OptinMonster to get more subscribers and customers.
Thomas Griffin
President of OptinMonster
This was so helpful. I couldn’t have asked for a better blog on active campaign pop ups!