Are you wondering how to track marketing campaigns to see what’s actually working?
It’s critical to understand just how well your marketing campaigns are converting. Otherwise, you might be wasting time and money on strategies that don’t actually work.
In this article, we’ll show you how to track marketing campaigns on your WordPress site using Google Analytics and UTM (Urchin Tracking Modules) tags.
Why You Should Track Marketing Campaigns
It’s important to track the success of your marketing campaigns because you can’t improve what you don’t understand.
You need to know exactly which marketing activities are working so you can continue using them or scale up. Similarly, you need to know what isn’t performing as well. Those marketing strategies can either be improved, scaled back, or totally eliminated.
But what should you even be tracking about your marketing efforts? Let’s check out the 3 most important metrics you need to know.
3 Marketing Stats You Need to Track
Before we start, it’s important to note that patterns and changes over time matter more than absolute numbers. Getting 5,000 pageviews in one month doesn’t mean anything on its own. But those 5,000 pageviews tell a very different story if you’re used to getting 500 pageviews per month than if you’re used to getting 50,000 pageviews per month.
So we aren’t going to provide any set numbers you should be at. Rather, you want to keep track of how each of these metrics changes over time. These 3 stats connect together to make or break your digital marketing success.
The first thing to track about your marketing campaigns is traffic. Traffic is simply how many people visit your website or social media profiles. Without traffic, you have no customers to market to in the first place. Check out our ultimate SEO guide to learn how to grow your traffic.
The next thing to track is conversions. A conversion is any time a visitor takes the action you wanted them to take. Some examples of conversions include:
- Newsletter signups
- Purchases
- Form submissions
- Subscription upgrades
- Event registrations
- Link clicks
All the traffic in the world is meaningless if none of them are converting. Here’s how to calculate your website conversion rate.
Finally, you need to track the revenue generated from each of your marketing campaigns. Your business exists to make money. So even if you have a lot of traffic and a high conversion rate from visitor to subscriber, none of that matters if those conversions aren’t ultimately generating any revenue.
Tracking Your Marketing Stats in WordPress
The easiest way to track your website traffic, conversions, and revenue is with an analytics plugin like MonsterInsights.
MonsterInsights is the best WordPress plugin for tracking your marketing campaigns. You can set up universal analytics and Google Analytics 4 with just a few clicks instead of hunting for the Google Analytics code and figuring out how to stick it in the header of your website template.
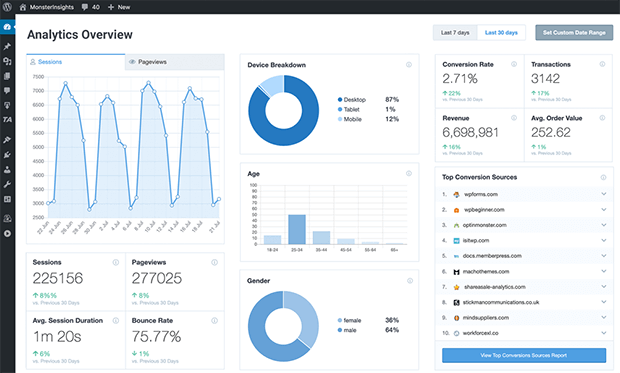
With MonsterInsights, your important analytics are available right inside your WordPress website.
MonsterInsights can show your traffic, the conversion rate on your contact forms, search engine terms, and even your revenue with the free eCommerce addon. The MonsterInsights revenue addon works with WooCommerce, Easy Digital Downloads, and other popular plugins right out of the box.
But because MonsterInsights depends on Google Analytics, there are some limitations.
On their own, Google Analytics and MonsterInsights can’t always identify the source of your traffic. That means you have no way of knowing how your website visitors got there.
Did they see a Facebook ad? Are they newsletter subscribers? Did they click a link embedded in a lead magnet?
Without this data, it’s harder to optimize your campaigns.
Fortunately, there’s an easy solution: UTM tags.
What Are UTM Tags?
UTM (Urchin Tracking Module) tags, also known as UTM codes or UTM parameters, are little snippets of text added to a URL. These snippets mark the source of traffic so you know which marketing campaigns are converting.
Here’s an example of a custom URL with UTM tags:
http://www.example.com/store?utm_source=newsletter&utm_medium=email&utm_campaign=spring_sale
After the ? are all the different UTM tags.
Google Analytics can read the UTM tags in a URL to tell the difference between a visitor who clicked an email link and a visitor who came in through a social media ad, for example.
There are 5 tags to use, the first 2 of which are required:
- Source (utm_source) shows the site, advertiser, or publication your visitors are coming from, like Facebook, Google Ads, or your email marketing platform
- Medium (utm_medium) identifies the advertising or marketing format, like email or ad
- Campaign (utm_campaign) identifies the specific marketing campaign in which the custom URL is being shared, like seasonal promotions or product launche
- Term (utm_term) identifies paid search keywords if you’re using them
- Content (utm_content) distinguishes similar content or links within the same ad, such as during split testing
If you’re running the same campaign in several different channels, you can use different UTM tags on the landing page URL to mark traffic coming from those channels.
For example, you might include this link on your Facebook posts:
http://www.mybusiness.com/landingpage?utm_source=Facebook&utm_medium=social&utm_campaign=webinarlaunch
But you might send this link, which leads to the same landing page, out to your email list:
http://www.mybusiness.com/landingpage?utm_source=ConvertKit&utm_medium=email&utm_campaign=webinarlaunch
And you might use yet another custom URL on your ad campaigns:
http://www.mybusiness.com/landingpage?utm_source=AdWords&utm_medium=ad&utm_campaign=webinarlaunch
If this looks complicated, don’t worry! We’ll show you the easy way to track marketing campaigns with UTM tags and custom URLs.
How to Track Marketing Campaign Conversions With Custom URLs
There are 2 ways to add UTM tags to your URLs: manually or with a URL builder.
Adding UTM tags manually is very time consuming, and it’s just too easy to make a mistake while typing or copying tags. One wrong letter and you won’t be able to track your marketing campaigns effectively.
Instead, you can use a URL builder to generate the links for you. Fortunately, MonsterInsights comes with a UTM code builder along with all its conversion tracking features. So you can generate your custom URLs and track their performance all with one plugin.
Let’s get started.
Step 1: Install MonsterInsights
First, you need to sign up for a MonsterInsights plan. The Smart URL builder isn’t available on the free version of MonsterInsights. Check the MonsterInsights website for updated pricing, as there are frequent promotions.
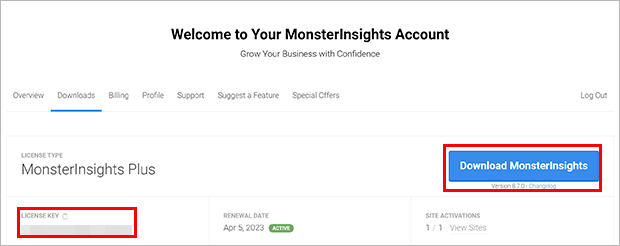
Once you’ve purchased your plan, log into your MonsterInsights account and go to the Downloads section.
Click Download MonsterInsights and save the plugin file to your computer. Then, copy the license key by clicking on the clipboard icon or selecting the license key.
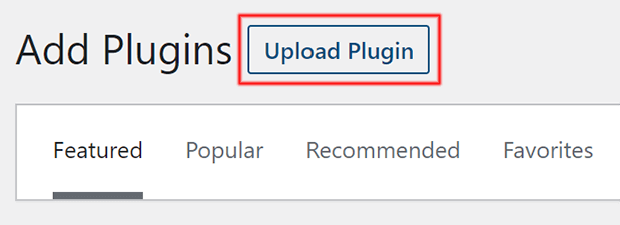
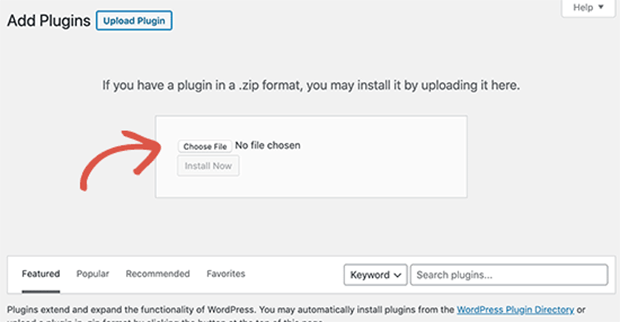
Next, log into your WordPress dashboard and click Plugins » Add New.
Then, click the Upload Plugin button on top of the page.
Click the Choose File button and select the plugin file you downloaded earlier from MonsterInsights.
Now, click the Install Now button. WordPress will upload the plugin file and install it. Once it’s installed, click the Activate Plugin button.
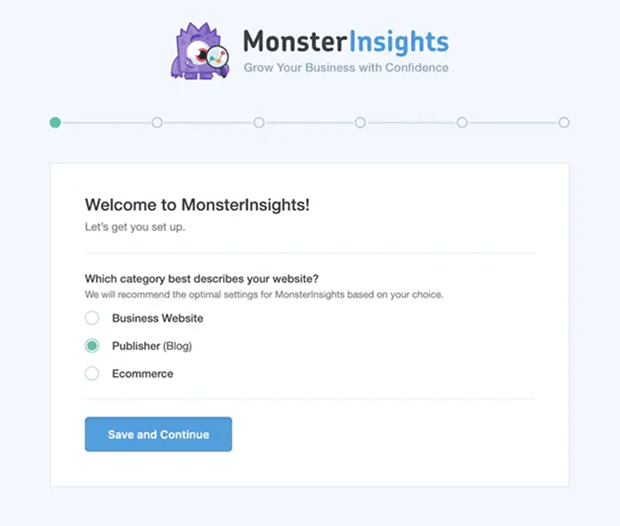
Once MonsterInsights is activated, you’ll see a setup wizard to connect the plugin to Google Analytics. Follow the 5 easy steps to properly add Google Analytics to your WordPress site.
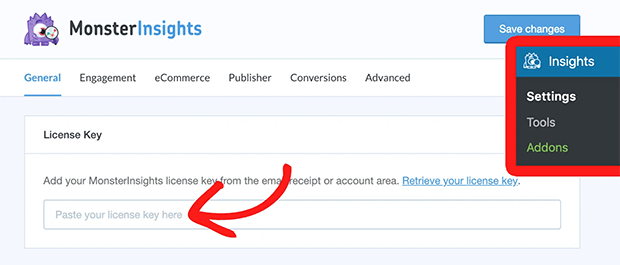
After this is done, you can add your license key to the MonsterInsights settings panel. You can find this by going to Insights » Settings in your WordPress dashboard.
If you need more help, check out our tutorial on how to add Google Analytics to WordPress.
Step 2: Add UTM Codes to Campaign URLs
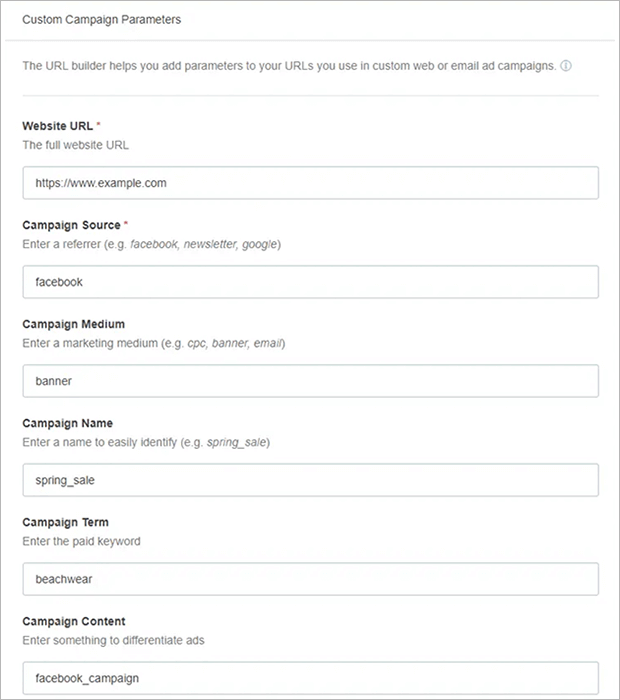
To build a custom campaign URL with the right UTM tags, go to Insights » Tools and click on the URL Builder tab.
In the URL builder, fill in your website URL and other details of your campaign. The website URL and Campaign Source are required. All other fields are optional, but we highly suggest adding the Campaign Name so you can compare different promotions over time.
If you need a refresher, here’s what all the fields mean:
- Website URL: the page URL you want the link to go to
- Campaign Source: the website name, publication, or advertiser the link is featured in, such as Facebook, Google, a referrer website, or your newsletter
- Campaign Medium: the type of marketing channel, such as email, ads, or social
- Campaign Name: the specific product promotion or strategic campaign, like summer_promotion or soft_launch
- Campaign Term: the keywords of your ads if you’re running paid search campaigns
- Campaign Content: the name of different ad variations pointing to the same URL
- Use Fragment: We don’t recommend using this, but if checked, your UTM codes will be built with fragments instead of queries
You need to use underscores or dashes to separate words in the UTM tags, and it’s best practice to use all lowercase letters. For example, a campaign named “Back to School” would require the tag back_to_school.
You also want to use different tags in each field. For example, don’t put Mailchimp for both the source and the medium. Instead, put Mailchimp as the source and email as the medium.
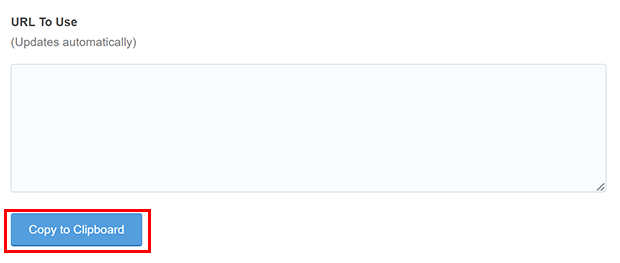
When you’re done, scroll down until you see the box labeled URL to use. Your custom URL with UTM tags will be generated automatically. Click Copy to Clipboard.
Now you’re ready to add this custom URL to your marketing campaign!
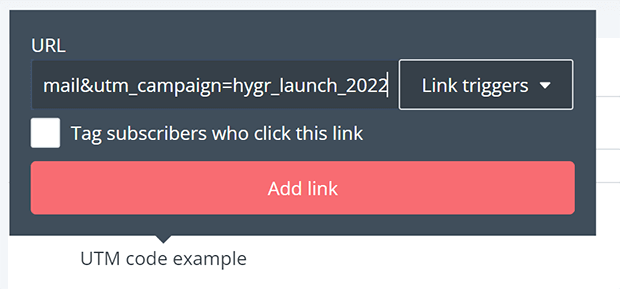
You can insert this URL into your email newsletter or social media posts just like any other link URL. Check out this full tutorial on how to set up email newsletter tracking in Google Analytics.
If you’re using OptinMonster, you can show onsite campaigns to visitors based on these UTM tags. This allows you to optimize the optin forms and other popups on your website.
For example, you could give specific visitors an extra nudge when they visit your website:
The words “don’t forget” would only make sense if a visitor already knew about the sale through an email campaign or social media ad. You can easily target those visitors by adding a Query Argument Targeting Display Rule.
Let’s finish up by checking out where to find all this data in Google Analytics.
Step 3: See Campaign Tracking Data in Google Analytics
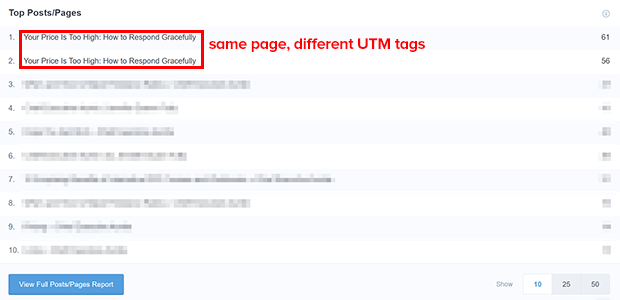
You can see a limited view of your custom links in MonsterInsights if these links make it into the top posts and pages view.
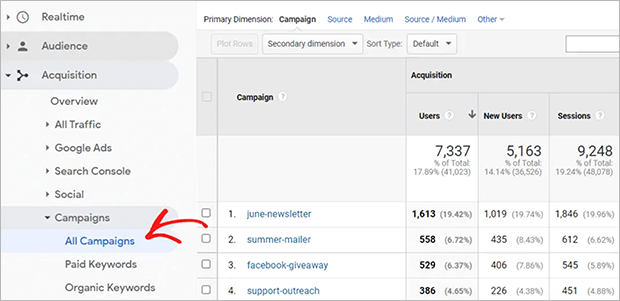
It’s easy to get more detail in Google Analytics. To see your custom campaign data in Universal Analytics, log into your Google Analytics account and go to Acquisition » Campaigns » All Campaigns.
The default dimension in the report is Campaign Name, but you can choose a different primary dimension like Source or Medium.
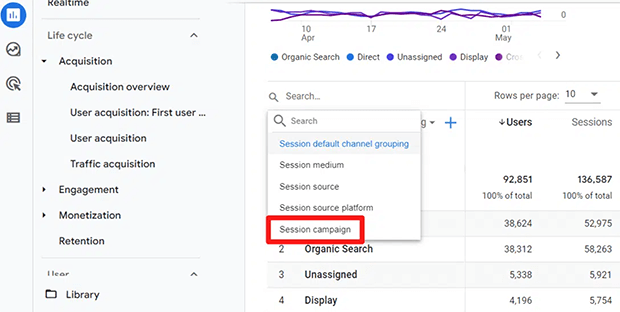
To see your custom campaign data in Google Analytics 4, head to Acquisition » Traffic Acquisition. Then click on Session default channel grouping and select Session Campaign.
You can also add Source and Medium to this report by clicking on the blue plus sign.
Now you know how to track marketing campaigns with custom URLs, almost entirely from inside your WordPress admin dashboard.
Through conversion tracking with UTM parameters, you can see how well your marketing efforts are paying off.
If you run Facebook ads and want to monitor their performance, check out our guide to retargeting pixels.
What are you waiting for? Get started with MonsterInsights today!
If you like this article, please follow us on Facebook and Twitter for more free articles.
Disclosure: Our content is reader-supported. This means if you click on some of our links, then we may earn a commission. We only recommend products that we believe will add value to our readers.

