
The Ultimate Guide to Bullet Points in HTML Email
In the world of email design, a seemingly straightforward task—like adding a bulleted list to an email—can actually be quite complicated. That’s because bullet points will render differently depending on your subscribers’ email clients. (Fun fact: there’s over 300,000 potential ways an email can render.)
As a workaround, we often see email marketers:
- Resorting to tables to maintain consistent formatting, or
- Avoiding bullet points altogether.
While these are considered “fixes,” they aren’t accessible and should only be thought of as temporary solutions. Why? Because both approaches create difficulties for subscribers who rely on screen readers.
So, what’s an email marketer to do? If you’re looking for an accessible fix to bullet points in email, you’re in the right place.
In this guide, we’ll share everything you need to know about bulleted lists in email. Read on to learn:
- The benefits of bullet points in email
- Using list tags
- Getting started with semantic bulleted lists
- Gmail considerations and workarounds
- Outlook considerations and workarounds
- Nested lists
- Custom symbols and images
- Why the table method isn’t ideal for accessibility
- How to make table lists accessible
The benefits of HTML bullet points in email
Bulleted lists are valuable for establishing content hierarchy. By nature, bullet points provide visual anchor points for subscribers, making it easy for them to read, scan, or skim your email. They also help subscribers quickly digest the key elements of your message, helping to distinguish important information from the rest of your email copy.
Using list tags for bulleted lists
Here at Litmus, we use list tags to code HTML email bullet points.
<ul>indicates an unordered list, or a bulleted list of items
<ol>indicates an ordered list, or a numbered list of items
<li>indicates a line item in either an unordered or ordered list of items
How to get started with semantic bulleted lists
To get started with bulleted lists in your emails, you’ll need to include some basic code to make them work.
We cover the following ahead:
![]()
Unordered disc bullet
<ul style="margin:0; margin-left: 25px; padding:0; font-family: Arial, sans-serif; color:#495055; font-size:16px; line-height:22px;" align="left" type="disc">
    <li>
        Unordered Disc Bullet
    </li>
</ul>
Ordered disc bullet
<ol style="margin:0; margin-left: 25px; padding:0; font-family: Arial, sans-serif; color:#495055; font-size:16px; line-height:22px;" align="left" type="A">
    <li>
        Ordered Uppercase Alphabet Bullet
    </li>
</ol>
In this code, you’ll notice a couple of things we’ve made sure to include. One of those is identifying the specific type of bullet we’re interested in including in our list, with a defined type attribute in the <ul> and <ol> tags. For <ul>, we’ve specified a disc-style button.
For <ol>, we’ve specified “A”—so list items would be identified with A, B, C, and so on—but numbers, roman numerals, and both lower and uppercase letters can also be used in ordered lists.
Here is the full list of type attributes you can use in email:
- Unordered list type options
- disc (read as “bullet” • )
- circle (read as “white circle” ○ )
- square (read as “black square” ■ )
- Ordered list type options
- 1 (default decimal numeral)
- A (uppercase alphabet)
- a (lowercase alphabet)
- I (uppercase roman numeral)
- i (lowercase roman numeral)
You may have noticed: we included margin-left in both lists. That’s to make sure that the bullet points render inside of your container boundaries, rather than misaligning or not appearing at all.

Gmail considerations and workarounds
Notably, Gmail webmail (but not Gmail app for mobile) is the one client that doesn’t need margin-left to ensure the bullets render inside the correct boundaries. This means your lists will include that extra left indentation.
If you absolutely need your bulleted lists to be flush with the left margin of your container, you can reset the left margin to zero with Gmail-specific CSS, like so:
u + .body .glist { margin-left: 0 !important; }

@media only screen and (max-width: 640px) {
  u + .body .glist { margin-left: 25px !important; }
}
With these classes in place, we only need to add them to our HTML.
<body class="body">
    <ul class="glist" style="margin:0; margin-left: 25px; padding:0; font-family: Arial, sans-serif; color:#495055; font-size:16px; line-height:22px;" align="left" type="disc">
        <li>
            Unordered Disc Bullet
        </li>
    </ul>
    <ol class="glist" style="margin:0; margin-left: 25px; padding:0; font-family: Arial, sans-serif; color:#495055; font-size:16px; line-height:22px;" align="left" type="A">
        <li>
            Ordered Uppercase Alphabet Bullet
        </li>
    </ol>
</body>
As you can see, we included the mobile responsive media query to ensure that the margin reset doesn’t affect the Gmail app on mobile. Also, please note the order in which the CSS is written. If you put the mobile-responsive CSS before the desktop CSS, then the mobile-responsive CSS will be overruled due to the cascade.
P.S. Semantic bulleted lists are naturally mobile-responsive, so that’s a win-win with accessibility benefits!
Outlook considerations and workarounds
Additionally, there are a few workarounds you’ll need to make bullet points render correctly in Outlook.
In Outlook, lists tend to have large margins. To work around this, wrap your code in <div>. This eliminates the margins and helps the bulleted lists flow within the confines of the email. (Unfortunately, this workaround will only work on unordered list, and not ordered ones.)
First, add this to your CSS head:
<!--[if (gte mso 9)|(IE)]>
<style>
li {
margin-left:27px !important;
mso-special-format: bullet;
}
.forDumbOutlooks {
margin-left: -25px !important;
}
</style>
<![endif]-->
The mso-special-format class ensures that the bullets show up the correct size instead of super tiny. The margin-left class on the li moves the bullet points over, while the forDumbOutlooks class moves the <div> containing everything to the left to offset the margin-left on the li. Then, wrap the whole thing in a MSO conditional statement so it doesn’t show up anywhere else.
Next, add the HTML:
<tr>
    <td align="left" valign="top">
            <div class="forDumbOutlooks">
                <ul class="glist" style="margin:0; margin-left: 25px; padding:0; font-family: Arial, sans-serif; color:#495055; font-size:16px; line-height:22px;" align="left" type="disc">
                    <li>Fusce et ullamcorper magna. Sed non ornare enim. Duis libero neque, porta at feugiat eget, vulputate pharetra metus.                    </li>
                    <li>Nam non leo eu justo lobortis porttitor id id metus.
                    </li>
                    <li>In scelerisque, sapien nec aliquam elementum, augue nisl sodales nulla, eget mollis lorem lectus ut sapien.
                    </li>
                </ul>
            </div>
    </td>
</tr>
How to style HTML bullets in email
Now that we’ve established HTML email bullet points can be a bit… complicated, does that mean you need to keep things simple? (We’re thinking black, round bullets, or just 1, 2, 3.)
The answer: absolutely not! Good news: the sky’s the limit with bullet points. You can do virtually anything to bullets that you can do to text in emails.
Do you want to change the color to match your brand’s style guide? Go ahead. Do you want to use a custom font or web font to match the rest of your email? You definitely can (and should). For any list, you can change the size and color of your bullets—and for ordered lists, you can change the font and bold or italicize your numbers or letters, too.
Let’s see what some of that styling does to our original code from earlier.
<ul style="margin:0; margin-left: 25px; padding:0; font-family: Arial, sans-serif; color:#495055; font-size:16px; line-height:22px;" align="left" type="disc">
    <li style="color: #F1736A; font-size:22px; line-height:22px;">
        Unordered, Colored, Enlarged Disc Bullet
    </li>
</ul>

<ol style="margin:0; margin-left: 25px; padding:0; font-family: Arial, sans-serif; color:#495055; font-size:16px; line-height:22px;" align="left" type="A">
    <li style="font-family: Times, serif; font-weight:bold; font-style: italic;">
        Ordered, Uppercase, Serif, Bold, Italicized Alphabet Bullet
    </li>
</ol>

This styling isn’t quite right yet, though. If you notice, the global font styling we set earlier for each list was overridden by the styling we added to the bullets themselves. You only want to update the styling of the bullet, not the copy that comes after it. This is a quick fix—simply wrap the text of the list items in a styled <span> tag to reset the copy to its intended font style.
<ul style="margin:0; margin-left: 25px; padding:0; font-family: Arial, sans-serif;" align="left" type="disc">
    <li style="color: #F1736A; font-size:22px; line-height:22px;">
        <span style="color:#495055; font-size:16px; line-height:22px;">
            Unordered, Colored, Enlarged Disc Bullet
        </span>
    </li>
</ul>

<ol style="margin:0; margin-left: 25px; padding:0; color:#495055; font-size:16px; line-height:22px;" align="left" type="A">
    <li style="font-family: Times, serif; font-weight:bold; font-style: italic;">
        <span style="font-family: Arial, sans-serif; font-weight: normal; font-style: normal;">
            Ordered, Uppercase, Serif, Bold, Italicized Alphabet Bullet
        </span>
    </li>
</ol>

Nested lists in email
Now that you know how to add semantic bulleted lists in your email, how about a nested list?

It’s not nearly as difficult as you think to include nested lists without tables. You simply need to code your nested list as you would normally, but ensure that it’s nested within a <li> tag instead of outside, otherwise you might see some rogue bullets appear in email clients like Gmail IMAP (GANGA). Here’s how that code would look:
<ul style="margin:0; margin-left: 25px; padding:0; font-family: Arial, sans-serif;" align="left" type="disc">
    <li style="color: #F1736A; font-size:22px; line-height:22px;">
        <span style="color:#495055; font-size:16px; line-height:22px;">
            Unordered, Colored, Enlarged Disc Bullet
        </span>
        <ul type="square">
            <li style="color: #F1736A; font-size:22px; line-height:22px;">
                <span style="color:#495055; font-size:16px; line-height:22px;">
                    Unordered, Colored, Enlarged Square Bullet
                </span>
            </li>
        </ul>
    </li>
</ul>
<ol style="margin:0; margin-left: 25px; padding:0; color:#495055; font-size:16px; line-height:22px;" align="left" type="A">
    <li style="font-family: Times, serif; font-weight:bold; font-style: italic;">
        <span style="font-family: Arial, sans-serif; font-weight: normal; font-style: normal;">
            Ordered, Uppercase, Serif, Bold, Italicized Alphabet Bullet
        </span>
        <ol type="1">
            <li style="font-family: Times, serif; font-weight:bold; font-style: italic;">
                <span style="font-family: Arial, sans-serif; font-weight: normal; font-style: normal;">
                    Ordered, Uppercase, Serif, Bold, Italicized Numeric Bullet
                </span>
            </li>
        </ol>
    </li>
</ol>
Quick note: nested lists inherit the global styling of the parent lists, so you don’t need any additional spacing or styling to keep the lists consistent. However, spacing can still be tricky—surprise, surprise—in Outlook. Here are our tips to make sure you keep your spacing the way you want it.
Horizontal spacing
For horizontal spacing, add padding-left: #px; with the correct dimension to the <li> tag. This will help control spacing between the bullet and the copy.
Note this unfortunately, doesn’t work in Outlook for Windows.
Reminder: don’t forget to include the margin-left pointer mentioned at the beginning of this guide to ensure your bullets don’t render far away from your copy.
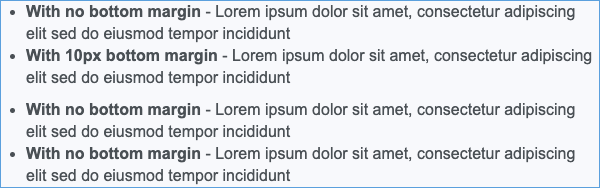
Vertical spacing
For vertical spacing, add margin-bottom: #px; with the correct dimension to the <li> tag. This will help increase vertical spacing between each list item.
Using custom symbols or images for bullets
Want to take your bullet points up a notch? Try using images or icons instead!
Unlike styling your bullets to a custom size or font, custom symbol and image bullets aren’t as universally supported across email clients, often leading to images being blocked in email. Be sure to proceed with caution and use a tool like Litmus Email Previews to make sure your lists render well across your subscribers’ devices.
For our code, we’ll change our bulleted lists to include hearts, as well as our very own Litmus logo for some great email branding.
Metadata
<meta name=Generator content="Microsoft Word 15 (filtered medium)">
CSS
<style type="text/css">
  @list heart {
    mso-level-number-format: bullet;
    mso-level-text: ♥;
  }
  @media screen and ( -webkit-min-device-pixel-ratio:0 ) {
    .heart { list-style: none; }
    .heart:before {
      content: '♥';
      margin-left: -1.4em;
    }
    .heart span {
      padding-left: .5em;
    }
    [class="x_heart"] { list-style: initial !important; }
    [data-outlook-cycle] .heart { list-style: initial !important; }
  }
</style>
Symbol bullet code
<ul style="Margin:0; Margin-left: 25px; padding:0; font-family: Arial, sans-serif;" type="disc">
  <li class="heart" style="mso-list:heart;">
    <span>
      Heart Bullet
    </span>
  </li>
</ul>

Image bullet HTML
<ul style="Margin:0; Margin-left: 25px; padding:0; font-family: Arial, sans-serif;" type="disc">
  <li style="list-style-image: url('https://campaigns.litmus.com/_email/2019/09_sep/201909xx_Ultimate-Bulleted/images/litmus-icon.png');">
      Image Bullet
  </li>
</ul>

Why the table method isn’t ideal for accessibility
You’ve heard us say that you should avoid using tables when coding bulleted lists. But why?
An estimated 7.3 million have a vision disability in the U.S. alone. Your subscribers might be using screen readers because they have a disability that requires it, or because they want to hear what emails they have while brushing their teeth in the morning.
When it comes to your email’s content hierarchy, we advocate for the use of semantic tags as much as possible—that is, meaningful and intentional use of <h1>, <h2>, and so on, versus generic <p> and <span> tags. But when it comes to semantic tags, one sticking point for email developers is the bulleted or unordered list.
Screen readers have trouble reading out emails with tables. If a screen reader identifies a table in your email’s code, it will read out loud as one. It will literally tell you about each and every row and column’s position and content. This can be a bit much for subscribers listening to your emails, and it certainly makes it hard for them to glean the intended content.
Let’s look at this bulleted list:

Coded with tables, it would sound a little like this:
That’s… not great, is it? When it comes to bulleted lists, many developers solve the visual issue by coding faux bulleted lists in tables. But if you knew those tables sounded like that, would you continue to code your lists that way?
Unlike tables, <ul>, <ol>, and <li> tags are much easier for a screen reader to understand.
When a screen reader sees these tags in an email it’s reading out loud, it will read this to your subscribers:
- To begin a list, it will tell you how many items there are in the list.
- It will describe the type of bullet used to denote each list item, from the following:
- Unordered Lists: “bullet” for
type=”disc”, “white bullet” fortype=”circle”, “black square” fortype=”square” - Ordered Lists: the associated alphanumeric character or Roman numeral (For example: “a”, “2”, “IV”)
- Unordered Lists: “bullet” for
- To end a list, it will say “out of list”
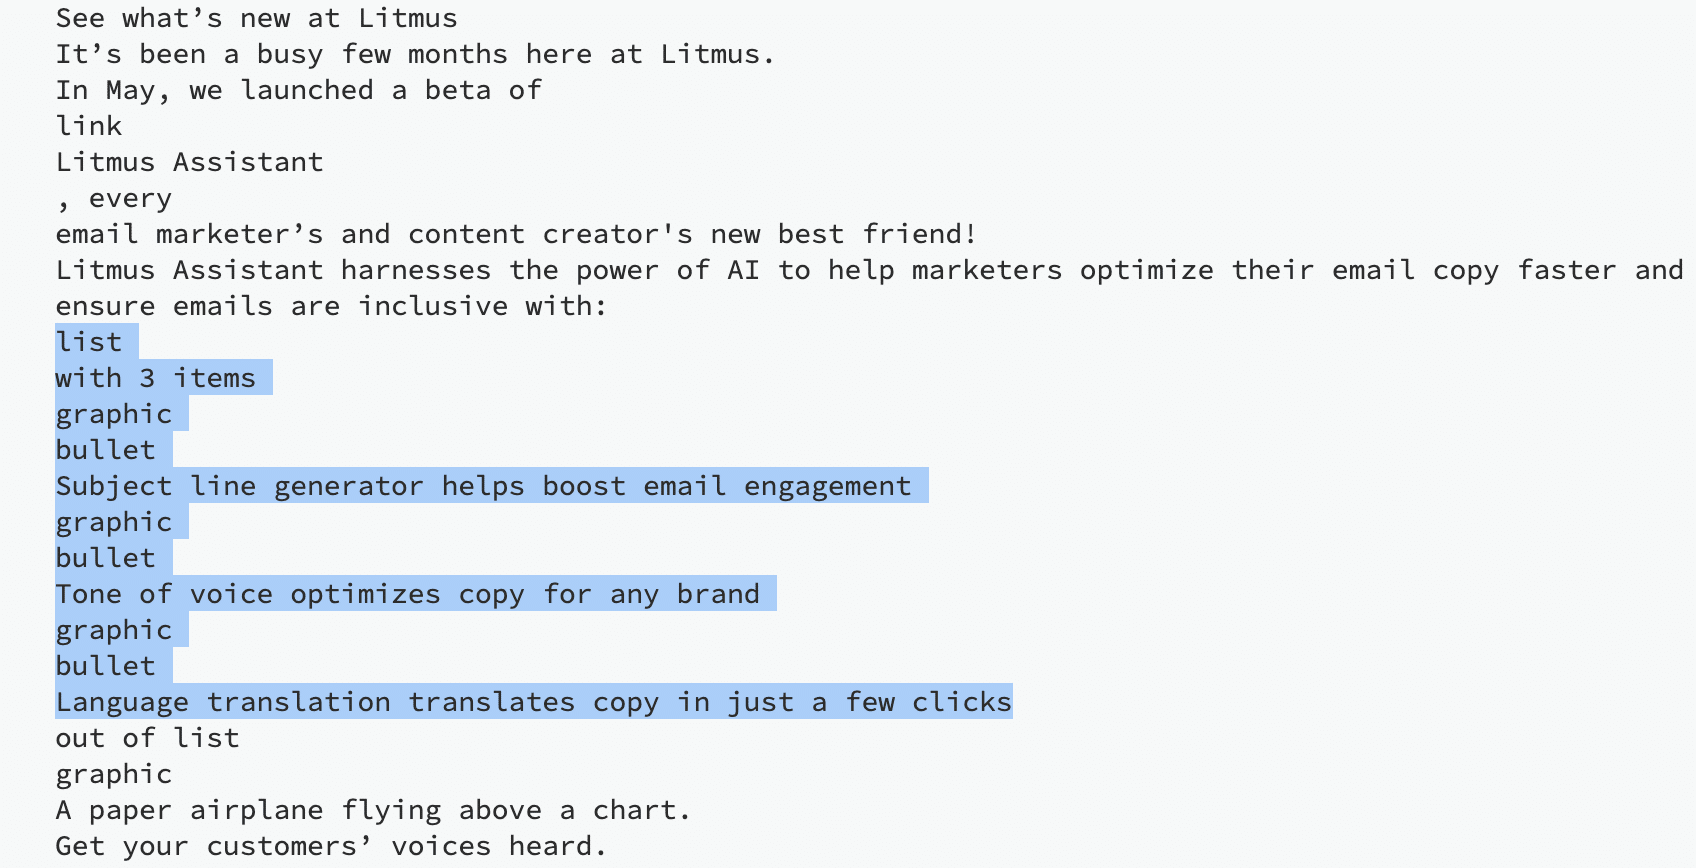
For example, here’s an accessible bulleted list, read by a screen reader:
That sounds much better than hearing a whole bunch of rows and columns, doesn’t it? It’s much easier to understand content in lists when it’s read out loud in the same way you would read the list inside your head, as if you were looking at the email itself.
How to make table lists accessible
But what if you have to use lists in tables? Fear not: we’ve got a solution to make them more accessible.
Let’s take a look at one of our recent emails. The following list is done with a table:
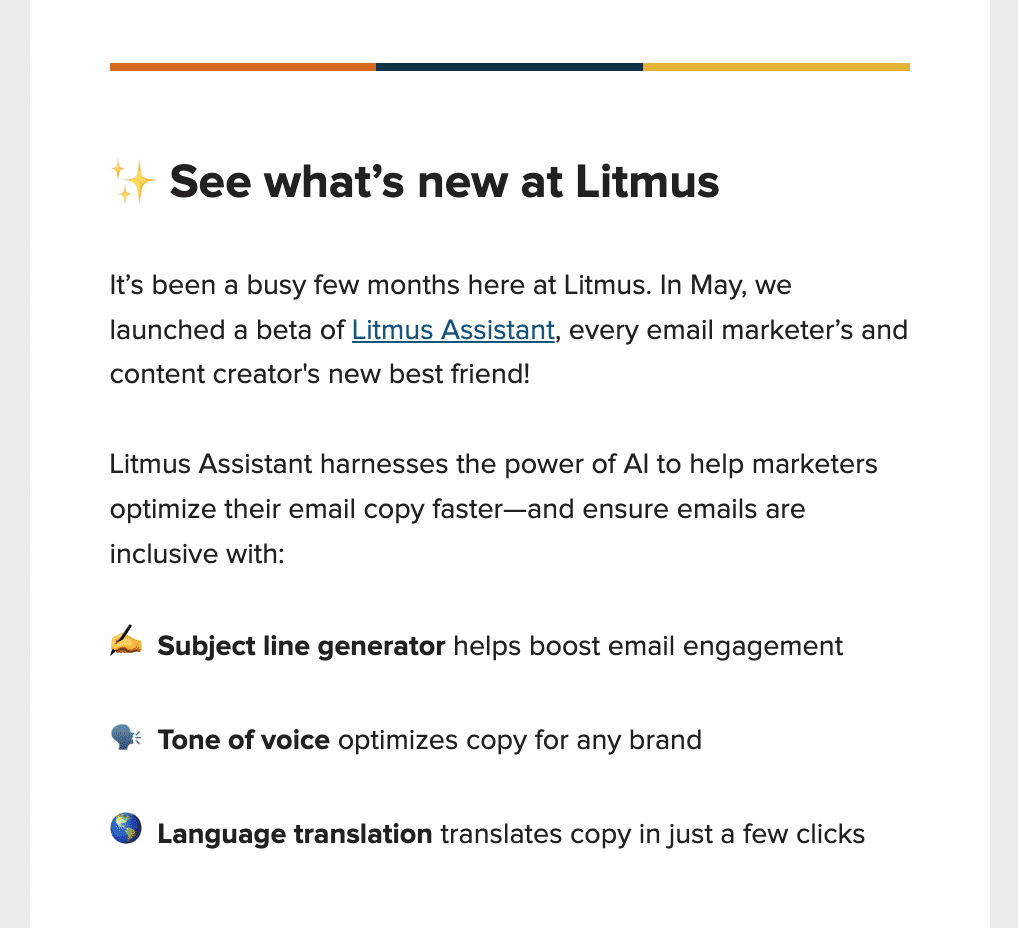
We used images (the emojis) for bullets and gave them an ALT text of “bullet” so it says “bullet” before each item. We’ve also included aria-role="list" and aria-role="listitem" to add some context for screenreaders so it read it as a list.
Here’s the code:
<tr>
  <td align="left" valign="top">
      <table border="0" cellpadding="0" cellspacing="0" role="list">
        <tr role="listitem">
          <td align="center" valign="top">
            <img src="https://campaigns.litmus.com/_email/_global/emojis/writing.png" width="20" height="20" alt="bullet" style="display: inline; margin: 0; padding: 0; vertical-align: -5px;" border="0" />
          </td>
          <td align="left" valign="top" style="padding-left: 10px;">
            <p><strong>Subject line generator</strong> helps boost email engagement</p>
          </td>
        </tr>
        <tr role="listitem">
          <td align="center" valign="top" style="padding-top: 30px;">
            <img src="https://campaigns.litmus.com/_email/_global/emojis/speaking-head.png" width="20" height="20" alt="bullet" style="display: inline; margin: 0; padding: 0; vertical-align: -5px;" border="0" />
          </td>
          <td align="left" valign="top" style="padding: 30px 0 0 10px;">
            <p><strong>Tone of voice</strong> optimizes copy for any brand</p>
          </td>
        </tr>
        <tr role="listitem">
          <td align="center" valign="top" style="padding-top: 30px;">
            <img src="https://campaigns.litmus.com/_email/_global/emojis/globe-showing-americas.png" width="20" height="20" alt="bullet" style="display: inline; margin: 0; padding: 0; vertical-align: -5px;" border="0" />
          </td>
          <td align="left" valign="top" style="padding: 30px 0 0 10px;">
            <p><strong>Language translation</strong> translates copy in just a few clicks</p>
          </td>
        </tr>
      </table>
  </td>
</tr>
Ready to make your lists bulletproof?
Motivated to make your email’s bulleted list accessible and want to make sure it renders well across email clients and devices? Using a tool like Litmus Email Previews will help you ensure your bullets in the email are bulletproof.
Plus, Litmus’ accessibility checks t help you instantly see whether your emails follow key accessibility best practices and get actionable advice on how you can make your emails more inclusive.
What’s more: Visual Impairment Filters are now available in Litmus, designed to make your email design experience inclusive for all subscribers.
Originally published on July 8, 2019, by Alice Li. Last updated July 14, 2023.

Email Guardian is there when you can’t be
Keep your emails pixel perfect and ready to drive revenue and results with Litmus Email Guardian! Never worry about accidentally sending out broken bullet lists again.
Carin Slater
Carin Slater is the Email and Content Growth Marketing Manager at Litmus