

Want to build a membership website with WordPress?
You don’t have to be a master developer to make a membership website. You can use plugins to create your WordPress membership site in just a few simple steps.
In this article, we’ll go over everything you need to know about creating a membership site in WordPress. You’ll learn what tools to use and how to set them up, step by step.
- What is a WordPress Member Site?
- Why Should You Make a Membership Site on WordPress?
- What’s the Best Membership Site WordPress Plugin?
- How To Create A Membership Site With WordPress
- Final Thoughts: How to Make a WordPress Membership Website Even Better
What is a WordPress Member Site?
A membership site is a way for you to invite visitors to register, and sometimes pay a fee, to access certain content on your site. You can put anything behind a membership wall: blog posts, downloads, forums, online courses, help desk, early or exclusive booking access, and many other perks.
Membership websites have become a popular way to make money from existing content and add value to service-based businesses. Wondering if you should make a membership site? Keep reading!
Why Should You Make a Membership Site on WordPress?
Memberships can bring many important benefits, such as boosting your income and authority. Let’s take a closer look at reasons to create a membership site.
You want a steady income stream. The recurring payments from members can stabilize your business revenue. You can also control your membership pricing more directly than affiliate or ad income, which is dependent on traffic.
You already have content ready to monetize. If you’ve spent years blogging about your topic, put some of that content to work for you! With the right membership website builder, you can enable content restriction on existing posts, which means you only have to add new premium content when you want to. Your content will seem new to each new member, so you don’t have to keep churning out tons of new posts.
You want to add value to your brand. Restricted content seems more valuable because visitors have to do something to get it, even if it’s just filling out a free registration form. People tend to value what is harder to obtain, so your members will be more likely to actually read and use the membership content you provide.
Your business would benefit from an online community. Community is a trending marketing buzzword right now, and for good reason. People are craving connection, and facilitating peer to peer relationships can strengthen the loyalty your customers feel toward you. If someone meets a new friend or feels seen and understood in your membership, they’ll remember that it was your brand that brought that positive experience into their life.
Your email list needs more subscribers. Gated content is a great way to add engaged subscribers to your email newsletter. They’ve already expressed interest in your content, so they’ll be more likely to open and click on your emails. This will improve your email marketing efforts across the board.
What’s the Best Membership Site WordPress Plugin?
There are a wide variety of WordPress membership plugins you can use to set up membership plans on your WordPress website.
Our top pick is MemberPress.

MemberPress is the best WordPress membership plugin for creating completely custom memberships with just a few clicks.
The MemberPress plugin lets you create unlimited membership options, control permissions for every page or piece of content on your website, create online courses, offer flexible payment options, and so much more.
It also integrates beautifully with popular page builders like Divi and Elementor and comes with in-depth reporting to help you grow your membership business.
You’ll also need a reliable WordPress web hosting plan to handle the traffic and storage needs of a complex membership site.
With that said, let’s set up your WordPress membership site.
How To Create A Membership Site With WordPress
Step 1: Install Your Membership Plugin
The first thing you need to do is sign up for a MemberPress account. Choose the subscription plan that fits your needs best.

Next, log into your MemberPress account and click on the Downloads tab. Here, you need to copy your license key and download the plugin file.

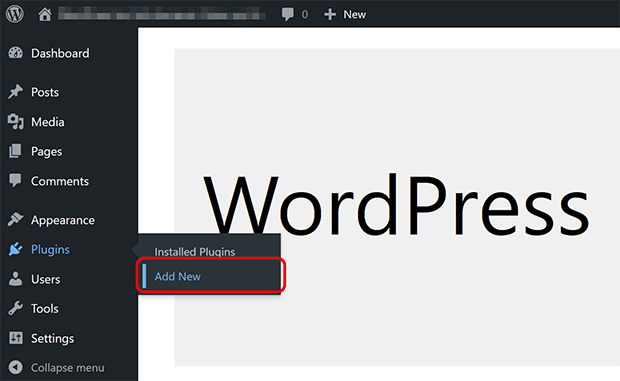
Now, log into your WordPress dashboard and click on Plugins » Add New.
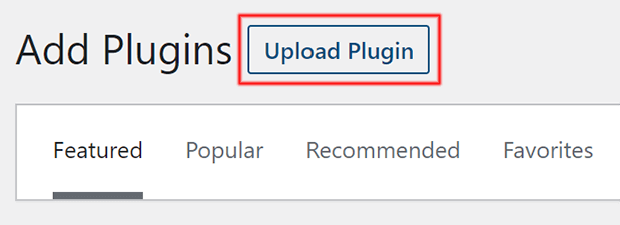
Click on the Upload Plugin button in the upper left corner.
Choose the MemberPress plugin file you downloaded earlier and click on Install Now. WordPress will upload and install the plugin. Then you need to click on Activate Plugin.

Once that’s done, you need to add your license key. Look for MemberPress » Settings and click on the License tab. Paste your MemberPress license key into the indicated field and click on Activate License Key.

Step 2: Add Payment Methods
Now that MemberPress is installed, the next thing we’re going to do is add payment gateways. After all, you want to be able to collect your membership fees, right?
From the MemberPress » Settings page, click on the Payments tab. Click on the Add Payment Method button. Choose a payment method from the dropdown menu and follow the provided instructions to set up your gateway.

Stripe and PayPal integration are available on every license level, and Pro users can also accept payments from Authorize.net users. You can also install an add-on that allows you to sell your memberships through WooCommerce if you’re already using that plugin for other eCommerce sales on your website.
Step 3: Create Membership Levels
The next step is to create your membership levels. You can set different pricing, features, and content access for every single level, and you can make an unlimited number of membership types.
To do this, click on MemberPress » Memberships from the left side menu. Then, click on the Add New button.

On this screen, you can give your membership a name and description. Use this space to list some of the exclusive content and other perks that come with membership and how members will benefit.
Scroll down until you see the Membership Options box. Here you can customize the registration process, limit which users can sign up for this membership, and more.

After you set the membership options, find the Membership Terms box. This is in the right column of the membership editing page. Here, you can set up the pricing plan for this membership.

If you set the price to $0.00, it will be a free membership that only requires registration. Otherwise, you can set up recurring or one-time payments, and either lifetime or term-limited access. You can choose to have memberships expire a set number of days after purchase or on a fixed date.
If you want to have different membership levels, you’ll need to create a Membership for each level.
Step 4: Set Up Access Rules
Once you’ve created your memberships, you can use those to set up access rules for every piece of content on your website. This protects your content from unauthorized access from non-members.
To do this, go to MemberPress » Rules in the left side menu and click on Add New.

As you can see, you can restrict just about any type of content you want:
- All content on your website excluding any exceptions you set manually
- Posts under specific categories or tags
- Single posts
- All posts minus any specific exceptions
- Specific URLs
- Custom post types
- and more!

One easy way to protect your content is to create a category or tag for each membership level and then set up a corresponding rule in MemberPress.
After you pick the type of content you want to protect, you can choose who has access. You can allow access based on membership, specific members, WordPress roles, and capability.

MemberPress also comes with drip and expiration functionality built in. Dripping content means that the content is only available after a specific action or trigger is complete. You can release content after registration, membership purchase, or a specific date. Expiration simply means that the content won’t be available after a certain period. These features are great for building engagement with existing and new users alike.

Step 5: Add Members-Only Content
You can either add new content exclusively for your members or designate existing content as members-only. Either way, the process is pretty much the same.
Create a new post or page just like you normally do on WordPress. Then add a category or tag that matches the rule you set up in the last step.

After that, scroll down until you see the Memberpress Unauthorized Access section. Here you can determine what non-members see when they try to access this page. You can show excerpts, an unauthorized access message, or a login form.

Once you’ve configured everything, go ahead and click on Publish in the right column.
To add members-only downloads and other content, you just follow the same process of creating a rule and then tagging or categorizing the content appropriately.
You can also create member-exclusive online courses using the drag and drop builder in the MemberPress courses add-on. This add-on is included in every MemberPress license.

Step 6: Generate a Pricing Page
The next thing we’re going to do is create a pricing page where visitors can choose a plan and sign up for membership.
All you need to do is go to MemberPress » Groups from the left side menu and click on the Add New button.
Fill in a group title, such as Pricing Plans or Membership Tiers. Then scroll down to Group Options. Here, you can add the memberships that you want to show on your pricing page.

You can also choose one of the pricing page templates and configure any other options you like before clicking Publish.
You can now add this page to your navigation menu for easy access, direct ad traffic to it, link it from popups on your site, or share it with your email list and social media followers.
Another important thing to do is to direct non-members to this new pricing page. After you create your group, go back to MemberPress » Group, and copy the group URL.

Then, go to MemberPress » Settings and click on the Pages tab. Scroll down to the Unauthorized Access section and check the box that says “Redirect unauthorized visitors to a specific URL.” Paste the group URL you copied earlier into the indicated field.
Step 7: Create Signup and Login Forms
You’re almost done! The last thing to do is make sure you have signup and login forms on your site. MemberPress does all the heavy lifting for you, so it’s super easy to set up all the necessary user profile pages.
To add a user login form to your footer or sidebar, you can use a widget. Go to Appearance » Widgets and click on a widget area. Available widget areas will vary depending on which WordPress theme you’re using. Click the + symbol and find the MemberPress Login widget.

You should also add the membership pricing page link to your navigation menu. Go to Appearance » Menus in the left side menu. Look for Custom Links and add the group URL you copied in the previous step. If you need to copy it again, go back to MemberPress » Groups in the left side menu. Don’t forget to click Save Menu when you’re done.

Final Thoughts: How to Make a WordPress Membership Website Even Better
That’s it! You’ve just built your very own membership site. If you want to create an even better user experience, consider adding OptinMonster!

OptinMonster is the best popup builder plugin for WordPress and it integrates perfectly with MemberPress. This means you can display eye-catching popups based on a user’s membership level, login status, course completion, and more.

That’s not all. You also have access to all of OptinMonster’s proven templates and the drag and drop builder you can use to make your own campaigns without any coding or design skills.

The MemberPress targeting rules can be layered with other display rules like our world-famous Exit-Intent Technology to supercharge your conversions.


Disclosure: Our content is reader-supported. This means if you click on some of our links, then we may earn a commission. We only recommend products that we believe will add value to our readers.