Have you ever really explored the depths of marketing emails you receive?

If you haven't, you're not alone. I hadn't either until yesterday. However, by exploring the details of email marketing messages, I've been able to find spoofed or phishing emails.
Take this marketing email I received, for example. If I look at the original message, I can search for a specific component that proves the message's legitimacy:
What I'm looking for is a DKIM authentication, which proves that an email hasn't been altered on its journey from the sender to an inbox.
When I learned about DKIM authentication, my life — and my inbox — changed forever. So in this post, we're going to talk about the glory of DKIM and why you need to apply it to your own marketing emails.
![→ Download Now: The Beginner's Guide to Email Marketing [Free Ebook]](https://no-cache.hubspot.com/cta/default/53/53e8428a-29a5-4225-a6ea-bca8ef991c19.png)
What is DKIM authentication?
When we talk about DKIM, we're talking about a method for email authentication. It's a tool for making sure your email marketing efforts are presented as safe and legal to subscribers.
What is DKIM authentication?
DomainKeys Identified Mail was designed to ensure that emails being sent are safe and authentic for subscribers. DKIM authentication can detect forged sender email addresses, which often occurs in phishing or spam emails
DKIM enables subscribers to review an email sender to make sure it's legitimate. A simple way to do this from the sender's standpoint is to provide a verified email signature in the header of an email, like so:
This signature, notated with "signed-by," tells the email receiver who sent the email. The hyperlink included from the sender takes the recipient to the official website of the sender — in this case, HubSpot.
Let's talk about how DKIM authentication works in a little more detail.
How does DKIM work?
DKIM signatures verify the email sender is legitimate. They're secured using data encryption (basically, a "lock-and-key" for private email details, such as a subscriber's email address).
This signature essentially proves that the sender is real because the sender's Domain Name System (DNS) records have approved the email.
Every email message being sent by an outbound server (the sender) will have its own DKIM signature and consists of information about how the signature was created in the DNS. This information should tell the inbound server (the recipient) that the DNS and DKIM signature are from the same source.
When this happens, the inbound server can verify that the email wasn't changed while it was being sent.
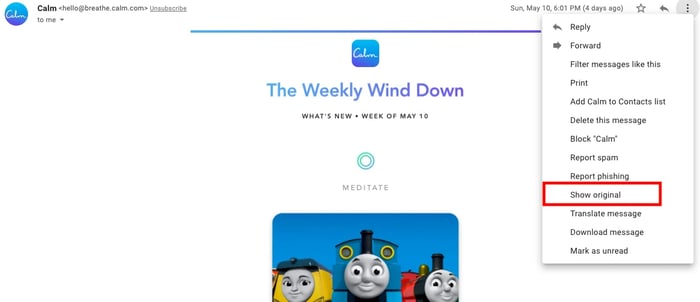
In Gmail, you can find DKIM authentication by clicking on the dropdown arrow next to the phrase "Sent to: me," shown below:

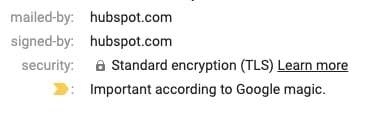
Clicking on that dropdown arrow will open up a box of a few details, including the sender, email date, mailing list, subject, and the encryption, which is where DKIM authentication fits:
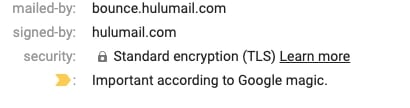
This box tells the user the details of the outbound server that sent the email, in this case, bounce.hulumail.com. Underneath, it tells the user the DKIM signature from that server, which is hulumail.com. Then, it shows that Google has verified the security of the email, and that the email used standard encryption in its DKIM signature.
Ultimately, when you use DKIM signatures, you make your emails more deliverable. It tells email servers and recipients that you aren't using email marketing for malicious purposes.
DKIM signatures aren't a physical "signature," rather, they tell email servers that the email from the sender hasn't been faked or modified. This happens from a server, and can be set up using automated email software tools, like HubSpot's.
Now that you know how DKIM works and why it's essential for your email marketing messages, let's talk about how to set it up properly.
How To Set Up DKIM
Let's get started with setting up DKIM authentication for your marketing emails. For this process, you'll be creating the unique DKIM signature for your domain(s),connecting it to your domain host, (i.e. GoDaddy or a similar service), and authorizing the authentication process to take place when emails are being sent.
Setting Up DKIM Authentication
- Generate or connect a domain key.
- Make sure you have DKIM capabilities.
- Connect your email sending domain.
- Add your domain to DNS records.
- In Google, turn on DKIM signing.
- Test your DKIM authentication.
1. Generate or connect a domain key.
Identify the domain or domains you'll be using to send email marketing messages. If you use multiple domains, you'll want to make sure you're authorizing all of them for DKIM. Each domain will need its own unique domain key.
If you need to create a domain key, you can do so in Google — you just need to make sure that your Gmail account has super administrator access. Then, access Gmail from the G Suite apps page and click "authenticate email," and Google will automatically select your primary domain (don't worry, you can change this if you'd like to select another domain).
After that, click "Generate new record" and you can select whether you want to generate a key by DKIM bit length or by prefix selector. To put it another way, you can select whether you want your DKIM key to have more strength based on the host you use, (2048 is one of them), or if you want to change when you've made the domain key. The latter is generally used if you already use another domain key through Google.
Then, click "Generate," and you'll receive your domain key, which tells servers that your messages are safe. If you use software, like HubSpot, you may be able to skip this step, as the software usually generates domain keys for you.
2. Make sure you have DKIM capabilities.
If you use email marketing software, make sure it has DKIM capabilities. Outgoing marketing emails need to have a DKIM signature. You can download separate DKIM software (here is a list of developers), or verify that your software provides those services.
3. Connect your email sending domain.
For this step, you're going to make sure that domain key is correctly connected to your email. If you used Google to generate your key, you can complete this step by updating your DNS TXT record with your generated key. Make sure you're switched out of the Admin console and on the domain host when you do so.
For HubSpot customers, go to Settings > Domain & URLs > Connect a domain > Email sending > Connect. This'll prompt you to enter the email addresses you use and verify the correct sending domain.
4. Add your domain to DNS records.
By now, you've created your domain key, also known as your DKIM signature. You've also either connected your domain to emails in your email marketing software or begun the setup process in Google. Now, we're going to begin to connect the two.
For this step, you'll also need your domain key so you can connect it to your DNS records. Remember, DNS records verify that marketing emails with your DKIM key come straight from your domain emails.
Note: If you're using Google and have multiple domains, you'll have to complete this step for each domain, since each domain has its own unique DKIM key.
Sign into the management console you use for your domain host and locate your DNS records. Remember, this is being done from your Google management console.
Then, add a TXT record. To do this, enter the TXT record name into this first field. You'll find this displayed in the Admin console, and it'll be under the DNS Host name. For the field below, you'll enter the string text displayed in the Admin console, which will be located under "TXT" record value.
For HubSpot and GoDaddy customers, you can either click "Authorize with GoDaddy" to allow HubSpot to set up hosting for you, or click "No, I'll set it up manually." Then, you'll be able to access your DNS provider, DNS settings, and copy-and-paste values for Host Name.
5. In Google, turn on DKIM signing.
If you're setting up DKIM through Google, this is the last step you'll need to do before completion. At this point, you've generated your domain key and added it to your domain record. So now, you're ready to turn on DKIM signing.
This step greenlights your authentication, but note that this may take up to 48 hours to be placed into effect.
First, you'll want to access your Admin console homepage and access Gmail. Then, click "Authenticate email," and select the proper domain. You'll see the status of email signing, and you'll also be able to click "Start authentication" to begin the process.
After that, you'll be ready to test your email signature.
6. Test your DKIM authentication.
This step is very important because every DKIM key is unique, and you'll want to make sure they're each sending correctly. To test your email in your email marketing software, send the email from that software to an account you have access to, such as your personal email address, and open the details of that message so you can see the original message details.
To test your email in Google, you can access the same page in Admin host from the last step, and send an email to a Gmail or G Suite account holder — I usually email myself for tests.
You can open the message in the recipient's inbox, and click More > Show original to open the entire message header, like below:
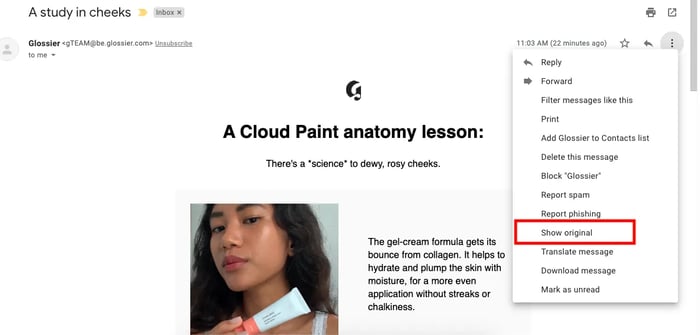
From here, you'll be able to access the original message and see the DKIM signature. The header will tell if the DKIM signature is authentic, and you can scroll down to the code to locate the signature details.
For this email, the DKIM signing was turned on. I can identify this from the specific portion of code highlighted in red. What this tells me is that the DKIM signature was sent from Glossier's domain and signed by their DKIM software:

If your DKIM signing is turned on, you should see code that's similar to this example:
DKIM-Signature: v=1; a=rsa-sha256; c=relaxed/relaxed;
The "s=" you'll see in the line below the above code confirms that the email was signed by a DKIM key.
If you can locate the DKIM signature, you can be sure that your DKIM authentication is complete!
Now that you're an expert on DKIM authentication, go ahead and create your own key and ensure the safety of the delivery of your emails.
Now, you can ensure that your subscribers receive their messages as intended.

![Professional Email Address: How to Create One in 2024 [+ Examples]](https://blog.hubspot.com/hubfs/professional-email-address-2.jpg)
![20 Tips to Write Catchy Email Subject Lines [+ Examples]](https://blog.hubspot.com/hubfs/improve-your-email-subject-line.jpg)