
Are you looking for an easy way to create a Constant Contact signup form in WordPress?
Constant Contact is a popular email marketing service provider. You can run email campaigns and monitor the performance of your emails.
Although Constant Contact is a good tool for creating emails, you might feel limited using their native form builder. It’s basic and often lacks customization options to match your requirements.
In this article, you’ll learn how to create a Constant Contact signup form on your WordPress website.
Let’s get started!
How to Create a Constant Contact SignUp Form
We’ll use the OptinMonster plugin to create a Constant Contact form.

OptinMonster is a premium WordPress plugin that lets you create high-converting email campaigns for your site. The plugin provides automatic integration settings to sync with Constant Contact.

With OptinMonster, you get access to 75+ readymade templates. All these templates can be easily customized with OptinMonster’s drag and drop builder.
Plus, you get precision targeting features for running your campaign. OptinMonster also lets you split test your campaigns and check the performance to optimize conversions.
You can create your own campaigns or use readymade Playbooks.
Playbooks are ready to use campaigns optimized for higher conversions. These Playbooks are built with the intent to save your time for creating campaigns.
If you’re still facing a dilemma, check out this case study on how Lilach Bullock converts 57% of visitors using OptinMonster’s inline campaigns.
Click below to claim your 100% risk-free OptinMonster account today.
Why Use the OptinMonster Plugin for Building Forms?
Although OptinMonster is a standalone solution, its WordPress plugin comes with several unmatched features you won’t find on any other form builder plugin.

- Automatic embedding: It lets you automatically embed your Constant Contact forms into all your WordPress posts.
- Widgets: Embed forms anywhere on your website. Be it footer, sidebar, or widget areas provided by the theme.
- Targeting rules: You can show campaigns based on WordPress-specific rules, like only on certain categories, tags, user statuses, and more.
And many more.
Before we start with the actual steps, let’s take a look at our final output.

Let’s start with our step-by-step guide for creating the Constant Contact signup form.
Step 1: Sign Up for OptinMonster
The first step is to signup for an OptinMonster account.
After signing up, go ahead and can install the OptinMonster plugin just like you’d install any other plugin.

Once you activate the plugin, you’ll see a setup wizard.
Click on Launch the Setup Wizard.
Follow along with the online screen instructions. After you’re done connecting OptinMonster to your WordPress website, we can start creating our campaign.
You can also refer to this guide on creating your first OptinMonster campaign in WordPress.
Step 2: Create an OptinMonster Campaign
Now, it’s time to create your form campaign.
Go to OptinMonster » Campaigns » Add New.

You’ll see the option to create different campaigns like popups, floating bars, full screen campaigns, inline forms, and gamified campaigns.
We’ll select an inline form for this tutorial.

Next, you’ll need to select a readymade template. OptinMonster offers plenty of beautifully designed templates that are ready for use. You’re free to choose any template of your choice.
We’ll select the Zen template for this tutorial.

After choosing the template, you’ll be asked to enter a name for your campaign.
Click the Start Building button.

Step 3: Customizing the Optin Form
Customizing inline forms is easy with the OptinMonster campaign builder screen.
It’s an easy to use drag and drop editor, and you’ll see all the designing blocks on the left-hand side.

Clicking on the block opens up the styling settings.

You can also add the following extra fields:
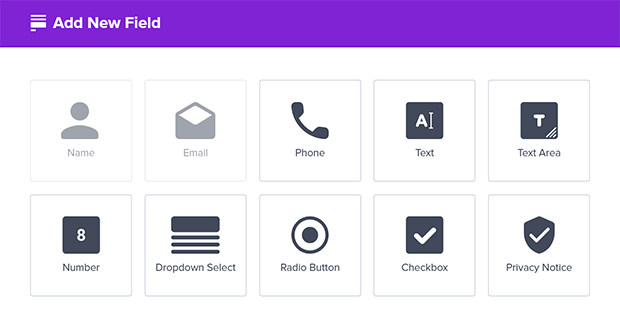
The Field Mapping feature lets you easily map these fields to your marketing integration’s forms without any custom coding.
We recommend checking out this detailed guide to creating your first OptinMonster campaign. It will help you to customize the form effortlessly.
In the next step, we’ll set some targeting rules for form.
Step 4: Configuring Inline Form Options
Now let’s check out the OptinMonster inline settings.
Click on the settings tab in the left-hand side corner, and see the Inline Settings tab.

You’ll see 3 options:
- Enable smart success: This setting ensures that visitors won’t see repeated campaigns if they’ve already subscribed through another campaign.
- Lock Content Below Campaign: It blocks or blurs the content below the inline form until the visitor unlocks it by subscribing.
- Enable Attention Activation: This setting fades the entire page and highlights the campaign when the user scrolls 100% of the form into view.
Based on your needs, you can select any of those options. Since in this example, we just need to embed a form on our page, let’s not turn on any of those options.
Our next step is to connect OptinMonster and Constant Contact.
Step 5: Connect the Form With Constant Contact
It’s time to integrate the form we’ve created with Constact Contact.
Switch to the Integrations tab and click on Add New Integration button.

You’ll see a dropdown for the available email providers.
Select Constant Contact from the list.

Click on the Register with Constant Contact button to start the integration process.

Next, you’ll see a popup for signing into your Constant Contact account.

Once logged in, Constant Contact will ask you for OptinMonster account access. Click Allow.

After this, you’ll be redirected back to OptinMonster. Here you can add a label for account and proceed with Connect to Constant Contact.

Add the basic configuration details that makes it easy to identify the campaign. With this step, you’ve successfully completed the integration with Constant Contact.
Now, it’s time to publish the campaign.
Step 6: Publish the Campaign
Switch to the Publish tab in the campaign builder.
OptinMonster provides a detailed campaign summary on the right-hand side.

Make sure to verify everything before we hit the Publish button.
Once you have published the campaign, scroll down to get the inline form embed code.

To embed the form on a post or page using the block editor, you can select the OptinMonster block and choose your campaign.
Check out this detailed guide on how to add an inline campaign.
Alternatively, you can choose OptinMonster’s campaign Output Settings to automatically display the inline form on your website.

Select the Automatic option with your preferred settings and change the status to Published from the right-hand side.

And here’s the inline form we’ve created.
This was the last step in our Constant Contact signup form tutorial.
We hope you enjoyed this easy to follow steps.
If you want to scale your lead generation efforts, don’t forget to check out these articles.
- How to Make a Profitable Follow-Up Campaign to Drive More Revenue
- 40 Exit Popup Hacks and Examples to Grow Your Email List
- 35 Best Lead Generation Software & Tools for Targeted Leads
What are you waiting for? Get started with OptinMonster today! If you like this article, follow us on Facebook or Twitter for more email marketing tutorials.
Disclosure: Our content is reader-supported. This means if you click on some of our links, then we may earn a commission. We only recommend products that we believe will add value to our readers.