

You probably know that Google Ads is the fastest way to 10X your sales, thanks to the high buyer intent traffic it drives towards your landing pages.
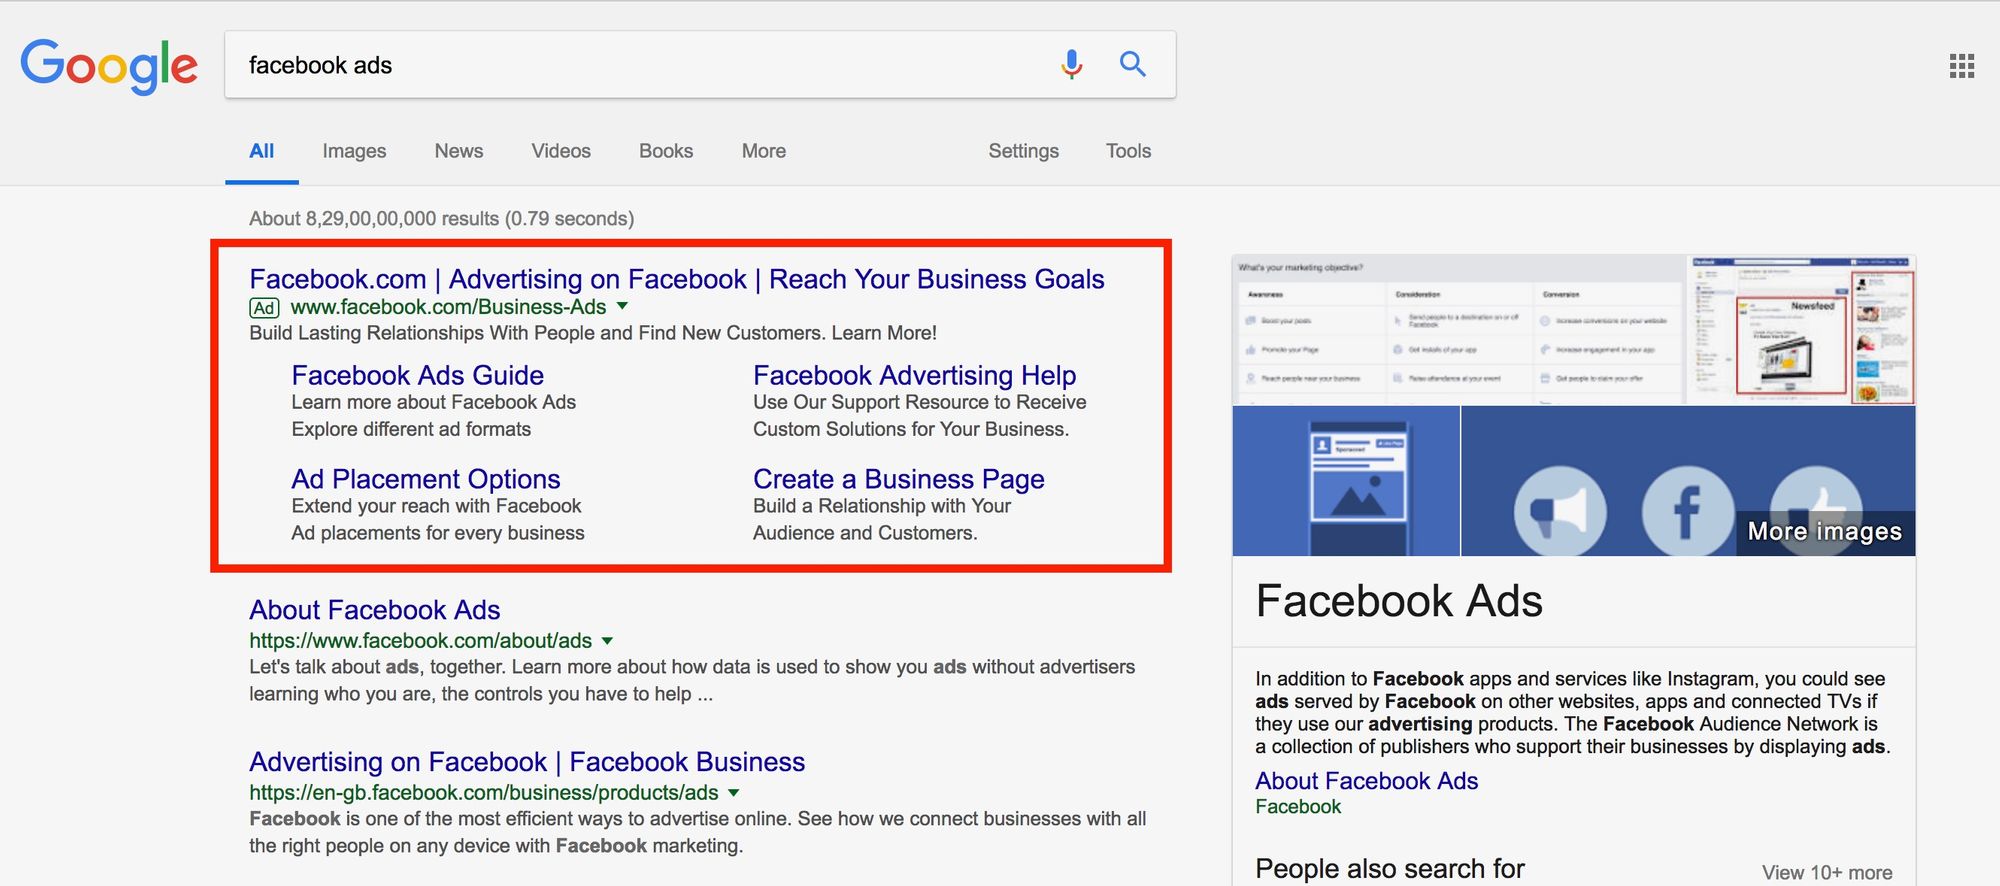
Unlike Facebook, where you’ve to rely on interrupting the user and getting his attention, the user WANTS to pay attention to you on Google.
But how can you actually make it work for you and get your ads placed like this?
Looking for the google ads pdf guide? Scroll below to download it. Or You can also test out Google ads consultants that genuinely enjoy helping.
Table of Contents
- Chapter 1: How a “Bare-Bones Google Ad” Can Get You More Customers
- Chapter 2: Being Omnipresent With Multiple Ad Types and Targeting
- Chapter 3: How to Get Upto Speed and Set-Up a Google Ad Account within No Time
- Chapter 4: Avoid Wasting Your Marketing Budget by Optimizing for Maximum Clicks (And Optimum Bidding Type)
- Chapter 5: How to Pick the Right Keyword Everytime to get Those Conversions!
- Chapter 6: Get More and Better Ideas By Analyzing Your Competition (and beating them!)
- Chapter 7: Making sure your “home-base” is Optimized to Get The Max ROI from your Ads
- Chapter 8: Getting fully locked and loaded with your Google Ad Campaign
The thing is, if you don’t know what you’re doing, Google Ads can be the fastest way to lose your money. Thanks to the high ad prices, and the fast evolving competition with huge budgets.
In this guide, I’m going to show you EVERYTHING you will ever need to dominate your competition on Google and make this powerful Ad Network work for you.
So if you’re looking to improve your advertising game for 2020 and beyond, you’ll love this guide.
Let’s jump right into it.
Chapter 1: How a “Bare-Bones Google Ad” Can Get You More Customers
In 2016, Google’s Ad revenue surpassed the total ad spend of all the countries except US, when it hit a whopping $79.4 billion. And it easily surpassed $90 billion by the end of 2017.
Making it the biggest ad selling company in the world.
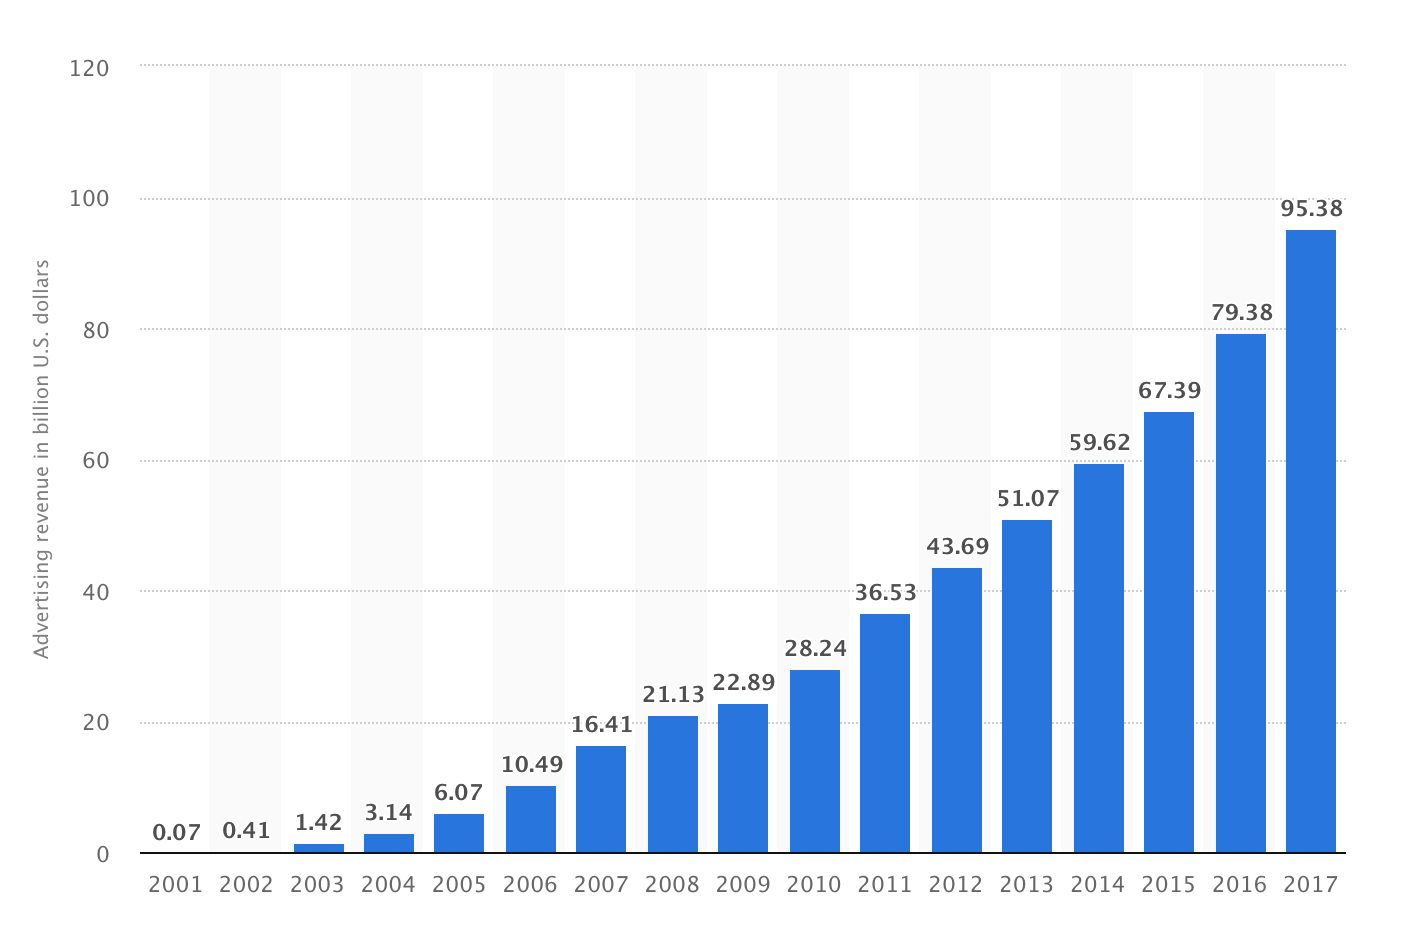
Source: https://www.statista.com/statistics/266249/advertising-revenue-of-google/
If you’re going to invest money into it, the first and foremost thing is to be absolutely clear on how the thing actually works. And how Google actually uses your money to bring new people into your business.
And that’s exactly what we’ll take a look at in this chapter, to ensure that your “Google Ad boots” have a solid ground to stand on!
Google Search Ads are the purest form of PPC advertising. If you can pay the most for a particular search keyword, you have a chance of getting your ads placed.
How do you make a typical Google Ad?
Here’s how it goes:
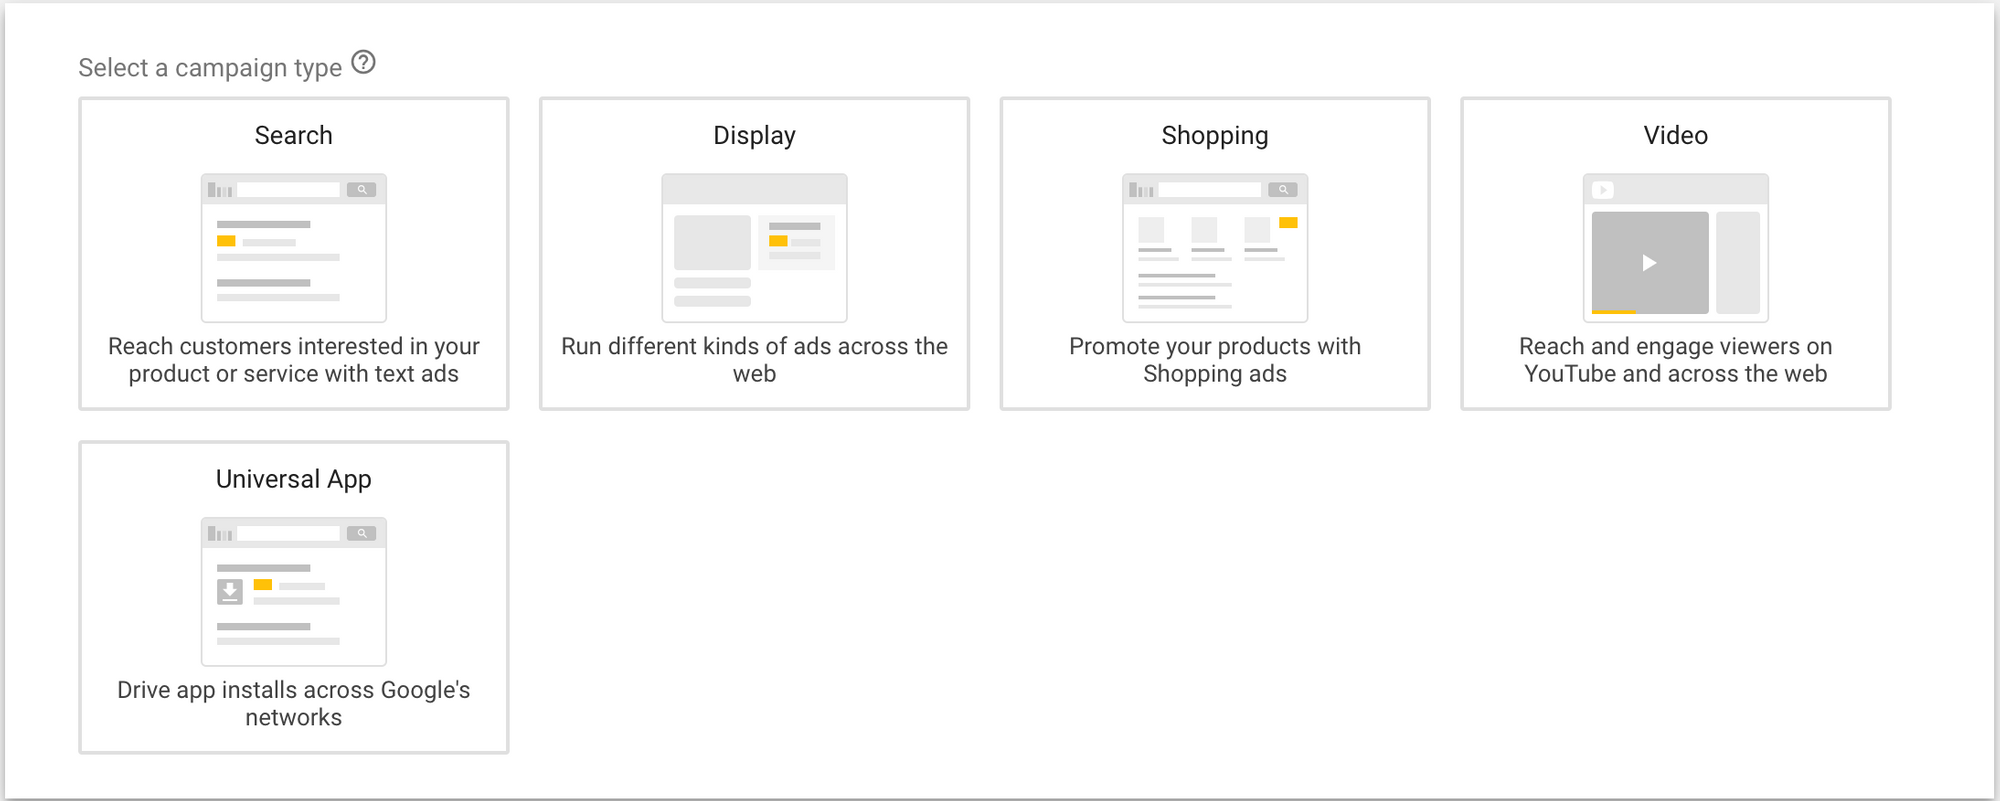
You make a Google Ads account and decide on the type of ad to create. Search, Video or Display.
You then choose some basic stuff and then go on to choose the keywords you want your ads to be displayed on.
You choose your bidding strategy, and place a bid (preferably higher than your competition). Following which you create your ad and submit it to Google to get you more visitors with buying intent!
Yeah, only if it were that simple.
You see, Google wants what’s best for its users. If your ad is not ideal for a search result on Google, Google won’t take your money. And you won’t get any visitors from Google regardless of how high you bid.
Is your Ad actually getting displayed by Google?
To regulate the ad quality, Google uses a little feature called Quality Score.
The Quality Score helps you figure out how valuable your ad is in Google’s eyes. It takes the following things into account:
- Clickthrough Rate (CTR)
- Keyword Relevance to the ad group
- Landing page quality
- Your ad text quality and relevance
- Your Ad account history
Google gives your ad a quality score and accordingly displays your ad. If your ad has a very high score, you have pretty good chances of getting your ad displayed without having the highest Cost Per Click (CPC).
And naturally, you can bid the highest amount but there are high chances that your ad won’t get displayed if your quality score is really bad!
Good guy Google to the rescue?
Now, I totally understand that you can’t directly control your account history right now, but you can sure as heck control the CTR, Keyword Relevance, Landing Page and the Ad Text!
And you can DRASTICALLY reduce your CPC and boost your conversions at the same time by keeping the other 4 factors into account.
In fact, dig deeper into this guide. You’ll find out that it’s actually in Google’s best interests to send traffic to you. That’s right. They actually WANT you to have low CPC and high performance!
And Google does that by allowing you to make different types of ads depending on what you wanna do.
Combined with the multiple ways you can reach your customer using the Google Network, you have an absolute powerhouse to increase your topline.
Speaking of powerhouse..
Chapter 2: Being Omnipresent With Multiple Ad Types and Targeting
Google allows you to target your audience on multiple places on the internet. Whether it be Google Search, YouTube, websites or other apps, you can literally reach your users in multiple places and capture their attention, allowing you to truly be omnipresent.
Research has shown that a user almost NEVER buys anything the first time they visit your site! In fact, you need to show the offer 6-7 times on average to get a sale.
So the more channels you’re present on and can display your offer to the user, the more chances you have of generating the sale.
In this chapter, we’ll go deep into how we can develop this omnipresence and gain maximum grounds to display our offers.
So without further ado, let’s head straight into it.
There are multiple types of Google Ads that you can make use of to get in front of your customers.
Types of Ads
-
Google Search Ads
These ads allows you to get your ad out on the Google Search Results page. These are the most used ads out there. And rightfully so, because these have the highest buyer intent out of all. Anyone who clicks on these, is very likely to be a qualified lead.
-
Google Video Ads
Video is one of the most talked about digital marketing factors to consider in 2020 and rightly so. Google video ads can help you kick start your video marketing.
These allow you be out there on YouTube. The second biggest traffic source on the internet. Based on the user’s search query on Google, you can run a Video ad, to be in front of the user even while he’s off the Google Search.
You can also display your video ad by targeting your competitors on YouTube. So before they view the competitor’s video, they will see your ad. This is extremely effective because the user is already in that state of mind if he’s checking out your competitor, and you putting an exceptional ad can win him over.
Where Video ads really shine though are Remarketing ads. YouTube allows you to create a remarketing list out of all the people who’ve viewed your videos. You can target those people with your ad for dirt cheap compared to any other ad.
The game become really interesting here, because the viewers of that ad are already very familiar with you, and would not be cold to your ads. This is HUGE for getting quality traffic for cheap FAST!
Shopping Ads allow your store, offline or online, to display your products along with a high quality image, at the very top of the google search results page. These are surprisingly overlooked by eCommerce store owners, and hence is a great opportunity for you if you have an eCommerce store!
-
Google Display Ads
The Display Ads utilize the massive Google Display network, ie a network of millions of websites, where you can advertise your products/services in various formats, with multiple targeting options. While the popularity of these ads are declining, since people are developing ‘ad-blindness’ and ad-blockers are extremely popular, Display ads are still surprisingly effective.
So much so that according to Wordstream, Google makes 20% of their ad revenue through display ads, and it reaches 92% of the internet users in the US. And even if you don’t directly generate a sale through these ads, you simply cannot afford to miss the ‘omnipresence’ and the remarketing opportunities these ads provide.
Here's a handy Cheat Sheet for Google Display Ads Placement on the Google Display Network. Use this to identify the best placement opportunities for your business and stay ahead of the curve!
It made my PPC life 10x better.
Source: Google Ad Placement Cheat Sheet
-
Google Universal App Campaigns
These ads were the last one launched by Google in order to capitalize on the huge attention on mobile apps, providing a great way for mobile app developers to make money as well. These are an all-in-one campaign with search, display, YouTube, admob and Google Play. Just link your app and begin creating your ads!
Having the ability to reach to people is pretty cool and all. But if you’re marketing to everyone, you’re marketing to no one.
And that is why we have several targeting options that we can use to reach the RIGHT people on Google.
Types of Targeting
-
Keyword Targeting
The oldest classical form of targeting for Google. You can target based on the keyword search queries you want your ad to appear on. Both Google and on other sites of the GDN you enter through that keyword search. Hence, available both on Google and on partner websites.
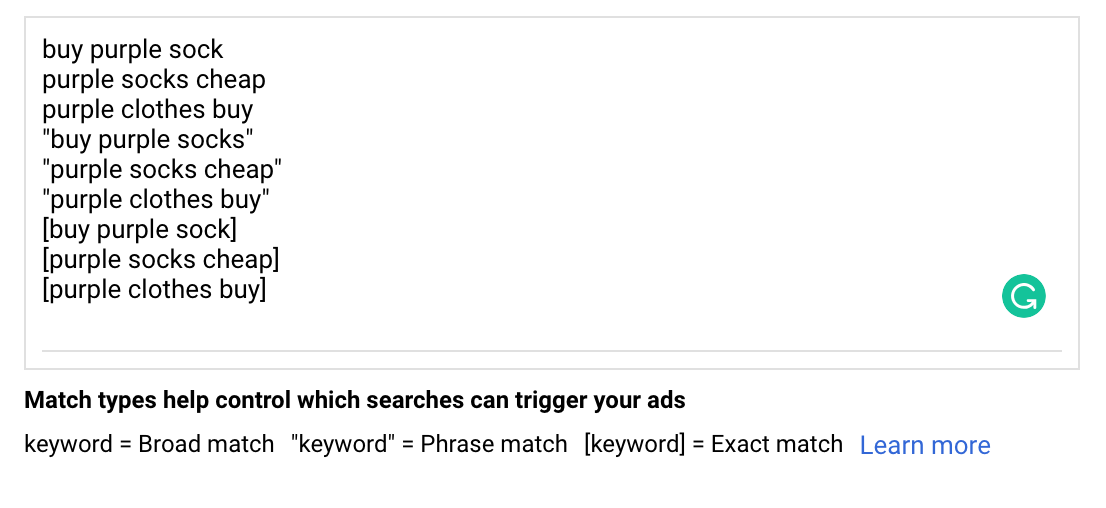
It has several options ranging from broad to exact to negative match types. When you put a keyword in, you get to choose the match type depending on when you want the ad to be displayed:
-
Broad Match
Any search query that uses any of the entered keywords would display the ad in this case. Ex: The keyword “purple socks” would show up on search queries like “why is the sun not purple” or “why does the sun not look like a sock”. Add a + before entering the keyword in your Google Ads dashboard to make sure it’s also included. So + purple would not show up on “why is a sock not a scarf” because “purple” is not included.
-
Phrase Match
The keyword “purple cone” would show up on queries containing the whole phrase. For ex: “Where can purple cone be thrown” and “Why is my purple cone not purple”. It won’t be shown in queries which don’t have atleast one of the words. So won’t be shown under “Why is cone weird”
-
Exact Match
Like the name suggests, a user will have to type “purple cone” and nothing else, to be able to see your ad. Nothing more, nothing less. Well, maybe an ‘s’ at the end. Since, Google treats both “purple cone” and “purple cones” eligible for your ad!
-
Negative Match
Any query which does not include a keyword. So if you add “purple cone” and then a modifier “- ice “, then your ad will not be shown for the keyword “purple cone ice cream” but will be shown for “purple cone for lunch”. Add a whole bunch of these negative modifiers to get an extremely target keyword selection!
-
Location Targeting
This allows you to target searches coming from specific locations. So if you want to sell primarily to the American and Canadian audience, you can select US and Canada, and your ad will only be shown to them. You can fine tune these and make it extremely targeted, by targeting according to states, cities, provinces, zip codes, etc.
-
Language Targeting
This allows you to select specific languages for your queries. So, if your site is in English, there is probably no point in showing it to the countries which don’t speak English. So you can select only the English speaking countries and potentially saving a lot of money!

-
Audience Targeting
Allows you to target specific people based on their behaviour. No, not as powerful as Facebook’s targeting. But it is definitely getting more and more powerful every month!
-
Remarketing Lists
Remarketing lists consist of the people who visit your site, and hence have a tracking cookie attached to their browser by Google. This is extremely useful for remarketing on different websites, app and of course YouTube.
Since they’ve already seen your content once, they would be much more receptive to your ads and are very highly likely to convert in the future. So, getting higher conversions for much cheaper targeting is a win-win situation you simply cannot afford to miss out on! Considering, your ads don’t suck (we’ll solve that in chapter 8).
-
Google Affinity and Custom Affinity Audiences
These allow you to reach to people based on segments that Google creates, or you create. These segments are extremely power for reaching people at the top and the middle of the funnel.
-
Similar Audiences
Pretty self explanatory. They allow you to reach new people based on similar interests to website visitors. So if you’re selling Purple Vanilla Ice Cream on your site, Google would create a similar audience of people who read about ice cream.
-
Google In-Market and Custom Intent Audiences
These allow you to target a group of people, who are actively researching and are very much ready to buy from you.
For ex: If you tell google to target people who searched for “blue bowl vs blue cone”, you are very much likely to reach people who are reading comparison articles and are very close to buying.
The reason I talked about all the targeting options and the ad types here are because these are essential to understand if you’re going to make full use of this ad platform and your money.
These combinations of ad types and targeting options used along with well researched keywords, optimized landing pages and an ad “written to sell” is the winning formula for Google Ads.
Chapter 3: How to Get Up to Speed and Set-Up a Google Ad Account within No Time
So you’re now all loaded up with what Google considers a “quality” ad, and how you can reach people using Google Ads on the internet. Now is the time to actually start setting up your Google Ads account.
Google themselves have a guided setup to hold your hand and get your started with ads. But they tend to confuse people who don’t know what they’re doing, and take them to a place where they spend loads of money without seeing an ROI resulting in them rage-quitting Google.
I get it. And that’s why I’ve written this guide, and specifically this chapter. To quickly get you up to speed, so that you can get up and running with Google Ads in no time.
Let’s get started.
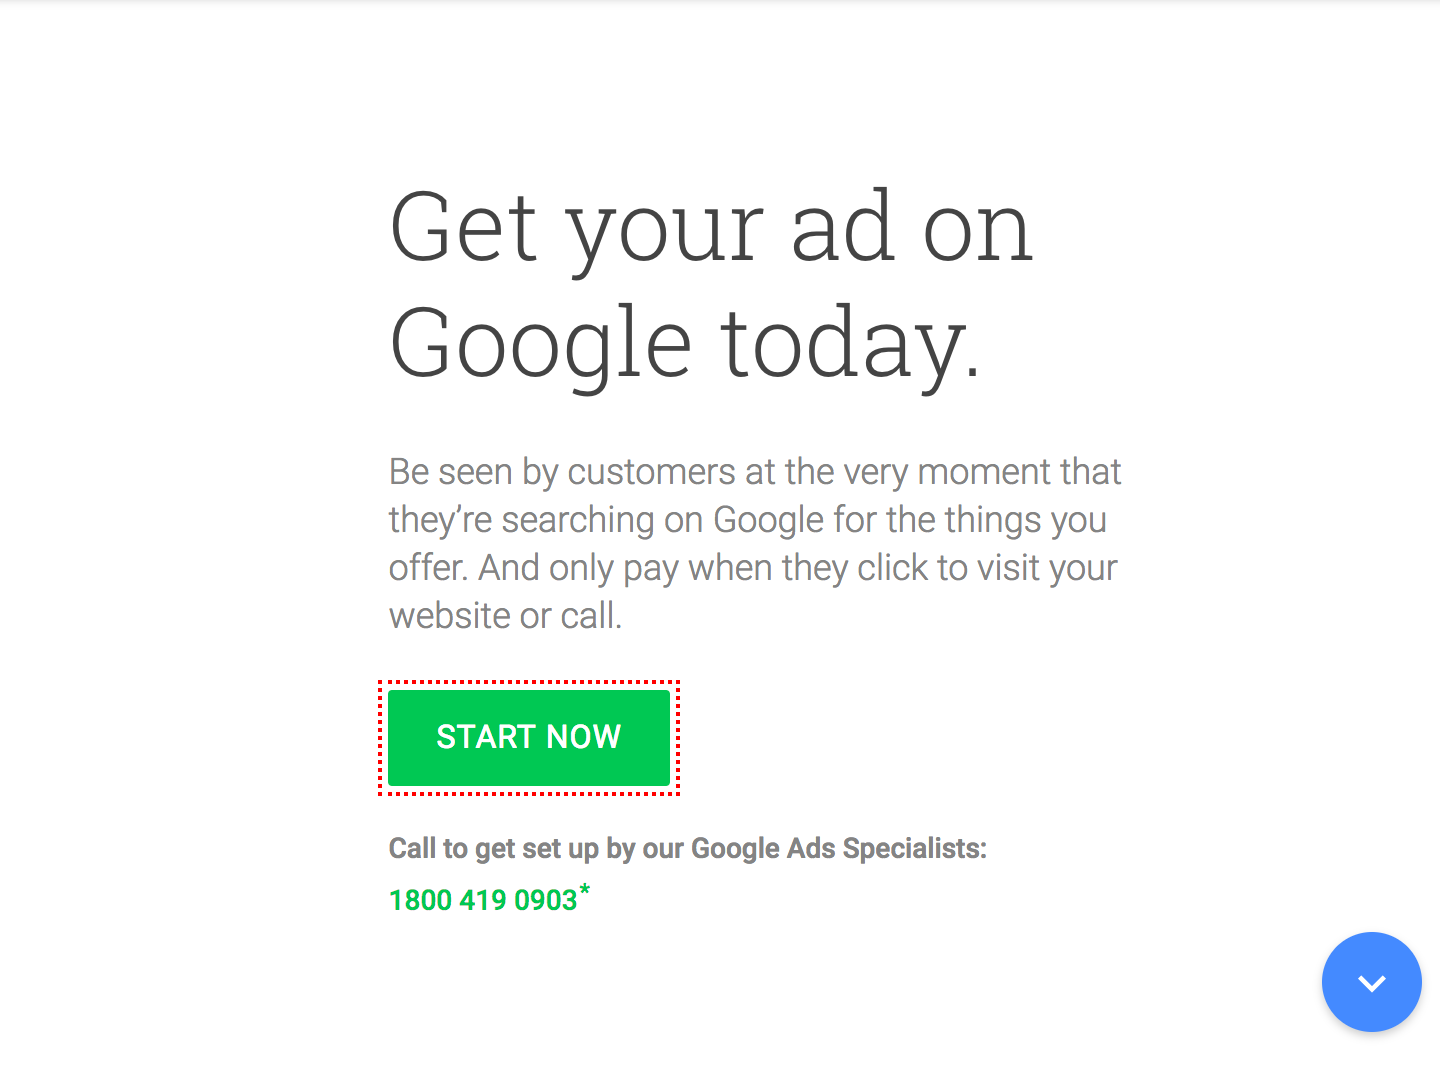
- Go to ads.google.com and click Start Now.
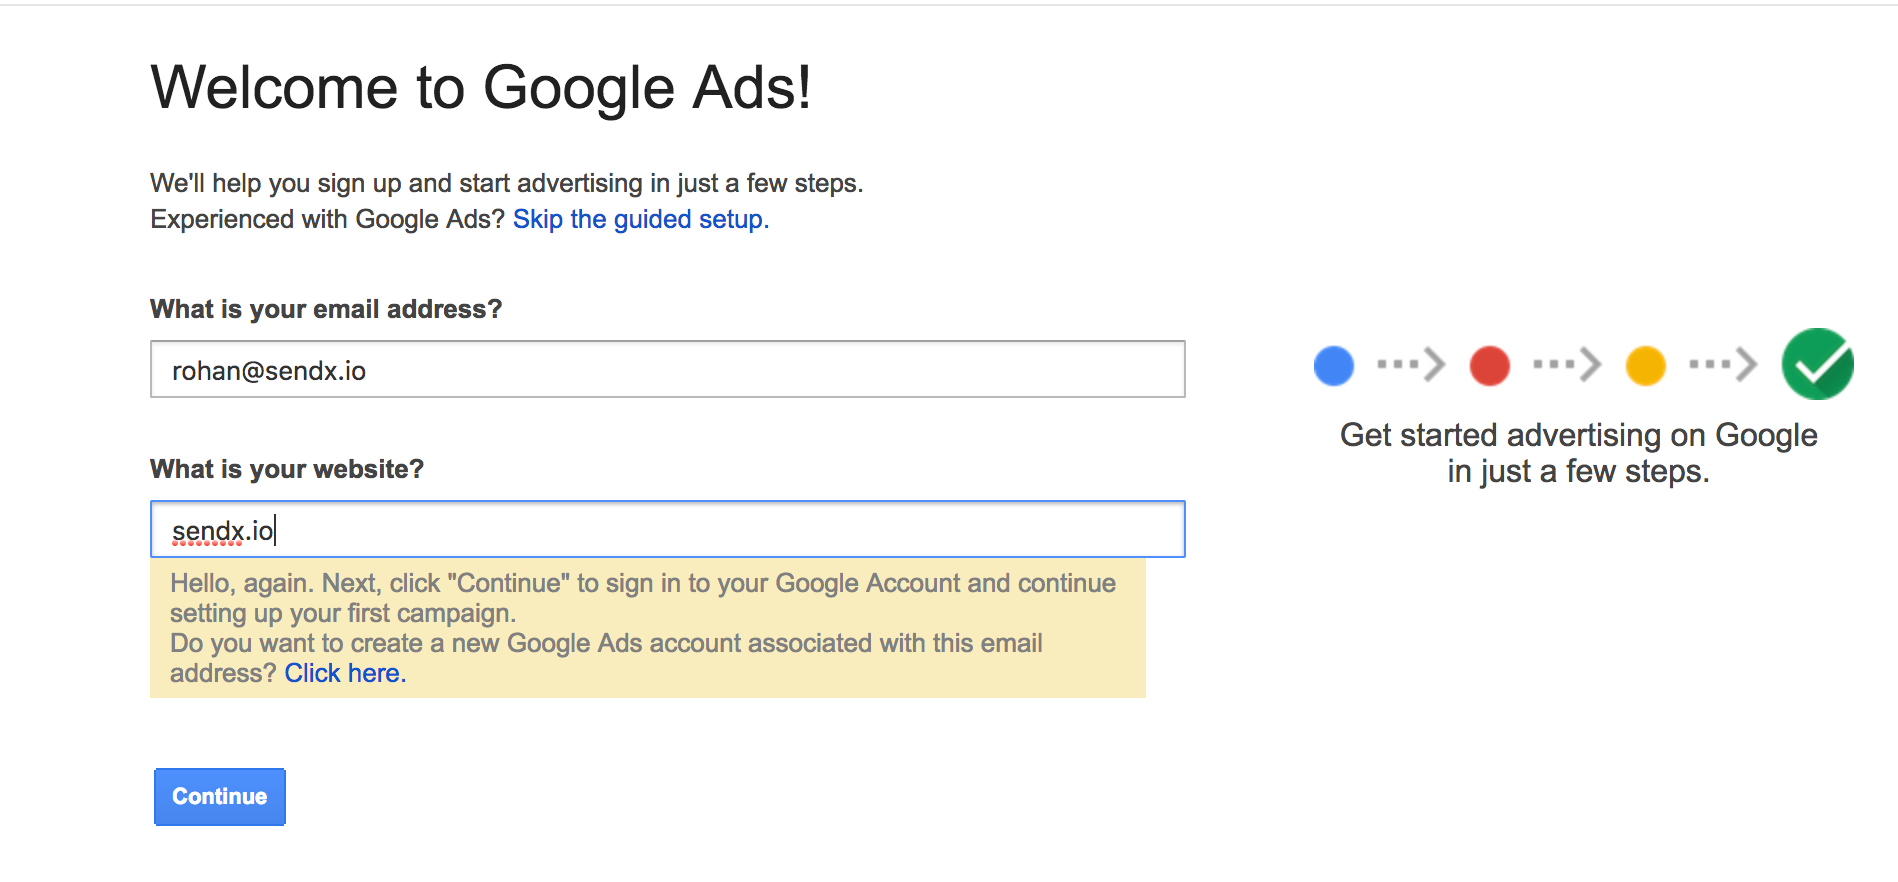
- Enter your Email address and Website and click Continue.
-
Google will ask you to set up an Ad Campaign to proceed. Don’t worry, you can just turn it of later. Just enter some basic stuff and get going.
-
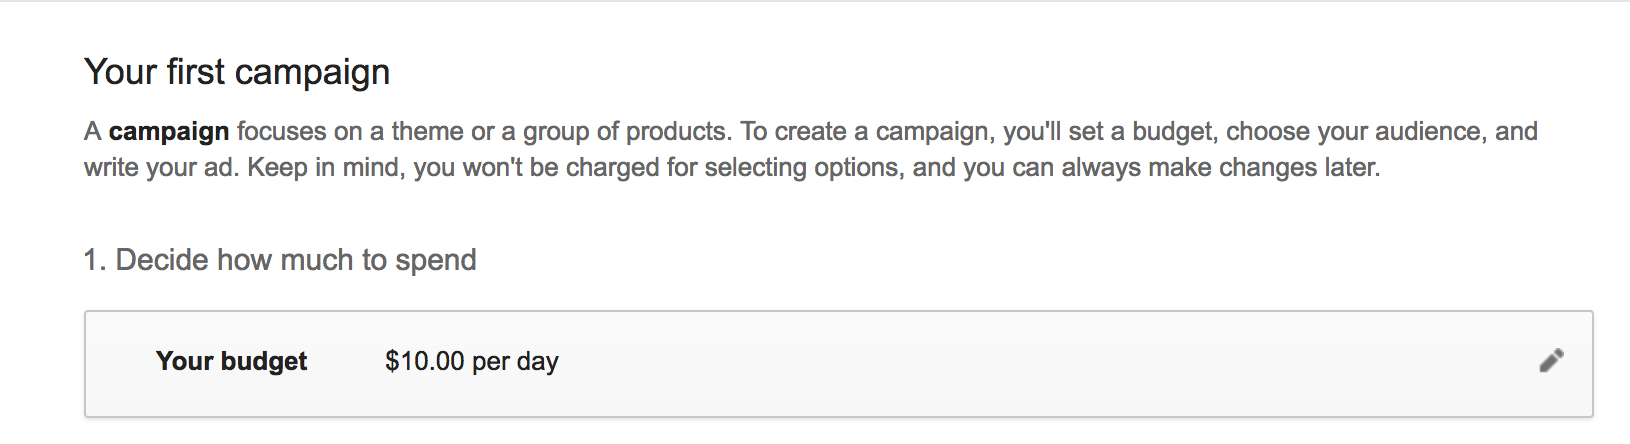
Pick a Budget:
Just choose a number to get started with. A number that you’re comfortable with spending. Don’t worry about calculating the ad budget here. We’ll do that in the next chapter in detail. You can always change this budget later.
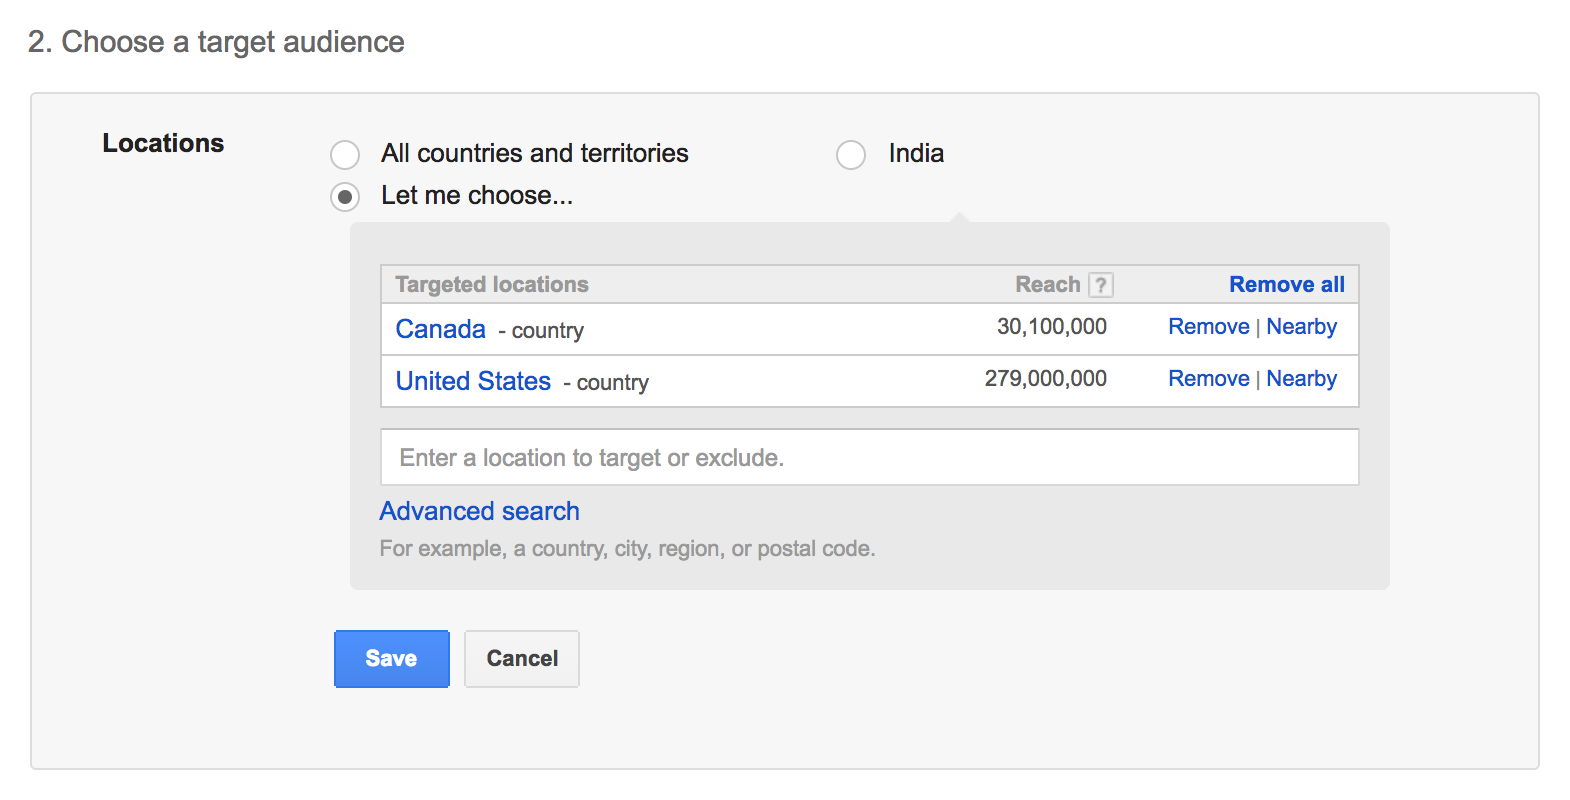
- Choose a Target Audience:
This is where you get to choose your Target Audience. You don’t wanna waste your money on displaying ads to people in countries you’re not even selling to. So if your product is only sold in US and Canada. Make sure you select that.
- Select a Network
This is where you can select among the two networks to run your ads on. Search Network and the Display Network.
So if you wanna run ads on Google, YouTube or sites that use the Google Search Engine. These ads are typically based on keywords that you choose, and the audience uses to search. Choose the Search Network.
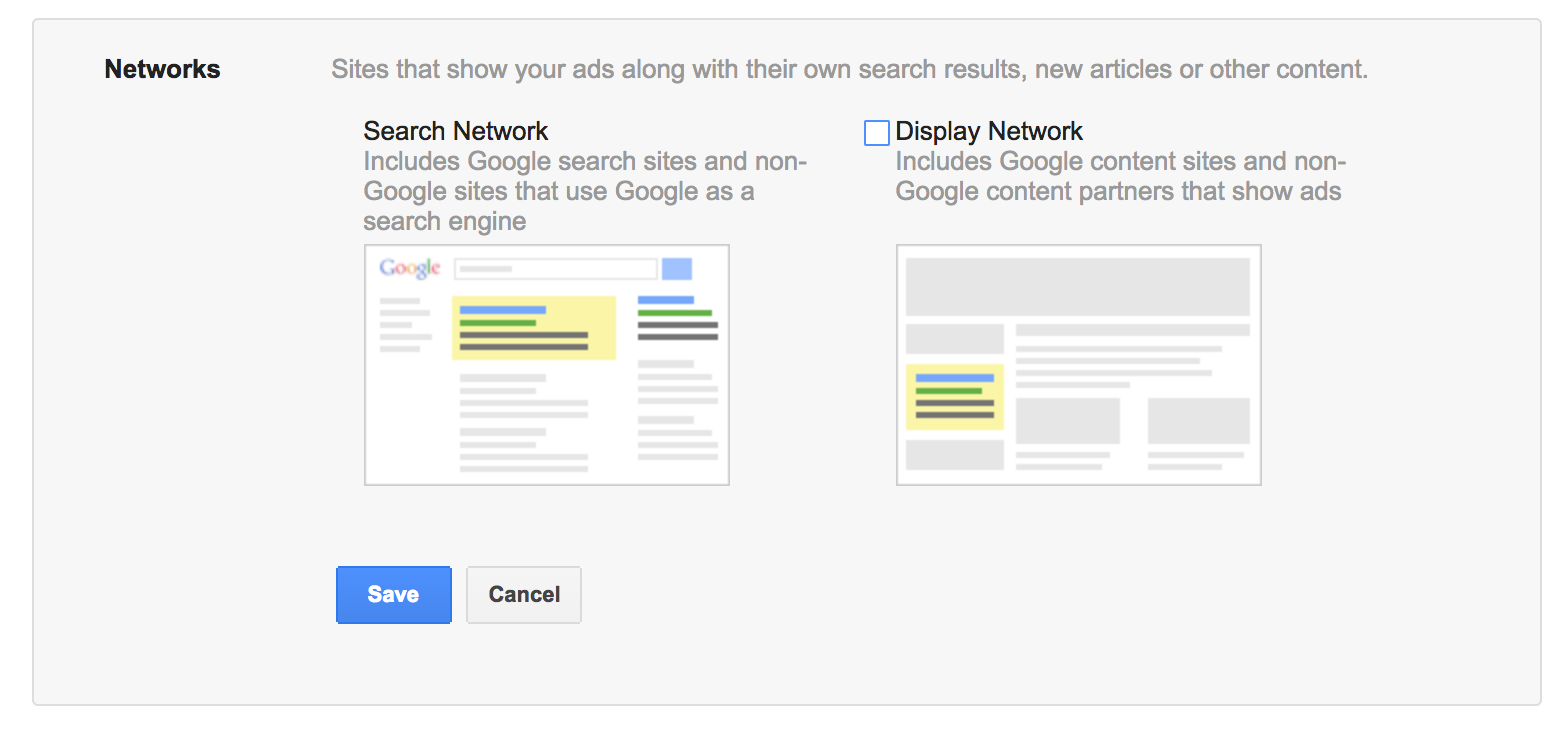
And naturally, if you wanna run ads on third party sites. Ads which are more visual and appear on other sites. Choose the Display Network. You can use this to reach potential customers who reach sites related to your niche.
- Enter some Keywords
Don’t worry too much about this. Just add some keywords that you might be knowing, or just leave them as default. We’ll go through the keyword research process later and fix this.
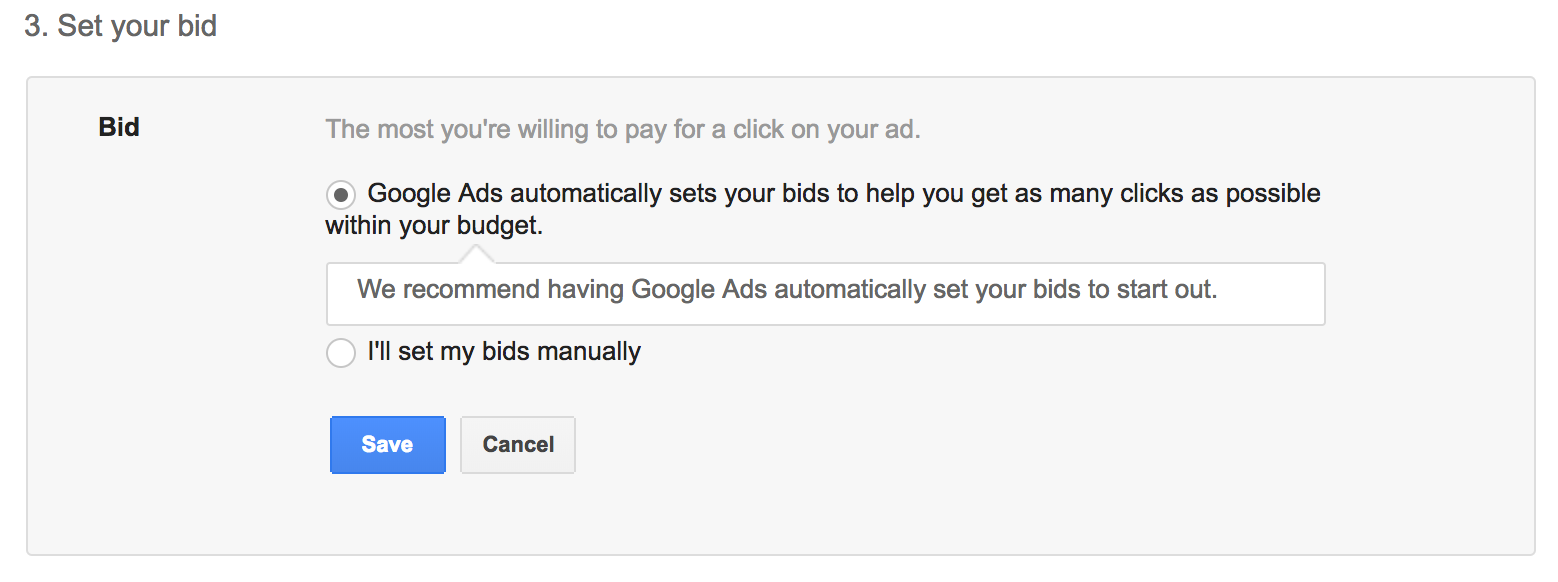
- Let the Bid stay at automatic for now. We’ll look into it in more detail later.
- Just Write something random on the ad and proceed by clicking Save and Continue. We’re anyway gonna be pausing the campaign later.

- Enter your Payment Information and other details on the next page. Click on Finish and create ad after that.
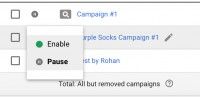
And that’s it. Your Google Ad account is now set up. Now go to your Campaigns Dashboard and Pause the campaign you just created.
Now that you’re set up with your Google Ad account, let’s begin optimizing for efficient spending of your money.
Chapter 4: Avoid Wasting Your Marketing Budget by Optimizing for Maximum Clicks (And Optimum Bidding Type)
I’m horrible at math.
So before you get all freaked out with the chapter title, know that you can literally calculate your budget as long as you know what multiplication and division mean. That’s it. Nothing more.
It’s essential that you calculate how much money you wanna spend on Google Ads. You going overboard with your money can be fatal to your business’ health. While spending less could mean you’re making less money from Google Ads than you could be making.
This chapter takes care of everything you could possibly need to calculate your ad budget.
Calculating the CPC
Google allows you to enter the Max. CPC you want them to spend on your ads. This give you full control over the money taken out from your bank account.
Getting to this Max CPC requires you to know a few things:
- No. of clicks your ad is getting.
- No. of sales you’re getting from that ad.
- The total cost of the product/service you’re selling.
- Your ad costs
Now, to find out the amount Google charges you for one click, we first need to find the conversion rate of our product.
As conversion rate is basically the percentage of people who actually bought your product, we can use the following formula:
Conversion Rate = (Number of sales/Number of clicks) x 100
So if you’re selling ice creams. And out of 2000 clicks, 30 people buy your ice cream. The conversion rate of the ad is (30/2000)*100. Which is equal to 1.5%.
Next thing we need to know, is the amount of profit we’re making. So if your ice cream package sells for $50 and you’re spending $20 to get one sale, your profit would be $30.
Now CPC is essentially the cost we’re paying for one click in order to be profitable on Google. So if we have the percentage of people who are responsible for the sales, and we have the total profit that we’re getting per sale, we can easily find the CPC using this formula:
Max CPC = Conversion Rate x Profit x 20%
Yes, 20% is the estimate of the commission that Google takes to place these ads.
So if your conversion rate is 1.5%, and the profit you’re making is $30, the CPC would be:
0.015 * 30 * 0.2 = $0.09
So, for every $0.09 spent on Google, you can make a profit of $30 per sale. Pretty dope right?
Note that you need to ideally have a minimum ratio of 1:2 between ad costs and revenue generated. So for every $1, you want to be making atleast $2 to be able to calculate the Max. CPC accurately.
Of course, the more data you have, the more accurate you’ll be able to calculate. But that shouldn’t stop you from beginning to optimise the ads as soon as you have made the minimum profit per sale.
The more in control you are of your marketing, the more money you’ll make with your marketing efforts.
You can control your CPC further by using several bidding strategies provided by Google.
Types of CPC
Google Ads gives you multiple ways to keep a track of your bids, so that you can manage your money with ease.
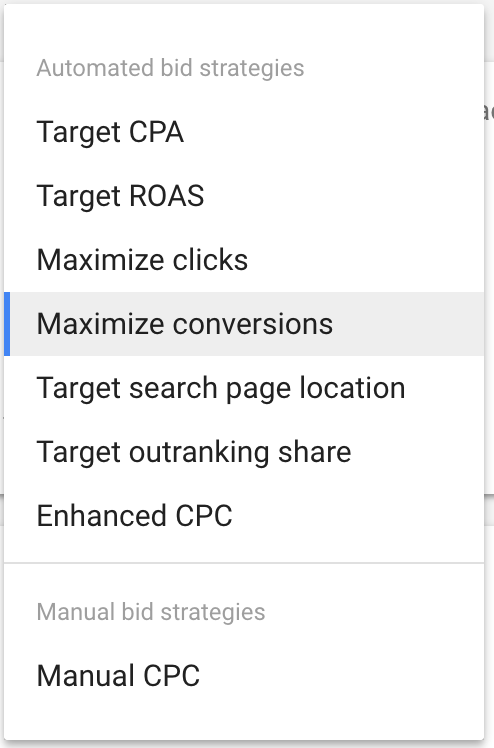
Target CPA:
This little dude optimizes your bids to get maximum conversions based on previous behaviour.
Know that you need to have had some conversions already for this thing to be unlocked. When you’ve got over 30 conversions in 30 days, you can use this Bidding to further optimize your bid for Acquisitions.
Target ROAS:
ROAS = Return on Ad Spend.
This is the average revenue you generate in return for every dollar you spend on ads.
This strategy will help you in getting the maximum ROAS, closer to your goal. Getting the most sales is not the main focus of this ad.
Maximize Clicks:
Pretty self explanatory. Google will optimize your bid to get the most clicks. Ideal if you’ve a conversion funnel which is already working for you.
You just need to drive the most clicks and you’re golden!
Maximize Conversions:
In this Bidding Strategy, Google will optimize your bids to get the most conversions.
Only use this if you have a large budget set aside. Google will straight bump up your costs to get the most conversions without worrying about the clicks.
Target Search Page Location:
While the top of the search page does not guarantee you’ll get the most clicks, it sure does give your ad the maximum visibility.
This bidding strategy will optimize your bids in order to get placed at the very top of the Google search results.
Optimize your quality score and then use this bidding to get the optimal results.
Target Outranking Share:
Depending on the bid and the quality score, multiple advertisers are almost always competing to get ranked at the top spot with their Ad.
This bidding strategy will allow you to select the competitor you wanna outrank, how many times. Google will then adjust the bid accordingly to give you the results.
You can very easily declare all out war against certain competitors if you desire.
Enhanced CPC:
This is a conversion focused strategy in which Google changes the bid according to the past behavior. Make sure you have Conversion Tracking enabled for this (more about this in a later chapter).
Google will automatically increase or decrease your bids, depending on the past data captured by Google’s tracking cookie.
The clicks that are more likely to get you conversions get an increased bid (up to 30%), and the clicks that are not likely get decreased bids.
Manual CPC:
As the name suggests, this allows you to set your own bids for the campaigns. This is the bidding strategy that gives you the most control over your ad activity.
Basically, Google will take the default ad group bid and apply it to all the keywords. You can always go in and change bids at the keyword level manually of course!
This is the strategy you should prefer in most cases as this gives you the most control over your advertising. But feel free to test with the other strategies and switch it up after 30 days if you don’t see good results.
Be smart.
Now that you know the different bidding strategies, let’s go one step deeper and gain that control.
Want to try Email Marketing? Sign Up for SendX
What about the remarketing budget though?
If you’re currently running a business which depends on advertising to make money (or maybe it will after you’re done with this guide!), know this: You are actively choosing to make less money if you’re not actively remarketing to your visitors.
There is no fixed budget or limit to how much you can spend on remarketing. But to begin with, here’s what I would recommend.
From your total number of sales, check out the number of sales which come from repeat visitors. So if out of 200 purple ice cream cone sales, 50 bought it after a repeat visit, you can safely conclude that 25% of your customers are repeat customers.
Which means, 25% of your marketing budget should be spent on remarketing ads!
Make sure you’re taking full control of your budget with these bidding strategies and modifiers, as well as remarketing to a good portion of your visitors to maintain maximum efficiency.
Combine this with getting clicks on quality keywords, and you’ll have literally done a better job than 90% of the advertisers out there…
Chapter 5: How to Pick the Right Keyword Every Time to get Those Conversions!
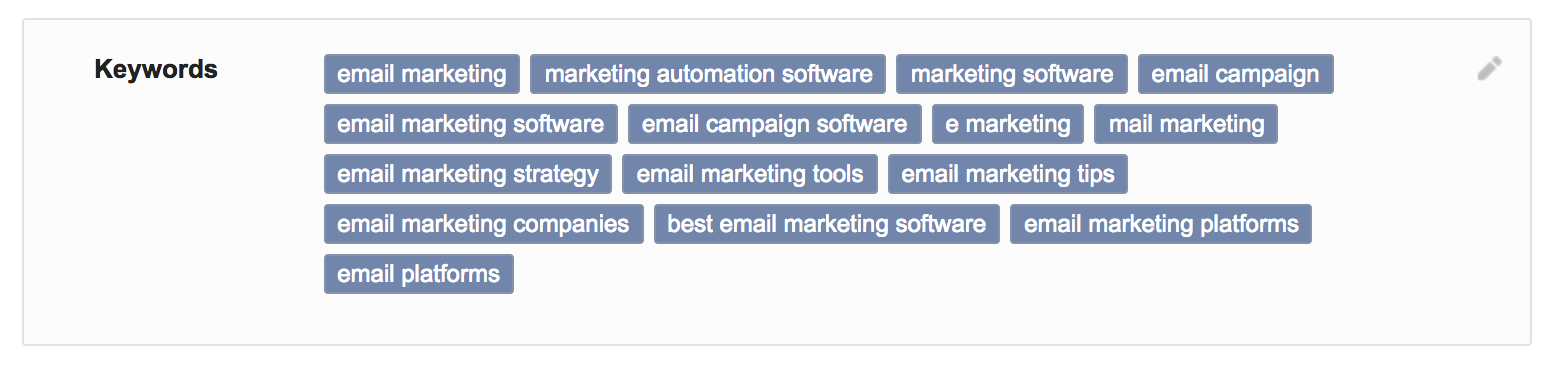
When you choose your bids and everything, Google will give you a bare bones version of its Keyword Planner. It will give you Keyword Ideas and allow you to type in the keywords you wanna run the ads on.
If you value your money even one bit, discard all these keyword ideas right now.
Google gives you these keyword ideas based off the content on your website. And you bidding on them means you’re potentially bidding on 90% of the keywords which are actually useless.
You need to pick the right keywords, that get high quality clicks.
And that’s exactly what I’ve outlined below. A step-by-step process for figuring out the keywords that will set your ads up for massive conversions.
Let’s jump right in.
1. Become your own customer
You’re running the ads for your ideal customer. So now it’s time you become one.
It’s SHOCKING how many businesses skip this step.
All the “tactics” and the “expert advice” is useless if you don’t understand and are not close to your customers.
To get the right keywords, begin with becoming your customer and what they would type on Google to come across your product.
So if you’re selling SEO Services, you need to step in the shoes of a business owner or a marketer, who’s looking for solutions to his SEO problems.
You’d search for things like:
- How to do SEO
- Paid Ads Alternative
- How to link building
- Do SEO services work?
- Why SEO consultant
- Marketing Agency vs SEO Consultant
- SEO service near me
- Hire SEO consultant
- SEO Agency price
If you look carefully, the keywords go from top of the funnel searches to the bottom as we go down this list. This is because not all of the people who are in need of SEO would be ready to buy yet as they might opt instead for performing free keyword research first. And don’t worry, you won’t be using the same ad for all these keywords.
Ask your customers
After getting an initial idea of the keywords your ideal customer would be typing in. Start talking to your existing customers.
Ask their pain points. Ask what they like the most about your product. What were they looking for when they stumbled upon your website?
The truth is, not matter how much you step in your customer’s shoes, you still will have your own biases which you cannot push through without getting candid feedback from your customers!
So make sure you’re actually having open conversations and are deliberately making an effort to understand your customers without expecting anything in return.
After you’re done with that, let’s move on to the next step.
2) Branded Searches
Go on Google right now and search for “amazon”. This is what I saw when I did that.
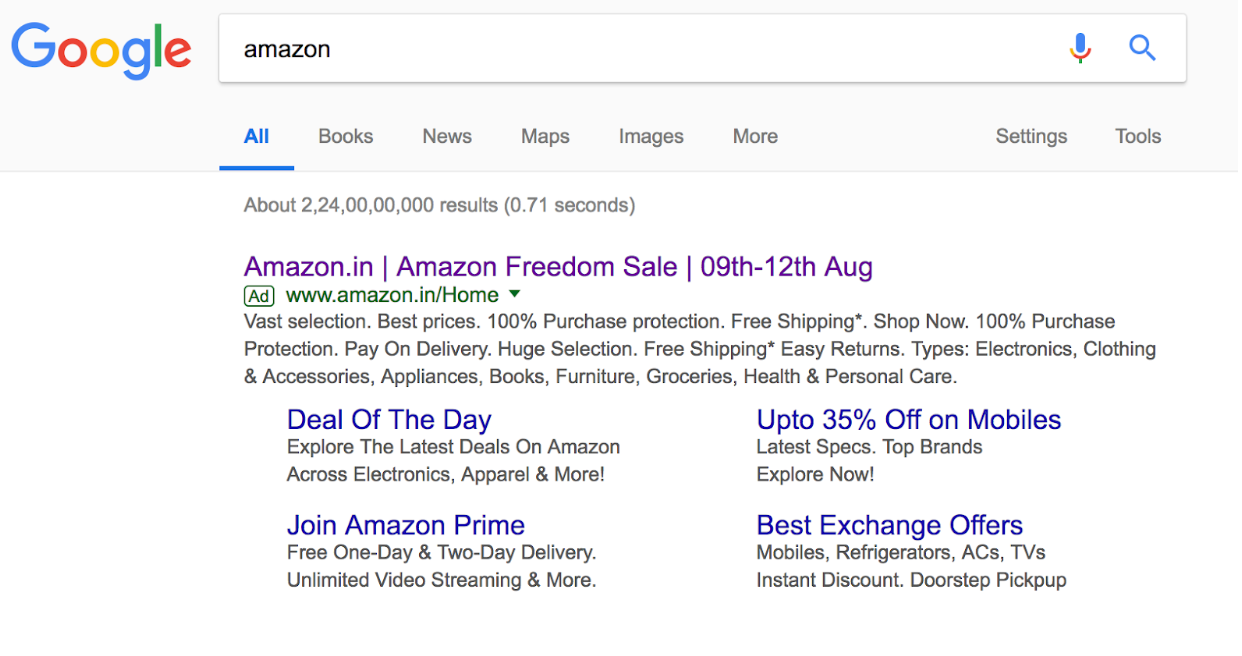
I’m sure we’ve all heard of Amazon. It’s one of the biggest brands in the world. And even they bid on a their own brand, regardless of people not needing any introduction.
Now search for “hubspot”. This is what I got.
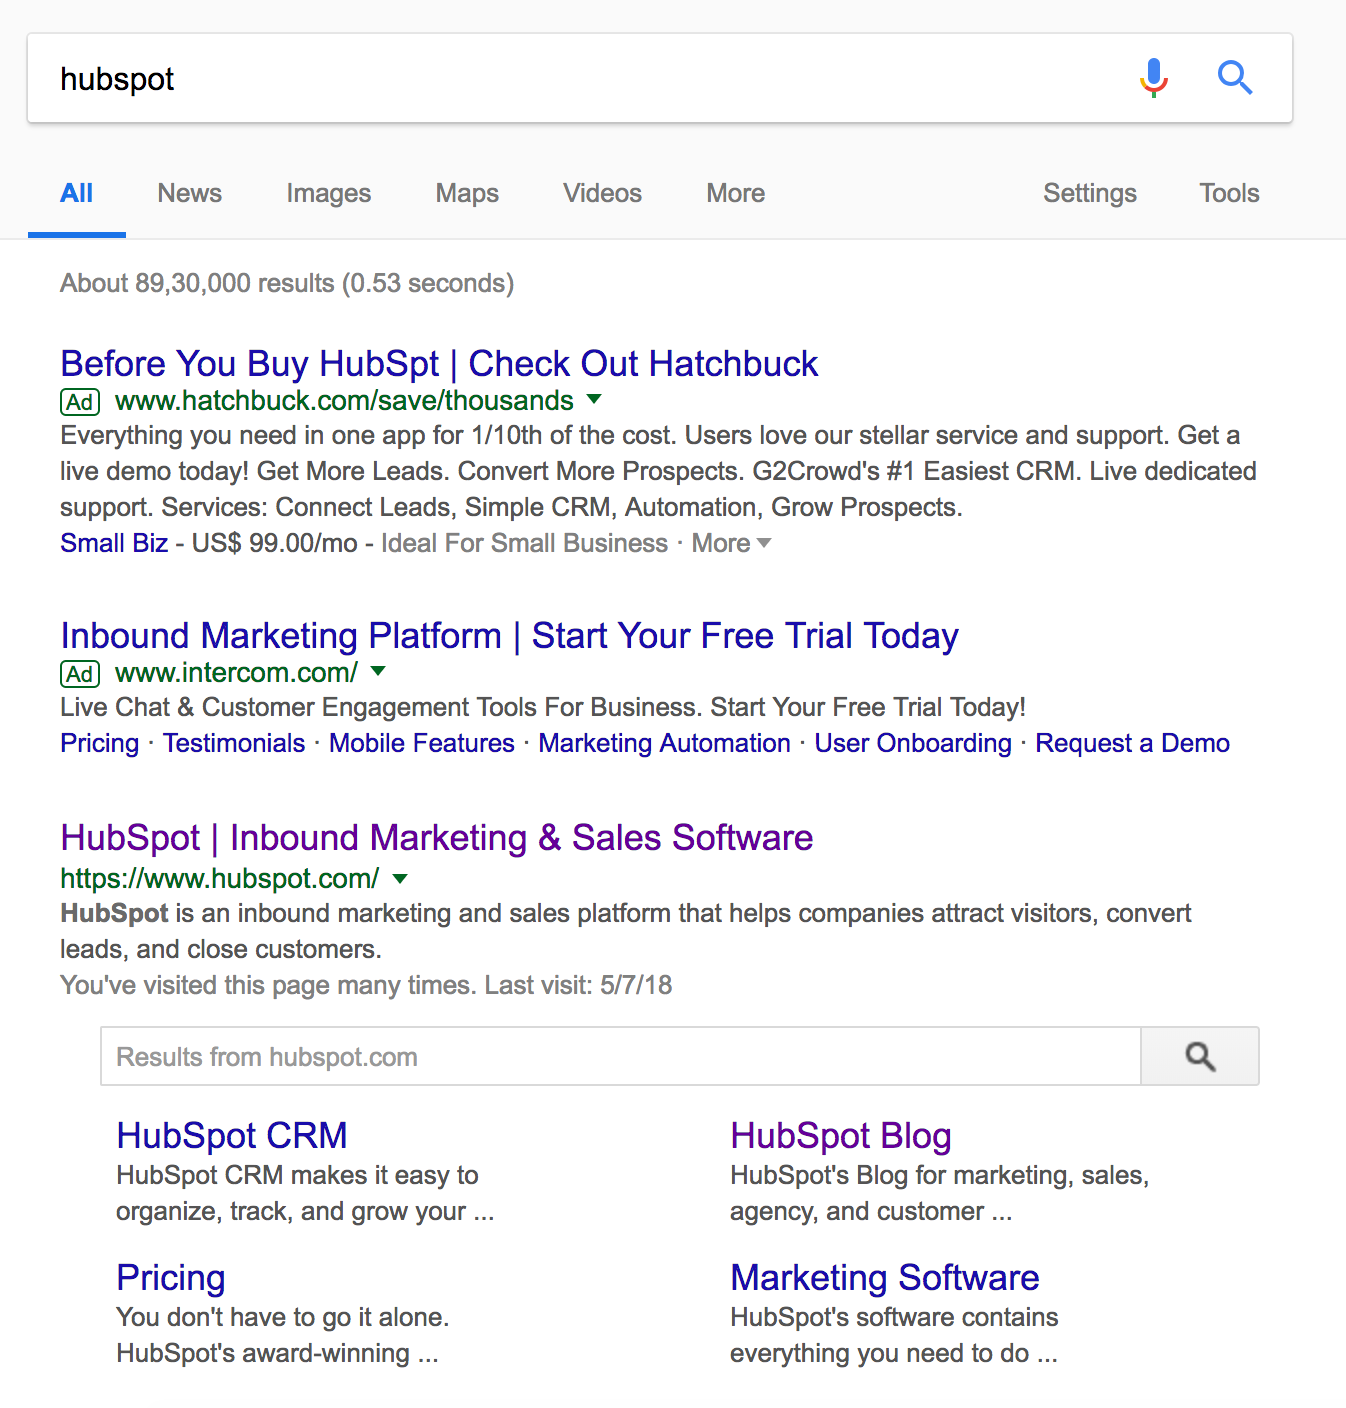
Yes, Intercom bid on the keyword “hubspot” and actually appear on top of all the other organic Google search results.
Yikes.
While Hubspot is a very well known brand in the Software space as well, they’re still at a high chance of losing potential customers to Intercom. Simply because they haven’t bid on their “branded keyword”.
You see, no matter how big you are, you need to keep an eye out for your branded keywords. Your competitors could be stealing customers from right under your nose!
Now that you know what your customer searches for, and have solid roots for your branded keywords. Let’s move on to the next step.
3) Go long
Before we go any further, make sure you’ve listen down as many keywords as possible that pop up in your head from the above 2 steps.
Do it right now. Open your Notes and jot down everything before proceeding. Don’t worry, we’ll be removing the ones that don’t make sense as we proceed with this guide.
How targeted should you go?
Imagine you’re selling iPhone X cases. What would a buyer search on Google?
Here are a few that pop-up in my mind:
- Buy iphone X case
- Buy iphone X cover leather black
- iPhone cases
Which one do you think gets more search volume? And which one has higher buyer intent?
Obviously, the third and the second one respectively.
So how do you decide which one to bid on? Considering the fact that you don’t wanna miss out on appearing in front of high volume searchers or high buyer intent both.
Search Engine Watch did an analysis a while back, in which they compared the percentage of clicks, impressions and conversions keywords of various length generated.
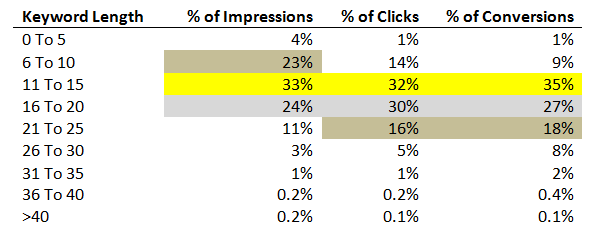
As you can see, the bracket marked in Gold ie 11 to 15 keyword length were found to be the most impactful, followed by the one marked in Silver ie 16 to 20 characters.
You know what this means.
If you want the maximum ROAS from your ads, go long.
But not longer than 30 characters. Going too short would mean you competing against a lot of other advertisers and potentially wasting a lot of money without getting enough conversions.
If you’re a sneaky rebel and wanna experiment further. Always go longer.
Because after all, you’re only paying for the clicks!
4) Google Keyword Planner
Now it’s time to return to the good ol’ Google’s Keyword Planner, and focus down even more.
Surprised?
Google Keyword Planner is a great tool, but solely depending on it is a surefire way to end up like this: alt text: sprinkling your money like a blindfolded dude trying to shoot a pigeon.
Added to that if the search volume for “Buy iphone X cover leather black” is not as high as you thought, maybe you can remove that and replace that with another keyword which you hadn’t thought about before.
Yep, the Google Keyword Planner is a hugely useful tool to find out the correct keywords. But if you start with this without doing your own research, you are guaranteed to be bidding for the wrong keyword 90% of the times!
You’ve narrowed down and selected proven keywords. It’s time to move on to the final step and select the correct match types.
5) Right Match Types for the Right Keywords
Let’s say you’ve found out that bidding for “buy iphone x case” is proven and could be profitable.
You’ve started the ad, set up the landing page for a sleek looking iPhone X case which is proven to sell well.
Then you see your first few clicks and analyse them.
Yikes.
Chances are, a lot of the clicks are not from the people who were looking for iPhone X cases. The people looking for iPhone 7 cases or simply any iPhone cases were also shown this ad!
This could be fatal for your marketing budget, especially if you’re bidding on a competitive keyword.
And it’s insane how many businesses mess this up.
I was recently looking at an ad report submitted by a PPC Agency working for my dad’s business website which is a portal of Educational Institutes and Private Coaches. I was BLOWN AWAY by all the bad quality clicks coming to his website. Due to one single reason...
All the keywords were set to “broad type”.
So let’s be smart and not fall for this. Because while Google won’t make a big deal out of this, your money (or your boss) definitely will!

Source: https://www.cardinalpath.com/adwords-keyword-match-types/
Broad Match
Unless you explicitly set the match type while typing in the keywords, your keyword will be a broad match.
So if you enter “purple cone chocolate vanilla mix ice cream”, your ad could be shown for search queries like “purple mix” or “ice cream”. Which in most cases might not be the most desirable for your ad.
Of course, this does have it’s advantages as well. For example: you might wanna expand your reach for your iphone cases catalog. In that case, using a broad match can be ideal.
So depending on your needs and the desired ROI, decide how you wanna use this match type.
Additionally you can add a broad match to any other match type by typing the keyword like this: +keyword.
Phrase Match
Phrase match allows you to narrow it down a little bit by only displaying the ad when the phrase you’ve types is present in the search query.
They are denoted like this: “keyword phrase”
So if you enter “vanilla ice cream”, your ad will be displayed to the users who type searches like:
- How to make vanilla ice cream
- Is vanilla ice cream white
- Why is vanilla ice cream not the best
Hence, it won’t be displayed for searches which don’t have the whole phrase “vanilla ice cream” present in them. So no impressions under:
Vanilla cream made of ice
Exact Match
As the name suggests, the ad is only displayed when the user types the exact keyword that we enter. So if we enter “buy iphone x case”. The ad will only be displayed under the searches “buy iphone x case” and “buy iphone x cases”.
Denoted by square brackets enclosing the keyword. Ex: [purple ice cream]
This is the most targeted you can get (which is pretty much the closest to your keyword!)
You would wanna start with adding all three match types within one Ad Group while running the ad. This way you can get highly targeted users from all types of searches, and then eventually refine and eliminate accordingly (and of course, Remarket)
So while creating your first Ad Group for iPhone X Case, you wanna type:
- Iphone x case
- “Iphone x case”
- [iphone x case]
Negative Keywords
While running ads, you will encounter some search queries for which you don’t wanna be displayed on. There is no point in being displayed against the search query: “sell iphone x case” if you’re the one offering the case for sale.
These types of scenarios are where Negative Keywords come in handy.
These are written like: -keyword or added separately in the Ads Dashboard.
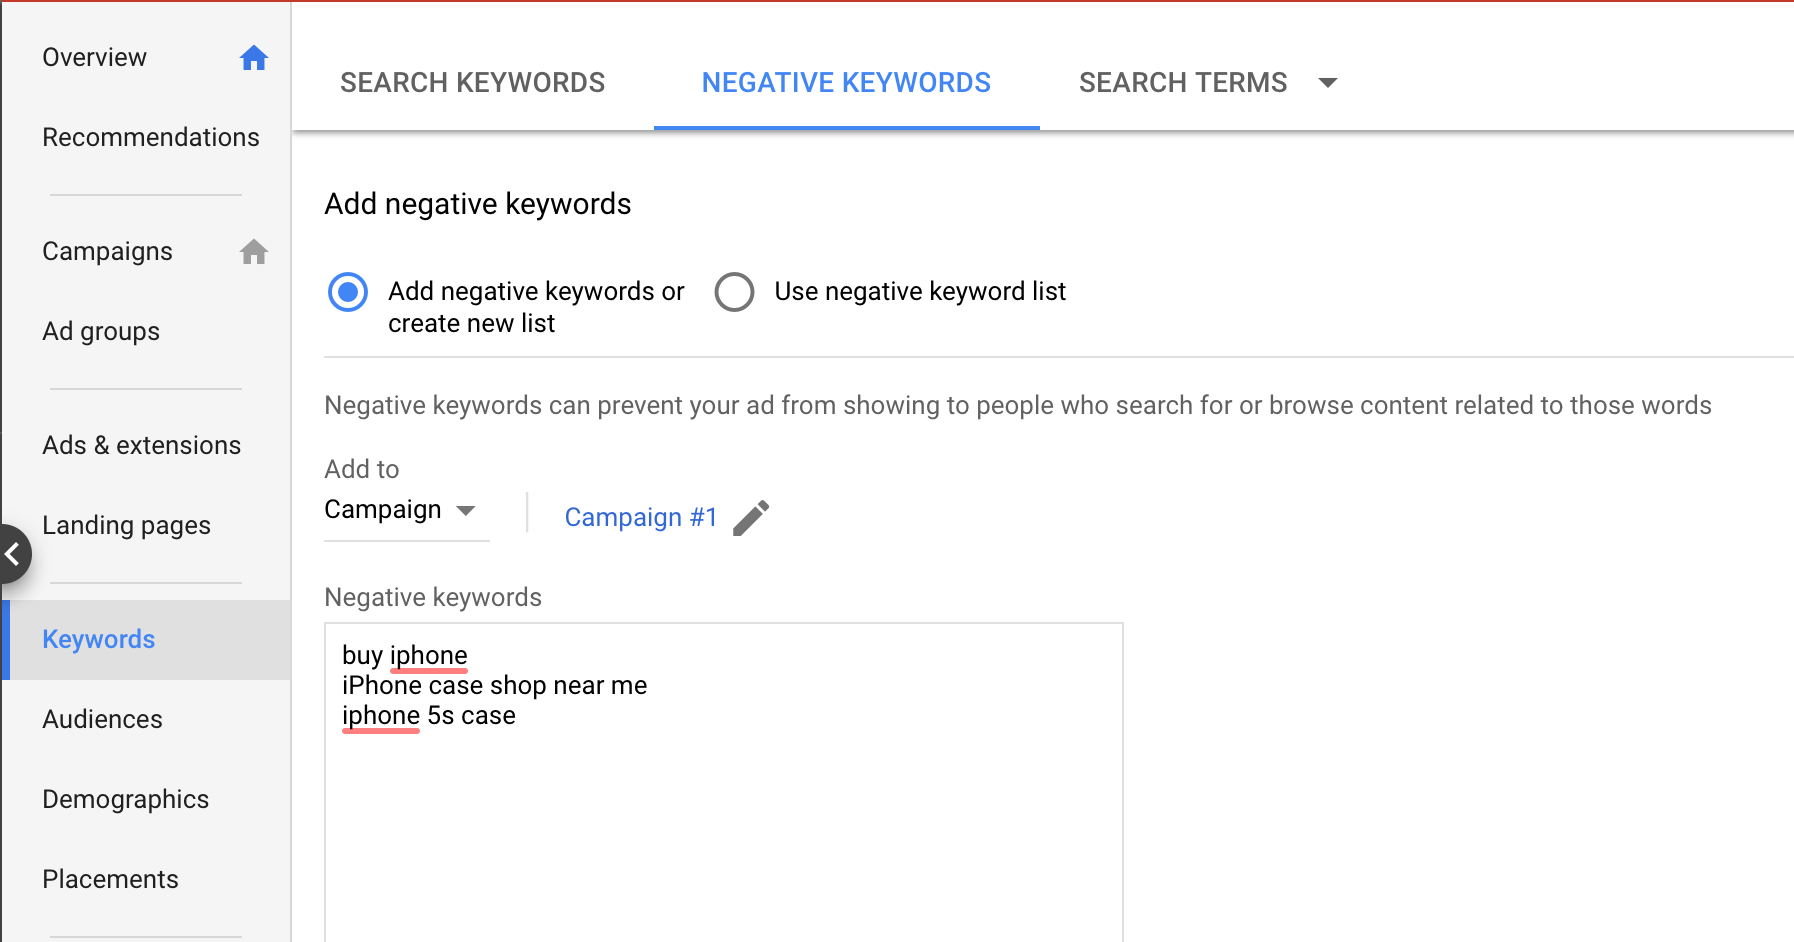
The capability to add negative keywords is insanely useful for making sure you’re not wasting your money.
By controlling every type of keyword under which your ad gets displayed on, you can truly manage your Ad Spend and Returns like a boss!
Now that you’ve selected the correct keywords and bidding strategies, let’s get into the battle and make sure we’re hitting the competition where it hurts!
Chapter 6: Get More and Better Ideas By Analyzing Your Competition (and beating them!)
It’s no secret that Google Ads are insanely competitive. Every company and their mothers want to advertise on Google.
This doesn’t mean that you should look somewhere else and be afraid of the competition. Remember, that there is competition only because there are people converting through these ads like CRAZY.
Which means that for you to actually beat them, you need to be aware of their moves and outsmart them by outranking them.
In this chapter, we’ll take a look at how you can gain an almost unfair advantage over other advertisers in your space, in order for you to get the most out of your bids, keywords and ad copy.
Let’s dive right in.
How much of a genius are you?
Let’s start with a simple research process. Open Google and type in the keywords that you came up with in the previous chapter.
Notice on which keywords the competitors are advertising, and the ones on which they are not.
If they are not, then you’re either a genius and have stumbled upon a gold mine, or you’ve no idea what you’re doing and the competition is way smarter than you.
Either way, take a call. If you’re not too sure, then you can always test things out and then optimize from there, since you’ll only be charged when a user clicks on the ad.
Becoming a spy
There are multiple 3rd Party Tools that allow you to literally spy on your competition and see the exact ads they are running. Tools like SpyFu, iSpionage and SEMRush all do the job fairly well.
I recommend you don’t overburden yourself with tools and only stick to one. SpyFu is the one I use the most and has worked well with a lot of other marketers as well. It allows you to see your competitor’s keywords and ad copies, along with their ad budget and CPCs.
If you want to see the landing pages, you can use iSpionage and literally get a view of the whole landing page.
On top of that, you can even look at the top keywords that you can bid on in your niche within SpyFu.
Dominate to win
Once you’ve figured out the exact keywords, ad copy and the landing pages your competition is using, all you need to do is reverse engineer them using SpyFu and iSpionage and create an ad which is a little bit better (or even similar in some cases!).
Remember that these ads are active because they simply convert! So don’t worry too much about innovating in the beginning. Copy these ads and make them a little bit better. Once you’re making some money through these ads, you will have enough time and room to test stuff out.
Let’s say you’re selling purple bags.
Go to SpyFu and type in purple bags.
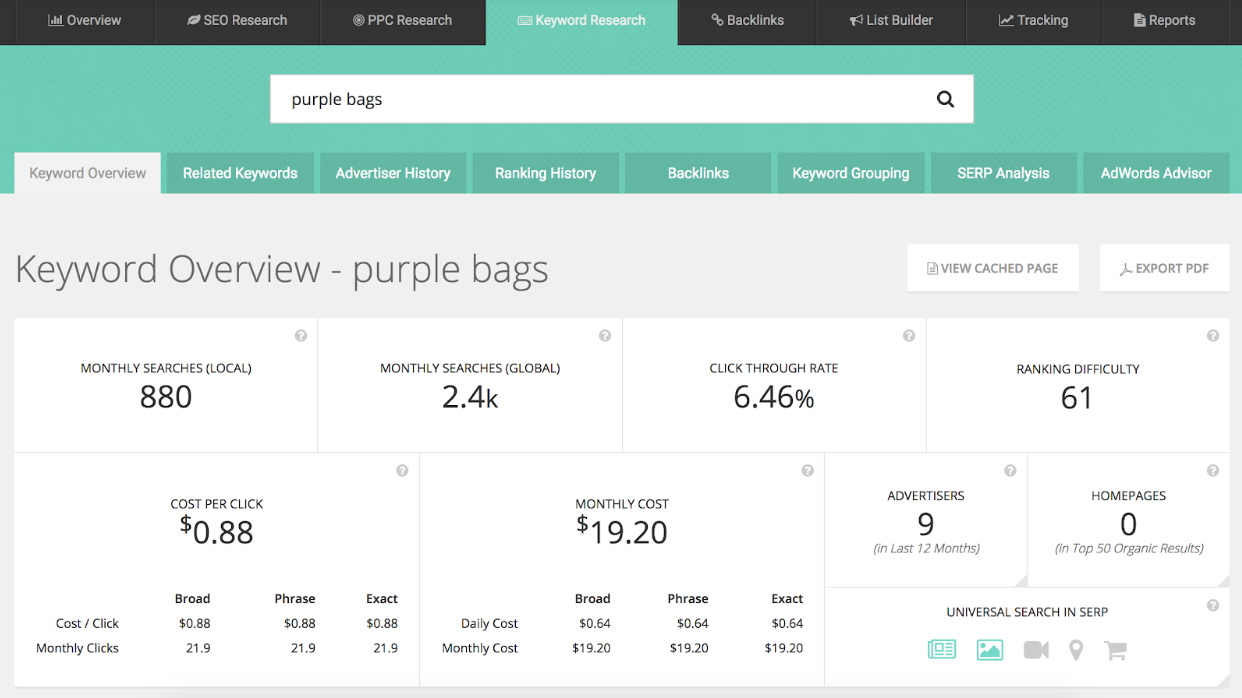
Right here, you can get get basic idea of the searches, CPC, CTR and the number of advertisers bidding for this. Scroll down and you’ll get recommendations on what keywords you can bid on, and what other related keywords are out there on which advertisers are bidding.
Under Current Ads, you’ll be able to see the exact Ad Copy along with the advertisers.
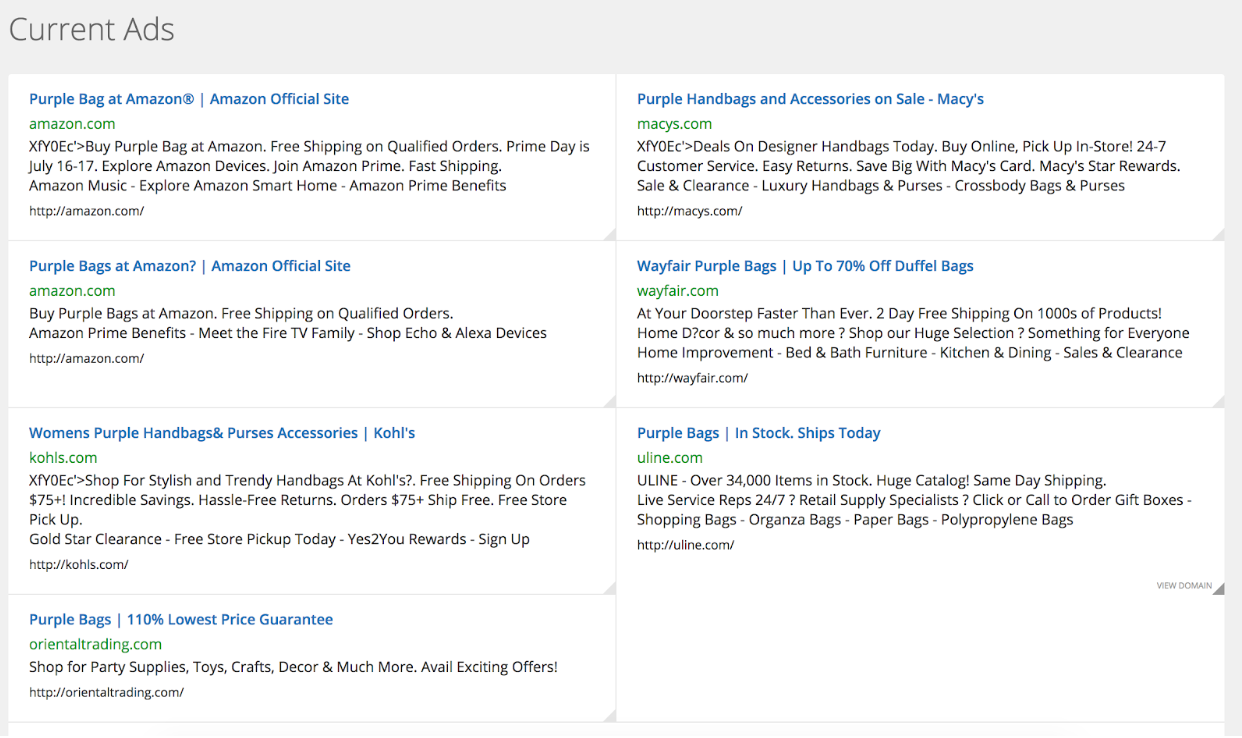
You can use this to quickly swipe off ads from your top competitors. Clicking on a particular ad will take you to an analysis of that particular advertiser, which will give you even more detail on what your competitors are advertising on.
Implemented with the right bidding strategy, this will give you the ability to literally steal customers from your competitors!
So now we’ve learned how to smarten up and dominate our competition even if we’re a beginner at this advertising game. We’ve seen what works and what doesn’t and we know what it takes to dominate the competition.
Now let’s move on to the final piece of the puzzle and make sure that the traffic that is sent via our Ads actually convert..
Chapter 7: Making sure your “home-base” is Optimized to Get The Max ROI from your Ads
In the previous chapters, we’ve went through everything you need to do to buy LOADS of high quality traffic.
But guess what? If the page you’re driving traffic to is shitty, you’re actively losing money with every single dollar you spend on your ads.
I’m sure some of you are thinking, “Why is there a chapter on Landing Pages in an article about ads?”
Remember when I talked about Quality Score in the beginning of this guide?
Well, your landing page has a HUGE impact on your Quality Score. And if you’ve made it this far, you clearly care about your Ad quality and your revenue.
In this chapter, we’ll go through a step-by-step process which you can use to ensure your landing pages are optimized to give you the highest ROI from your Ads.
Let’s jump right into it.
The Why and The How
Whatever type of Ad you’re running, you need a separate Landing Page for every ad. If you’re running an ad for “purple socks”, you need that ad to direct to a page selling “purple socks” only. Adding more options than needed only decreases conversions.
Your user clicked on the ad because he wanted to buy purple socks, why bother showing pink socks alongside and risk not selling anything? You’ll only end up confusing the user with too many options.
Stick to being highly specific and keep your quality score high.
If you bring 500 people to your page, and you get a 1% conversion rate on a $50 product. You’ll make $250.
Now what if you structured your copy a little bit better and increased the conversion to 2%? Yep, you literally made $500 from the exact same money spent on getting those people.
This is how huge of a difference your landing pages can make to your sales.
Now, there are multiple ways to make a landing page. You can either have them custom coded into your website, or use a tool like SendX’s Landing Page Builder to quickly make one.
Custom Coded Landing Pages
If you’re a tech person, or if you can grab hold of a developer, you can add a landing page to your website just like any other page on your website. These pages will be present along with your website, though you may choose to add a way to navigate to this page from other pages of your website. Make sure your website speed is up to the mark to get the maximum quality score. You can follow these speed optimization techniques by TheGuideX to increase the overall speed of your website.
I generally don’t recommend using this method. Because if you’re a marketer, you want to run constant Ad Experiments and the focus must be on speed. Getting a page custom coded simply to have it modified or removed a few days later (depending on your experiment) is simply not worth the effort.
Using a third party Landing Page Builder
There are lots of Landing Page Builders online that allow you to quickly create and host landing pages using their platform. The best part about them is that creating them is FAST and you can quickly modify and create new ones to conduct more experiments with your Google Ads.
You can quickly do this with SendX’s Landing Page Builder, or you can use other popular tools like ClickFunnels or LeadPages.
While these tools are not free, they are extremely handy for a marketer and are definitely worth the cost if you plan to take Advertising seriously.
Squeezing out the ROI (Landing Page Creation Process)
Let’s get into the meaty stuff.
Creating the actual landing page which persuades the visitor to take certain action is no rocket science. It’s a simple step-by-step process.
While a high converting landing page, may shuffle around the order of the steps or even skip out on 1-2 of these. A typical landing page consists of the following elements:
- The Headline
- The Hero Shot
- The Benefits
- The Testimonials
- The Call to Action
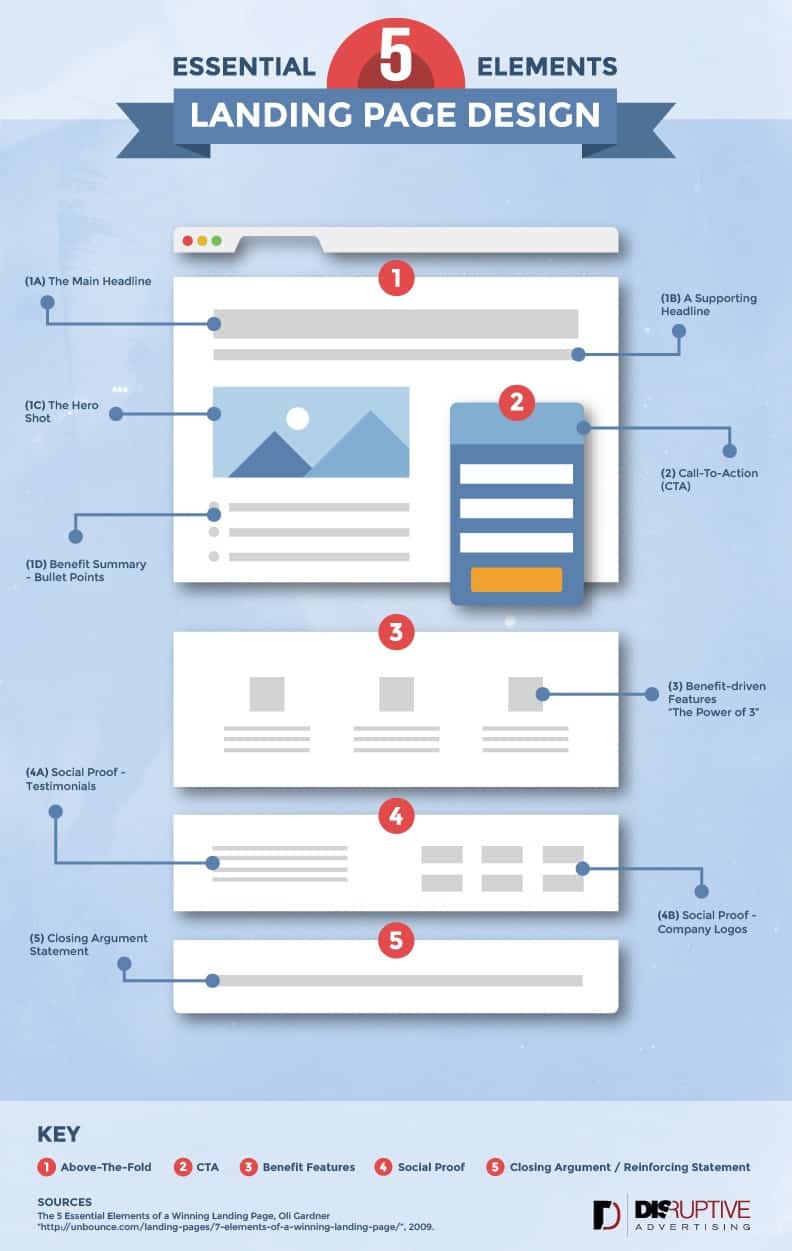
1. The Headline:
The headline is the first thing a visitor will read when he clicks on your ad. It has one job. To make the reader proceed with reading the rest of the landing page copy.
The secret to writing a converting headline is to not get attached to a headline that you created, and to keep the audience’s ultimate goal in mind. Don’t overthink it.
You might wanna add a subheading to “support” the headline and add an emphasis to the headline.
The following is the beginning of the landing page that we're taken to when we click on the Google Ad for ClickFunnels.
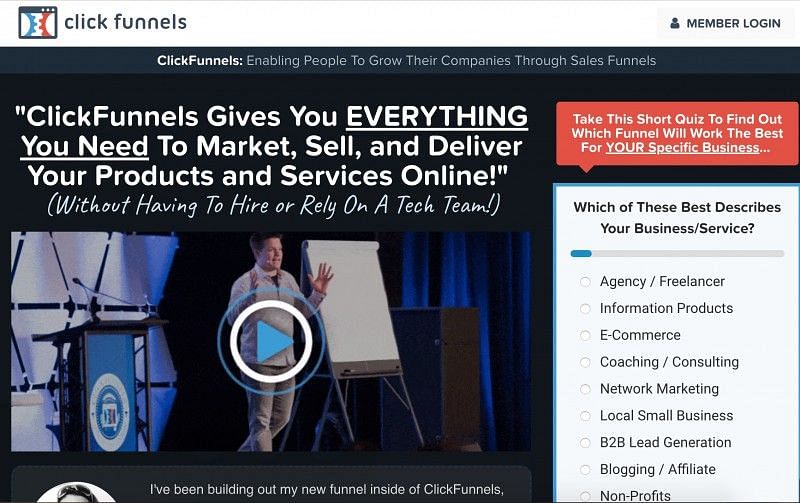
As you can see, the landing page begins with a headline that directly talks to the people with the ultimate goal of selling products online. And then emphasizes on that headline with a subhead which eliminates a major objection for their target market.
2. The Hero Shot
We humans are visual creatures. The presence of visual makes us understand and trust something better. Imagine if the above landing page didn’t have Russell Brunson’s video.
Would you trust that this is a legit product at first glance? I most certainly wouldn’t.
The hero shot sets the mood and gives context to your headline. I most definitely wouldn’t trust it if a landing page selling purple socks showed me a photo of a guy wearing purple cap.
3. The Benefits
We all know that we need to focus on the benefits. But here, things are a little different. Depending on the type of product and the action you want the user to take, the way you present the benefits differ.
Let’s say you run a Google Ad campaign for a Free eBook, which is given as a lead magnet. I’m pretty sure your ideal customer wouldn’t spend too much time thinking and reading about the ebook before giving his email and downloading it. He’s not paying anything for it after all.
For such a product, the landing page can only contain 2-3 benefits or just a small paragraph which presents the benefits.
Whereas if you’re advertising a $47 cup, you probably want to spend a little bit more time and effort in spelling out the benefits. I recommend straight up shooting a Sales Video in this case, to really shoot up your conversion rates.
4. The Testimonials
We’ve all been there. Whenever we buy a something from Amazon, we tend to check the reviews most of the time.
That’s because we don’t trust the product descriptions and the sales copy written.
So why should your audience feel any different when you are selling something?
That’s why getting GENUINE customer reviews and testimonials are so essential. Seeing reviews of other people who are not associated with the business, enhances trust in the prospects about our product.
Make sure you actually put time into getting quality testimonials from your customers. Trust me, if your product is genuinely good, they would love to give a short testimonial for it. Video testimonials with actual customers (not actors) tend to work best as they are the most relatable. But getting simple text based testimonials with a single image can work great too (depending on the nature of the product).
5. The Call to Action
The CTA is where you actually make the close and ask for the sale. While this might look like a very simple task, a lot of marketers lose a lot of potential sales because they’re too afraid to ask for the sale and make a compelling CTA.
Whether the CTA is a “Download” or “Add to cart” or “Submit Email”, make sure the CTA button is present multiple times in the landing page. One right below the headline and hero shot. And others between and below the benefits.
While asking for the close, make sure you make a compelling offer and offer bonuses whenever possible and make the offer enticing in order to make it “irresistible”.
Lastly, the color. It must stand out from the rest of the page. This will allow it to be easily spotted by the reader and make it super convenient for him to take action.
Whatever you do, make sure you always keep testing different copies with different ads and don’t get too comfortable when you find a winning ad. Remember, your competition can always see your ads and landing pages and outperform you.
When you're done with the landing page, make sure you capture the contact information on the landing page and begin your email marketing and Web Push campaign right after that. Simply sending the right emails to the right person can make your Google Ads MUCH more valuable for your business.
This is especially important if you're running an eCommerce business. Because chances are, 7 out of 10 people who visit through the ad, will end up abandoning your cart.
Choose one template from the planet's biggest email template collection and get started!
Now that we know how to drive traffic through ads and then actually convert that traffic profitably, we’re finally ready to get set and launch our ads!
Let’s apply the finishing touches and finish setting up our campaign.
Chapter 8: Getting fully locked and loaded with your Google Ad Campaign
Finally it’s time to get into the meaty stuff. With all the tools that we’ve equipped ourselves with in the previous chapters, let’s setup our campaign to drive traffic to the landing page.
You wanna be very methodical while doing this as setting up a campaign the wrong way can lead to loads of wasted money and lost sales.
Thankfully, I’ve laid it all down below in a step-by-step fashion.
Simply follow along and get started with your ad.
Step 1: Select your campaign goal
The first thing that Google asks while doing your Ads, is to select your Campaign Goal.
Unless you have a specific need to promote a blog post or building awareness, I recommend choosing Sales or Leads.
Sales should be the goal for most businesses. Leads is ideal for local businesses and consultancies.
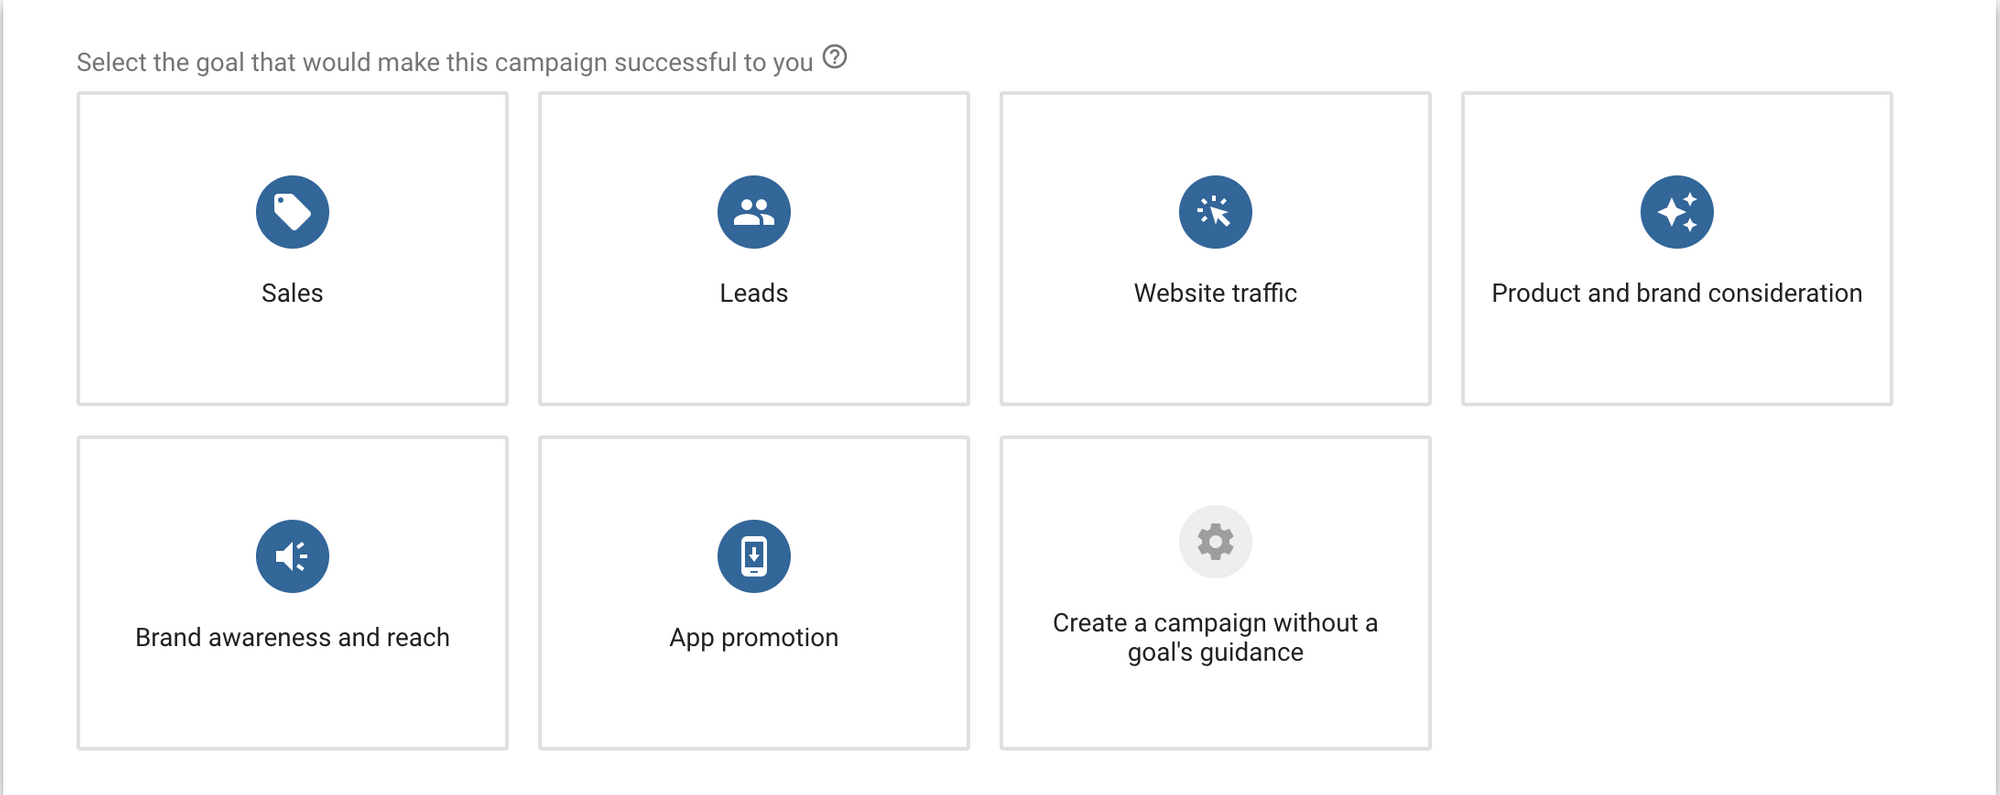
For now, let’s proceed by choosing Sales.
Step 2: Choose the campaign type
Next, you’ll get the option to choose between the different types of campaigns that Google recommends with the Campaign Goal Sales. Search, Display or Shopping.
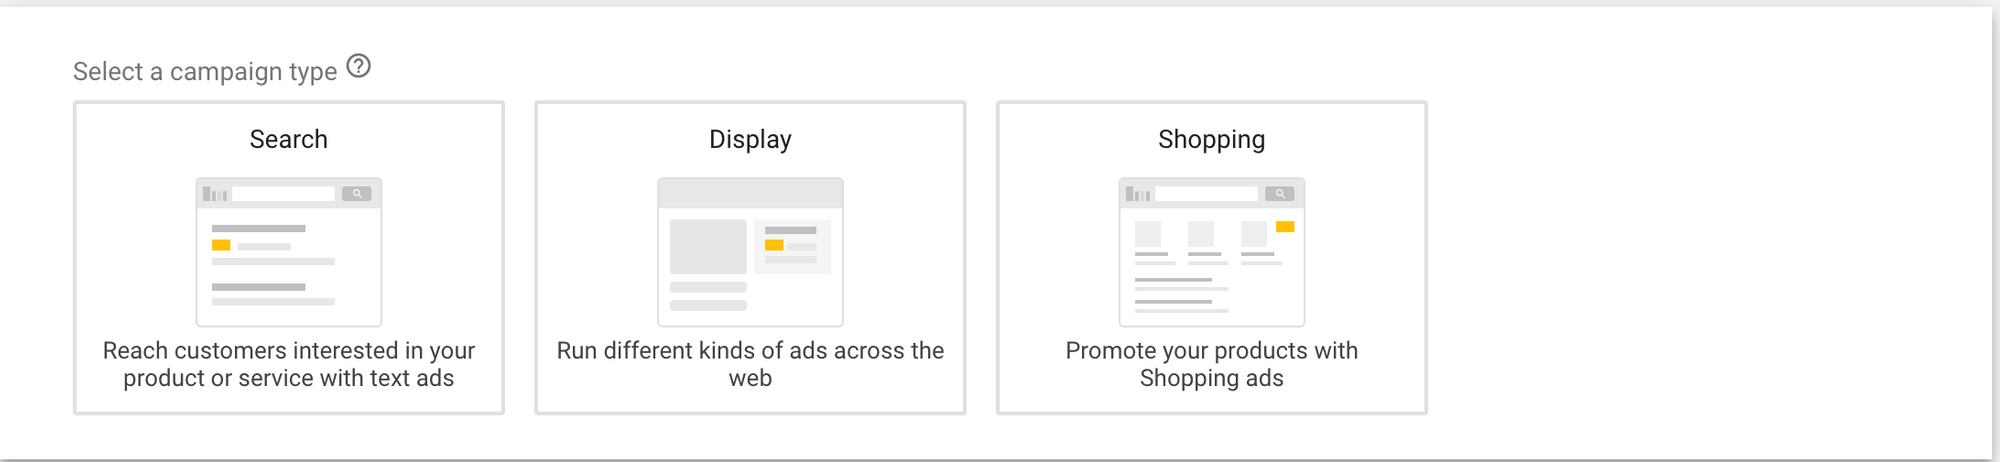
Click on Search and proceed forward.
Depending on the type of your business, you can choose the main method you’ll be making sales. You can choose multiple if you want.
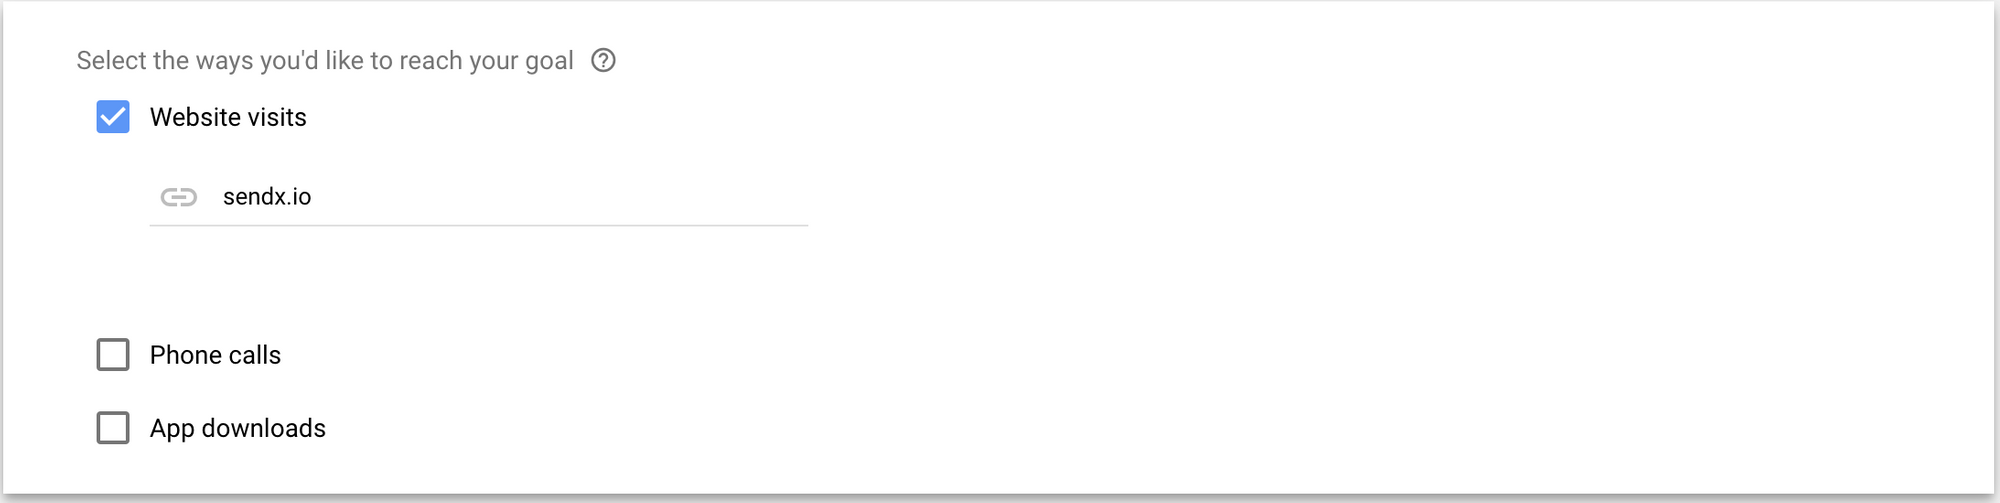
Click on Website visits, enter your website URL and Continue.
Step 3: Choose General Settings
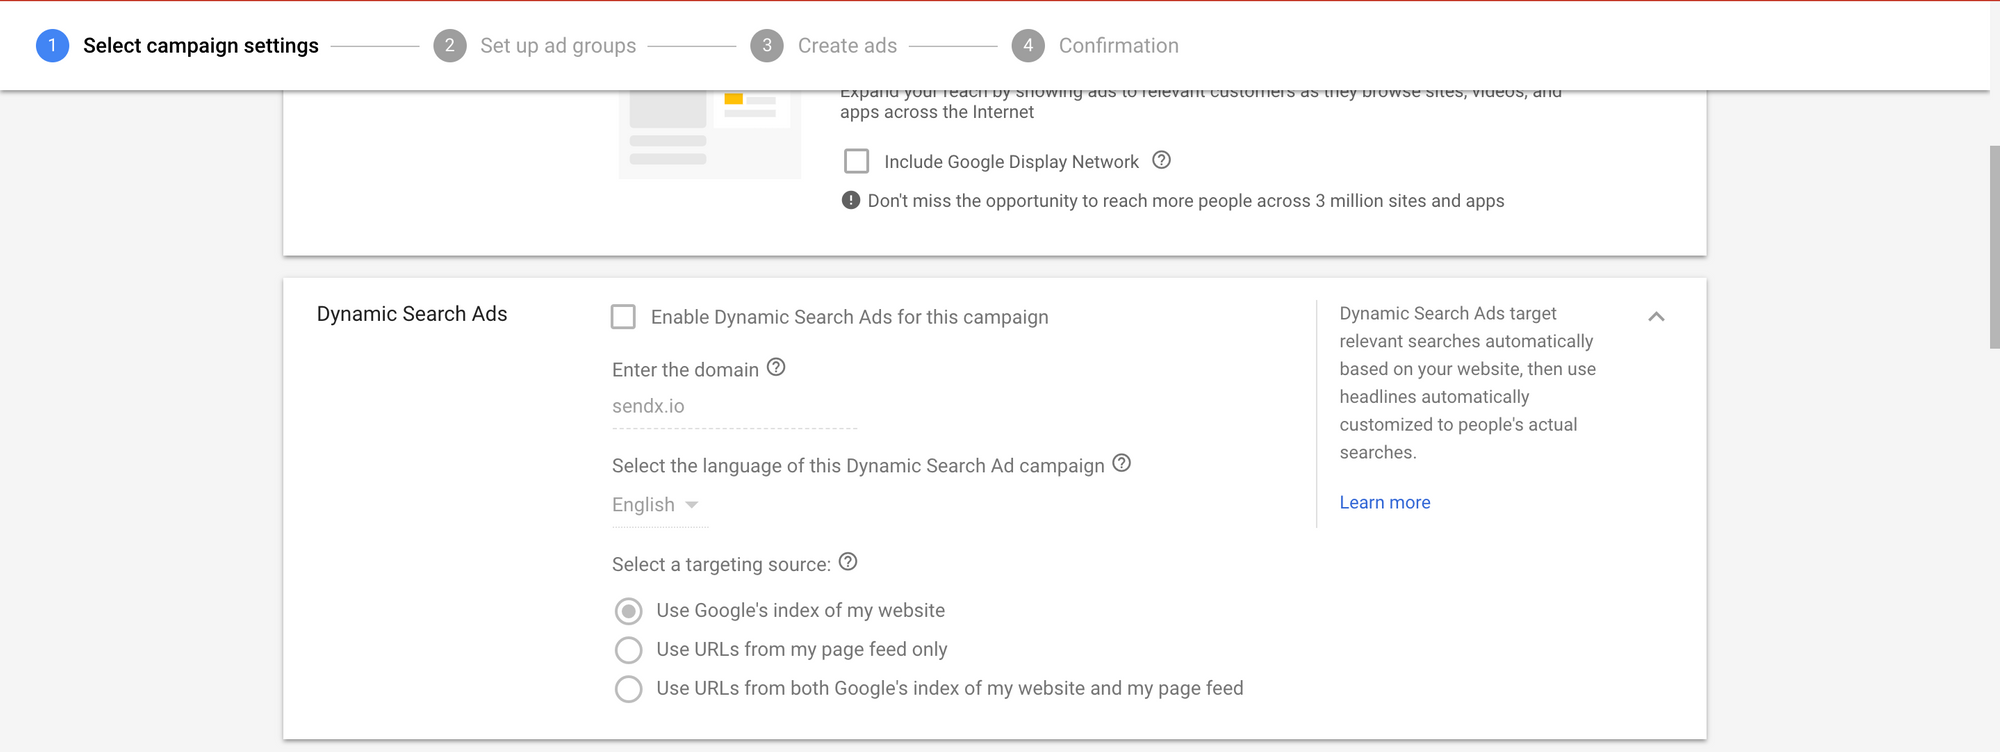
Give your campaign an appropriate name. And uncheck the box next to Google Display Network. This is because we’re currently focusing on Search only. After you’ve got some results with that, feel free to expand to the GDN.
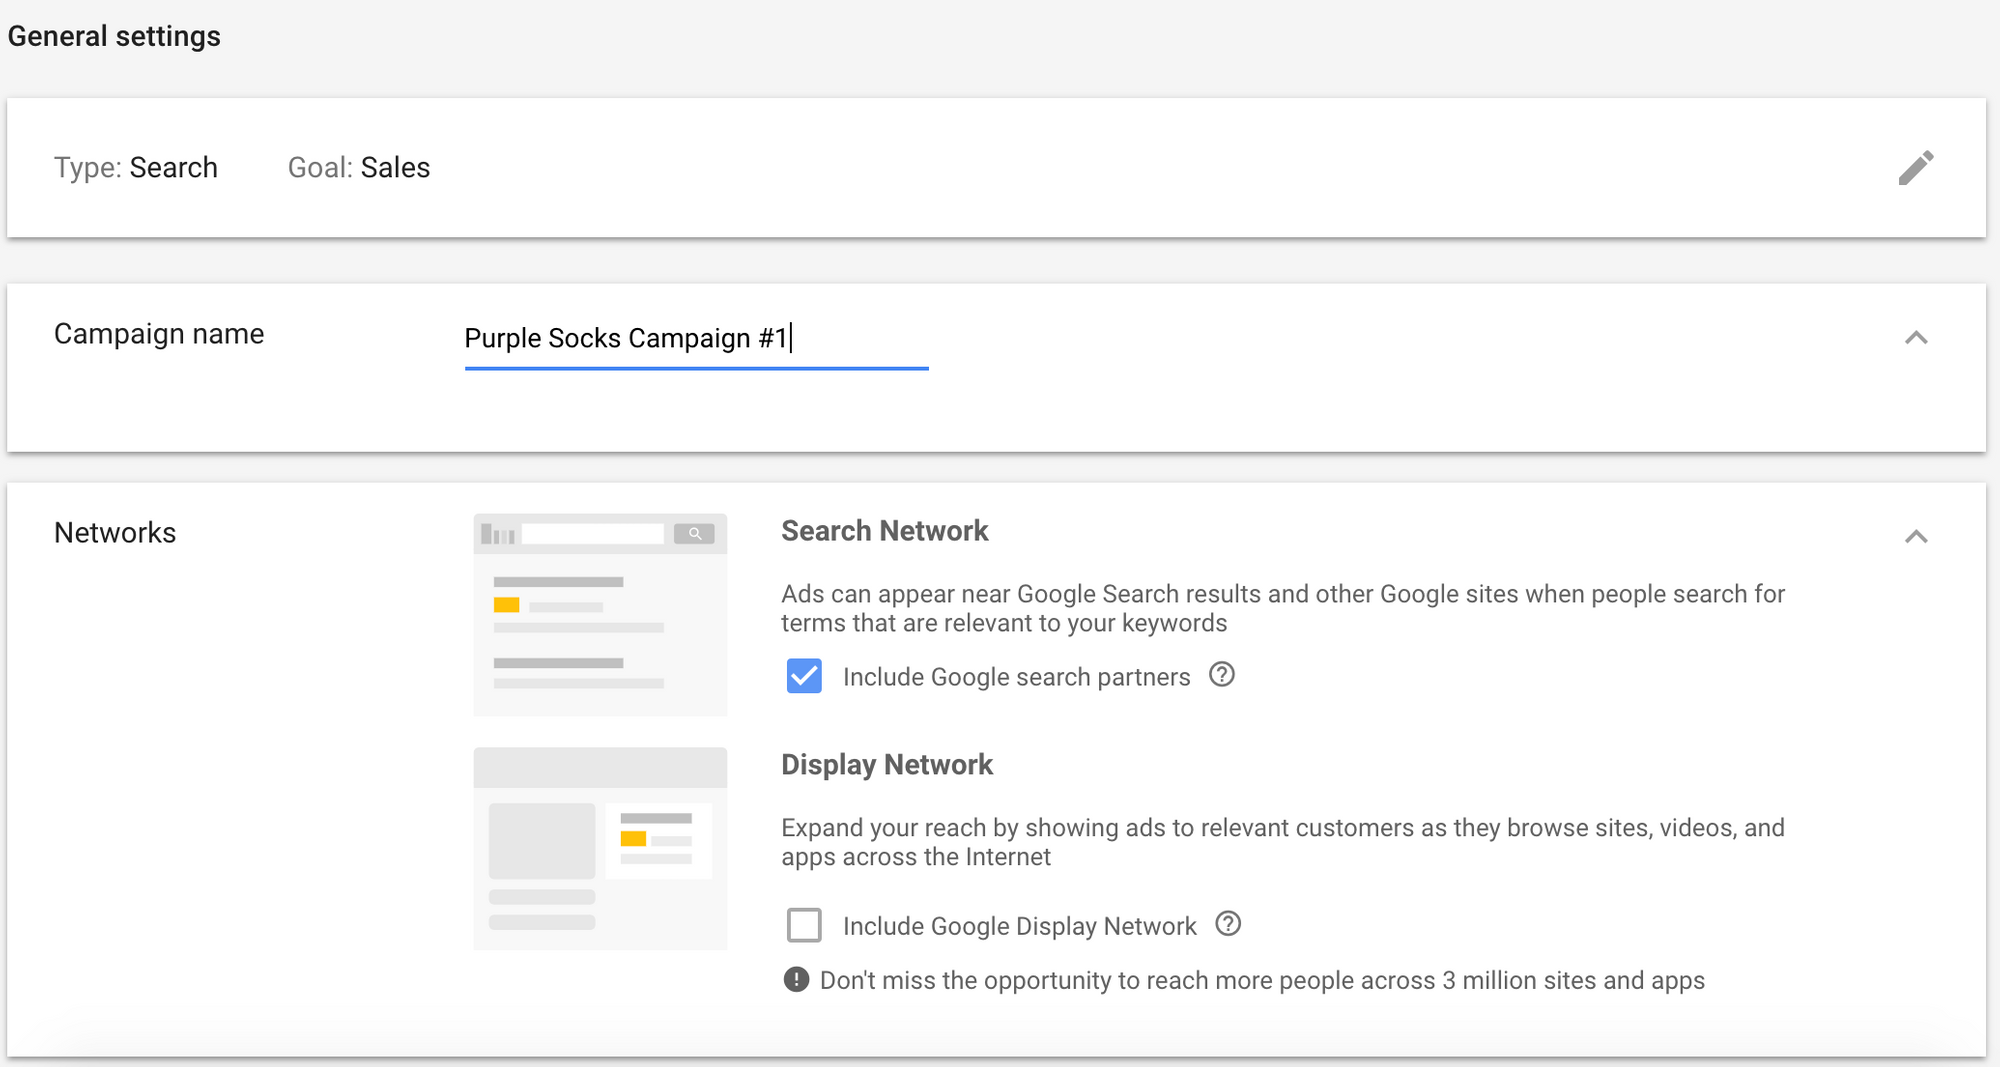
Right below that you will get the option to enable Google’s Dynamic Search Ads. These will basically modify your ad headline automatically, based on what the user searched. And the ad will be displayed automatically on searches based on the content of your website.
This nifty feature can come in really handy at times when you’re not sure what to do. But the reason I don’t recommend that you use this feature for now is because you lose control of your ads to a large extent. Which is something you should always avoid unless given a strong reason for the same.
Step 4: Select your targeting and audiences
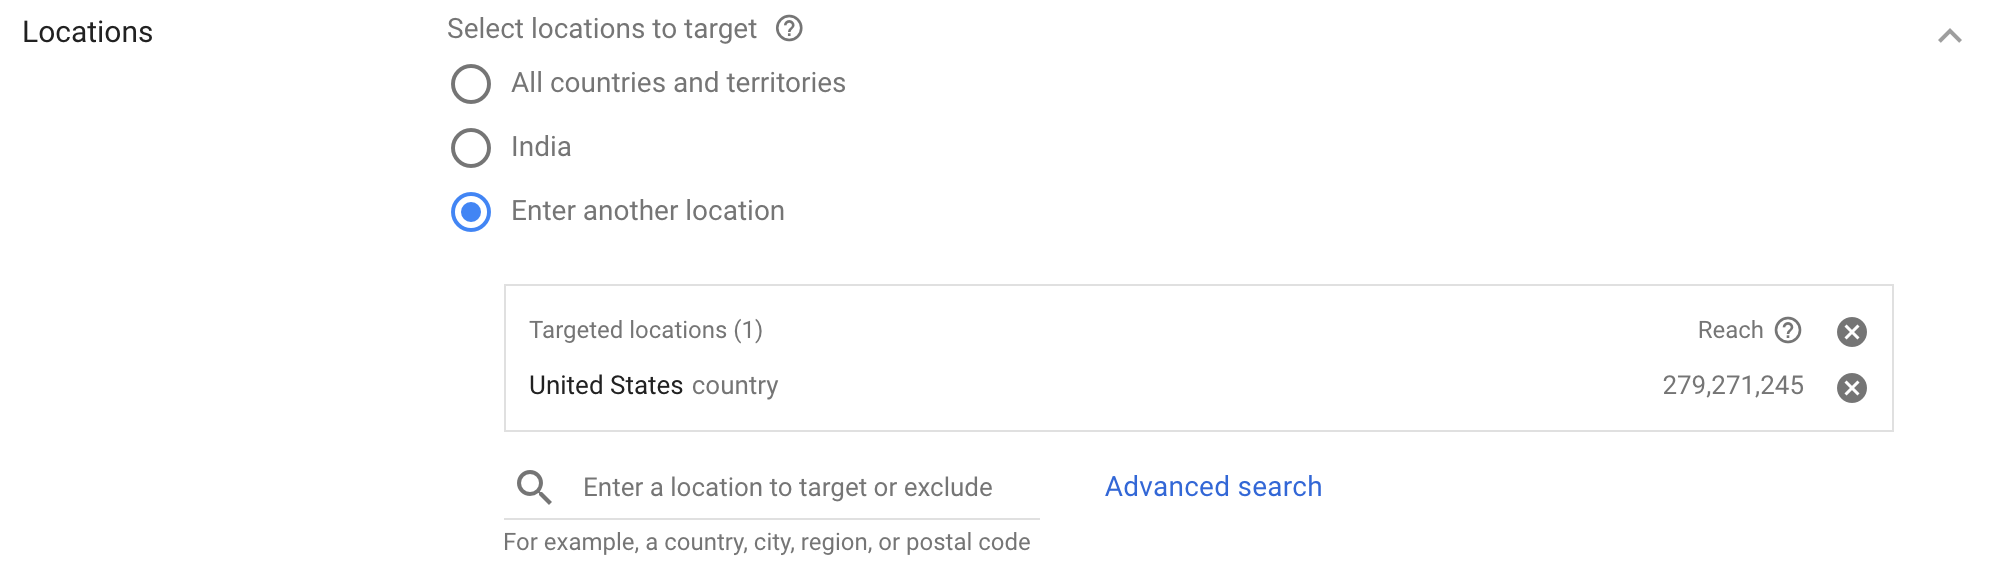
Next up, you get to choose the location you want to target with your ads. If your business sells mainly to the US, then there’s no reason to target Europe. Because even if you do get clicks, you won’t get your ideal customers.
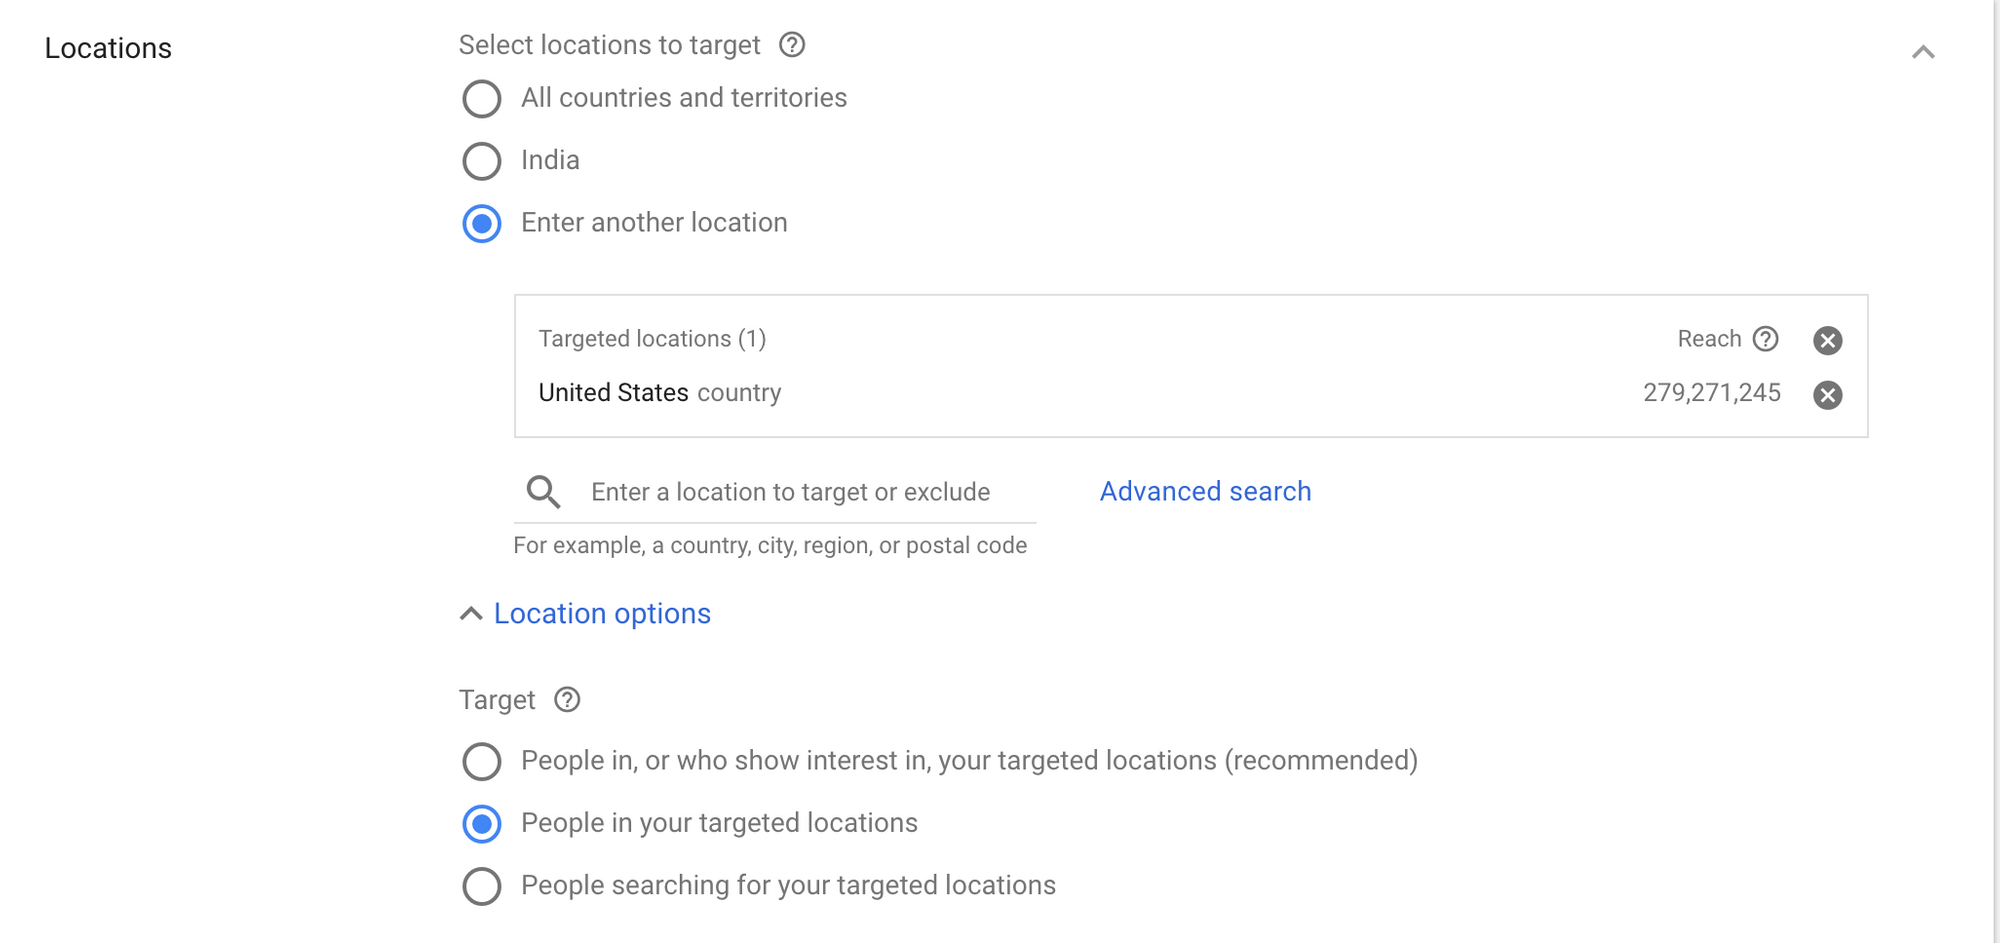
Click on Location options and select People in your targeted locations.
Next up, select the language spoken by your customers. In this case, we’ll select English.

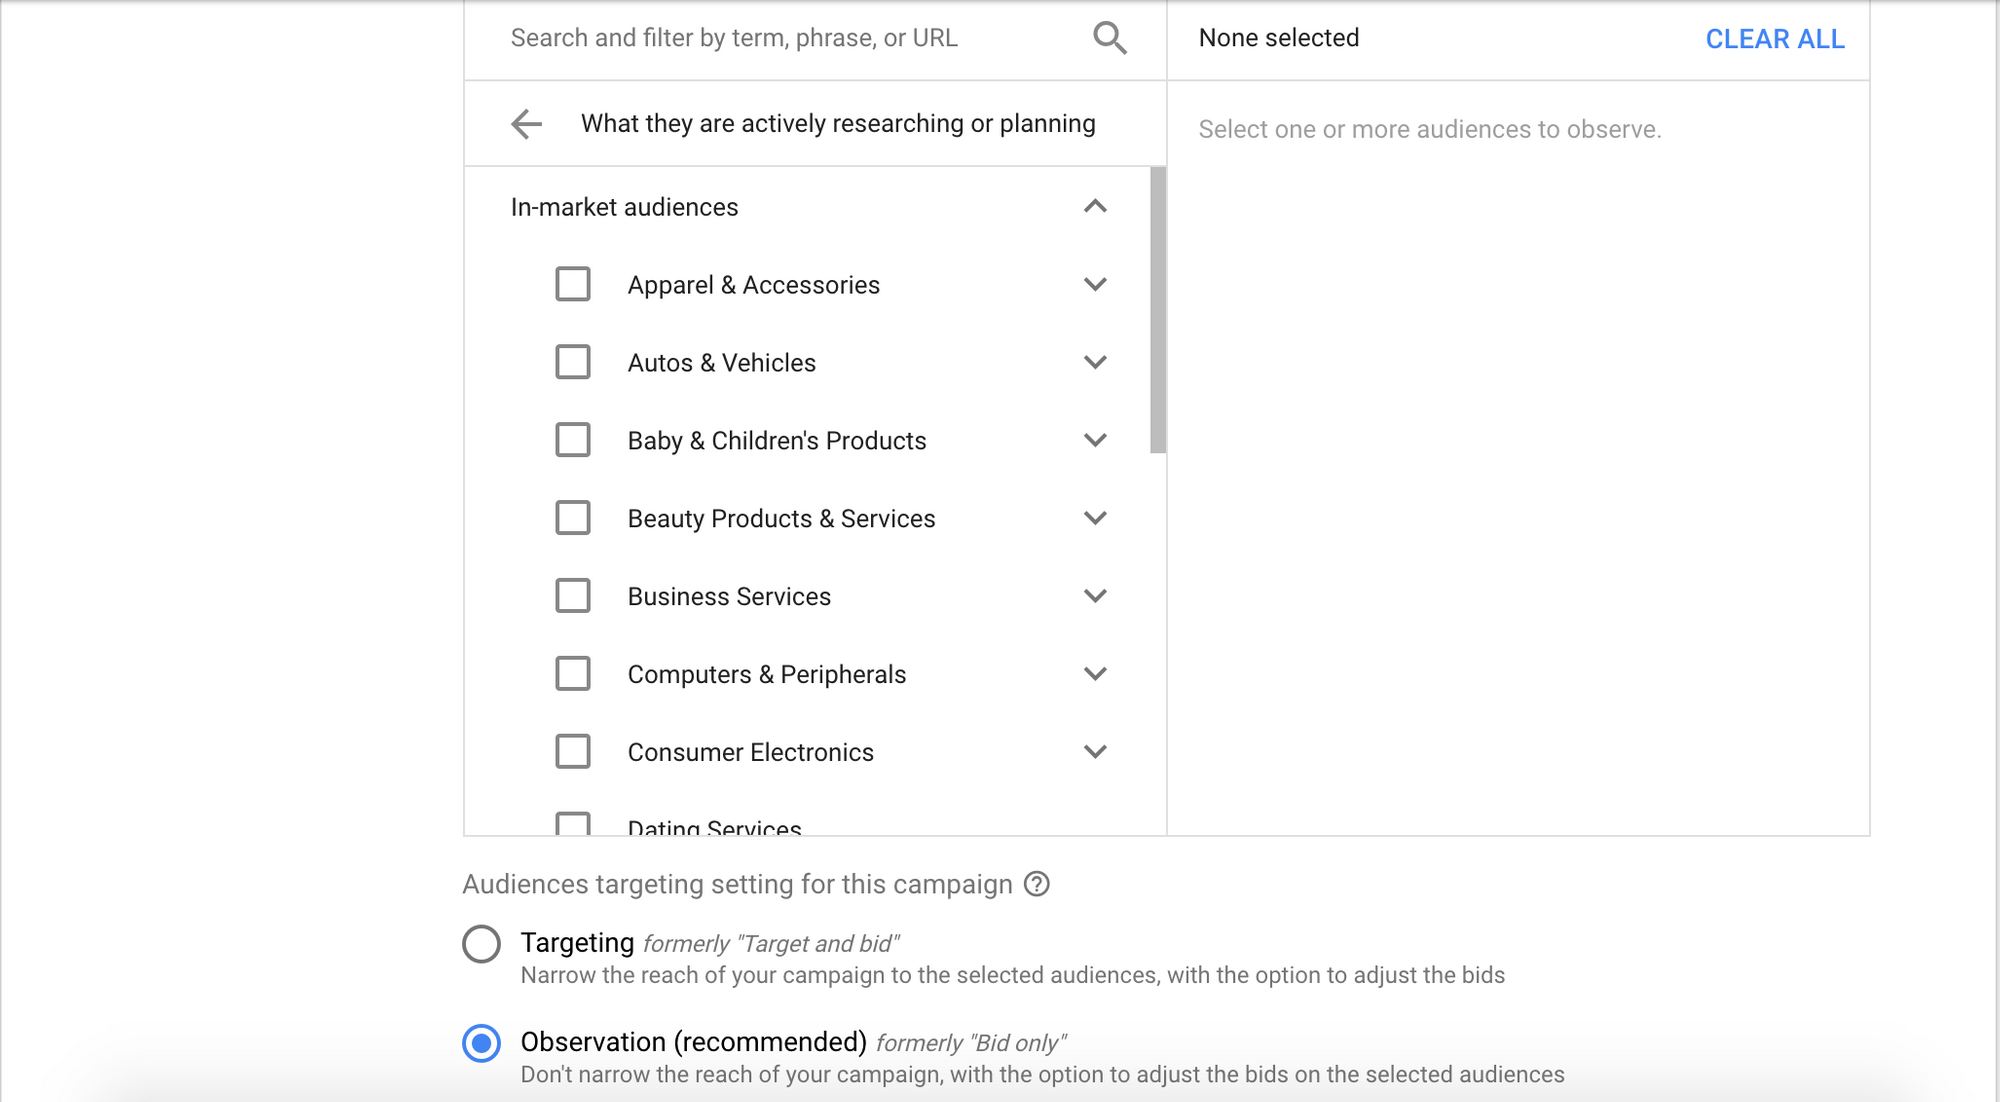
Don’t select anything under audiences as those options are only useful when remarketing or running ads across GDN or YouTube.
Step 5: Define the Budget and Bidding
This is where Google allows you to define the daily budget. Go back to the competitor research you did and see the average bid your competitors are getting results on. You want to bid a little bit higher than that.
Or you can just get started with a $10/day budget and modify it as you go along.
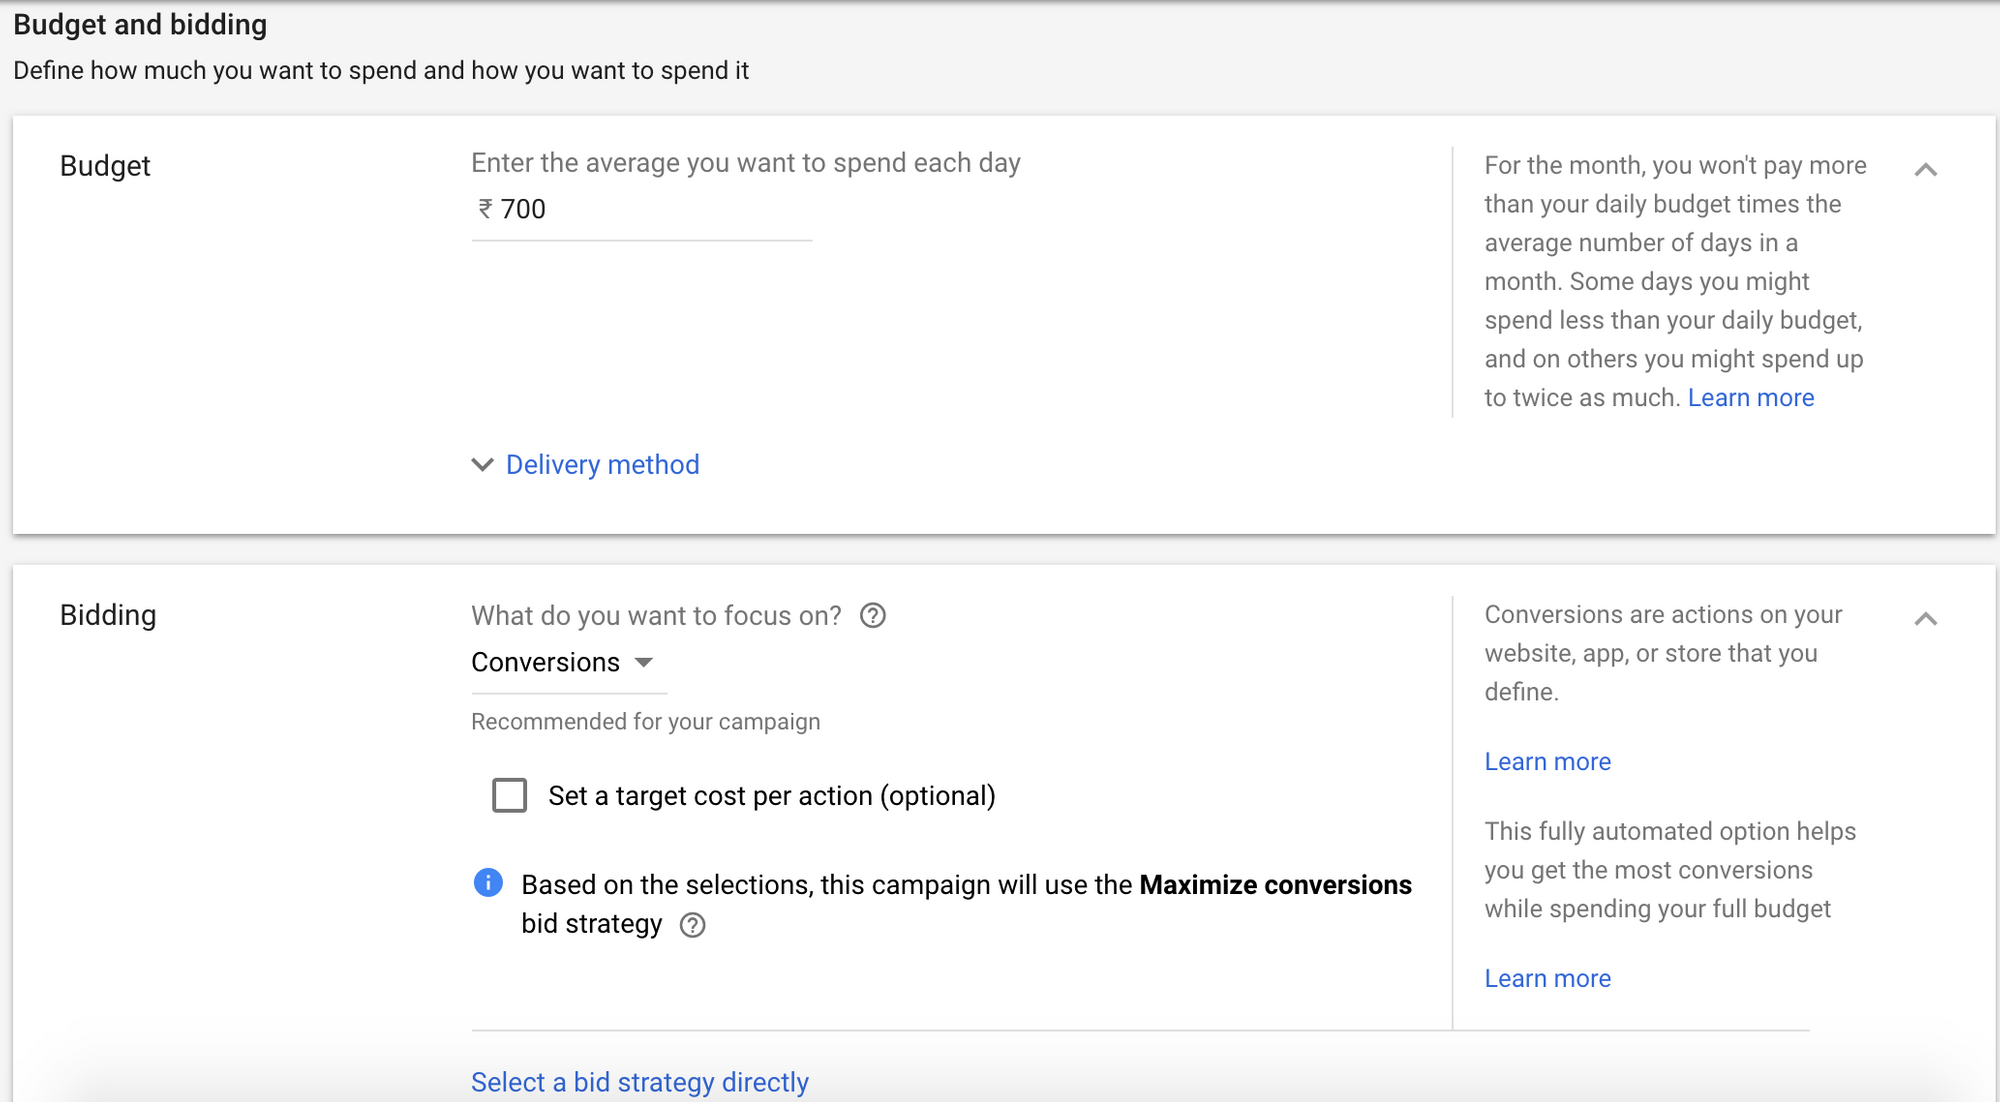
The Bidding section allows you to select the focus of your campaign. And a target CPA. Clicking on Select a bid strategy directly will allow you to choose from the multiple bidding strategies we talked about in the chapter on Bidding Strategies.
Since we’re focusing on Sales in this campaign, just choose Conversions and proceed.
Step 6: Setup the Ad Groups
A typical Google Ad account is structured like this:
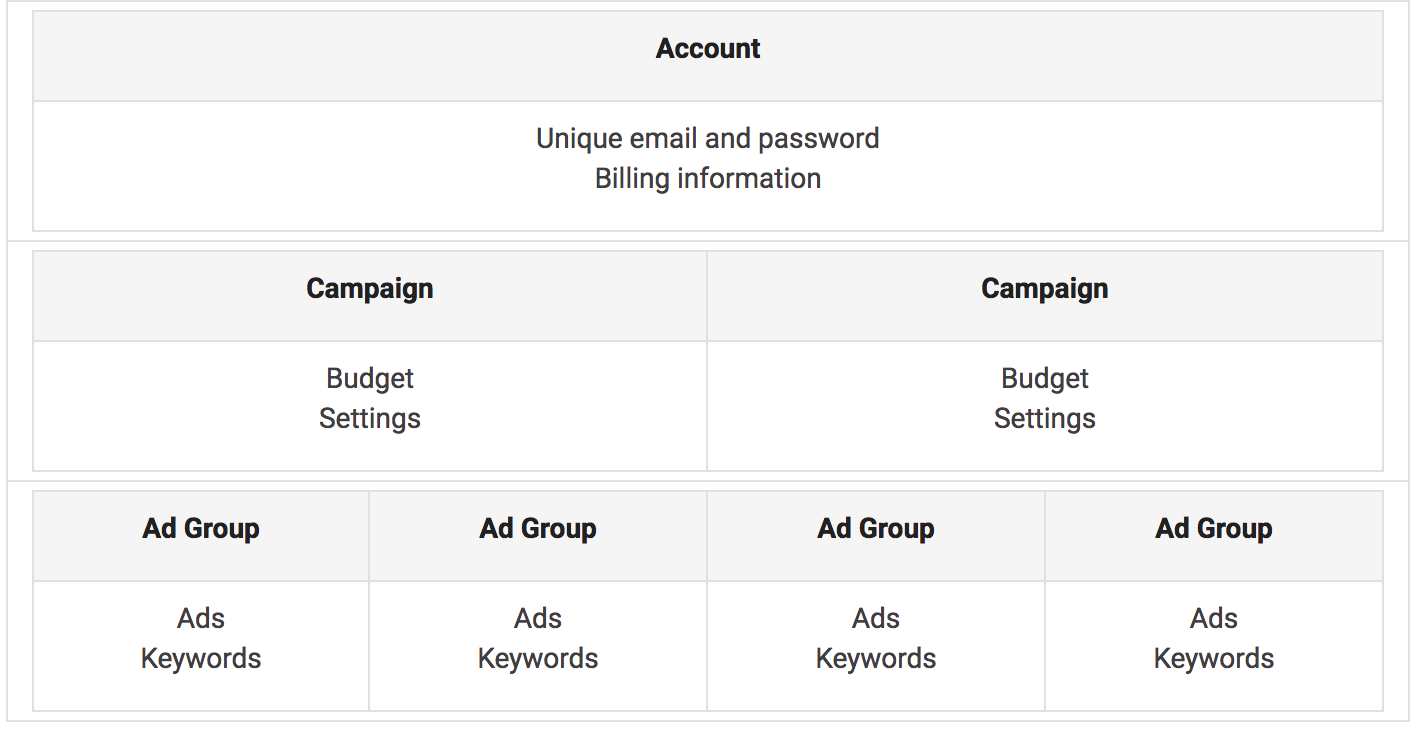
Source: https://support.google.com/google-ads/answer/1704396?hl=en
The steps we’ve taken so far have been to setup the campaign. Now we move on to setup the ad group. This ad group can have multiple ads.
Keep the Ad group type as Standard. Begin by giving a name to the Ad Group.
In the box below, enter the keywords you want to run the ad on. Make sure you ignore the Keyword Ideas suggested by Google on the right.
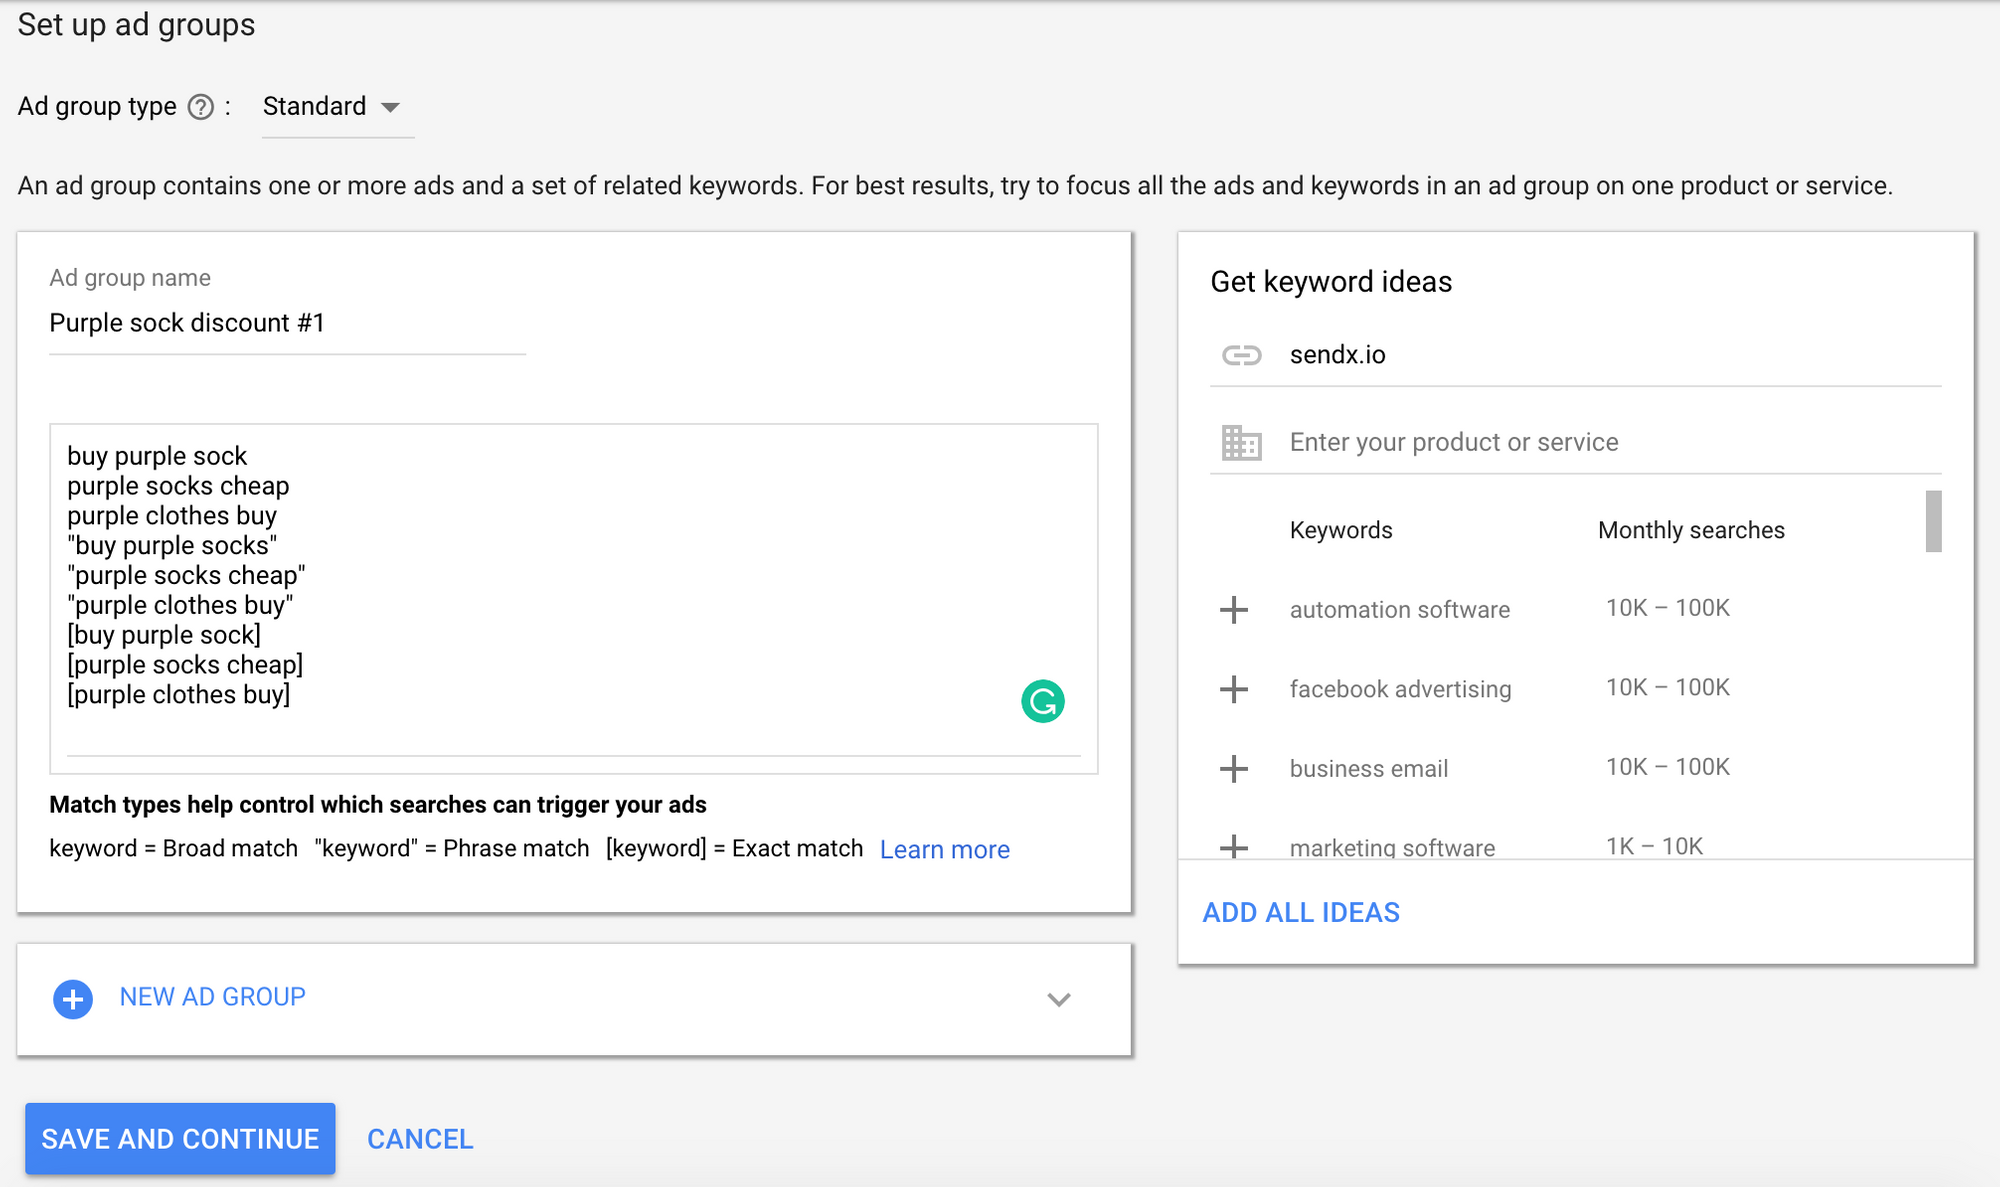
There are many ways you can setup the ad groups inside the campaign. You can choose to put a single keyword inside an ad group to micromanage the ads. Or you can choose to have one ad group for a particular match type.
To begin with, it’s best to have one ad group for one product or service. And enter the multiple match types inside that. This allows you to run multiple ads for multiple products and modify according to the results quickly.
Press Save and Continue when you’re done with the Ad Groups.
Step 7: Creating the Ads
The number one tip I’d like to give you while creating your ad (especially if you aren’t a PPC rockstar yet) is to don’t try to be too original or clever with your ad.
Like I talked during the chapter on Competition Domination, you want to mimic your competitors’ successful ads and put your own twist on them to make it better.
Trust me, I know how tempting it can be to create something unique. But you need to know that you competitor’s ads are working for a reason. You need to capitalise on that and make the most ROI. You can always experiment later when you’ve mastered the ins and outs of Google Ads.
Click on New Ad and begin creating your ad (after analyzing your competition properly)
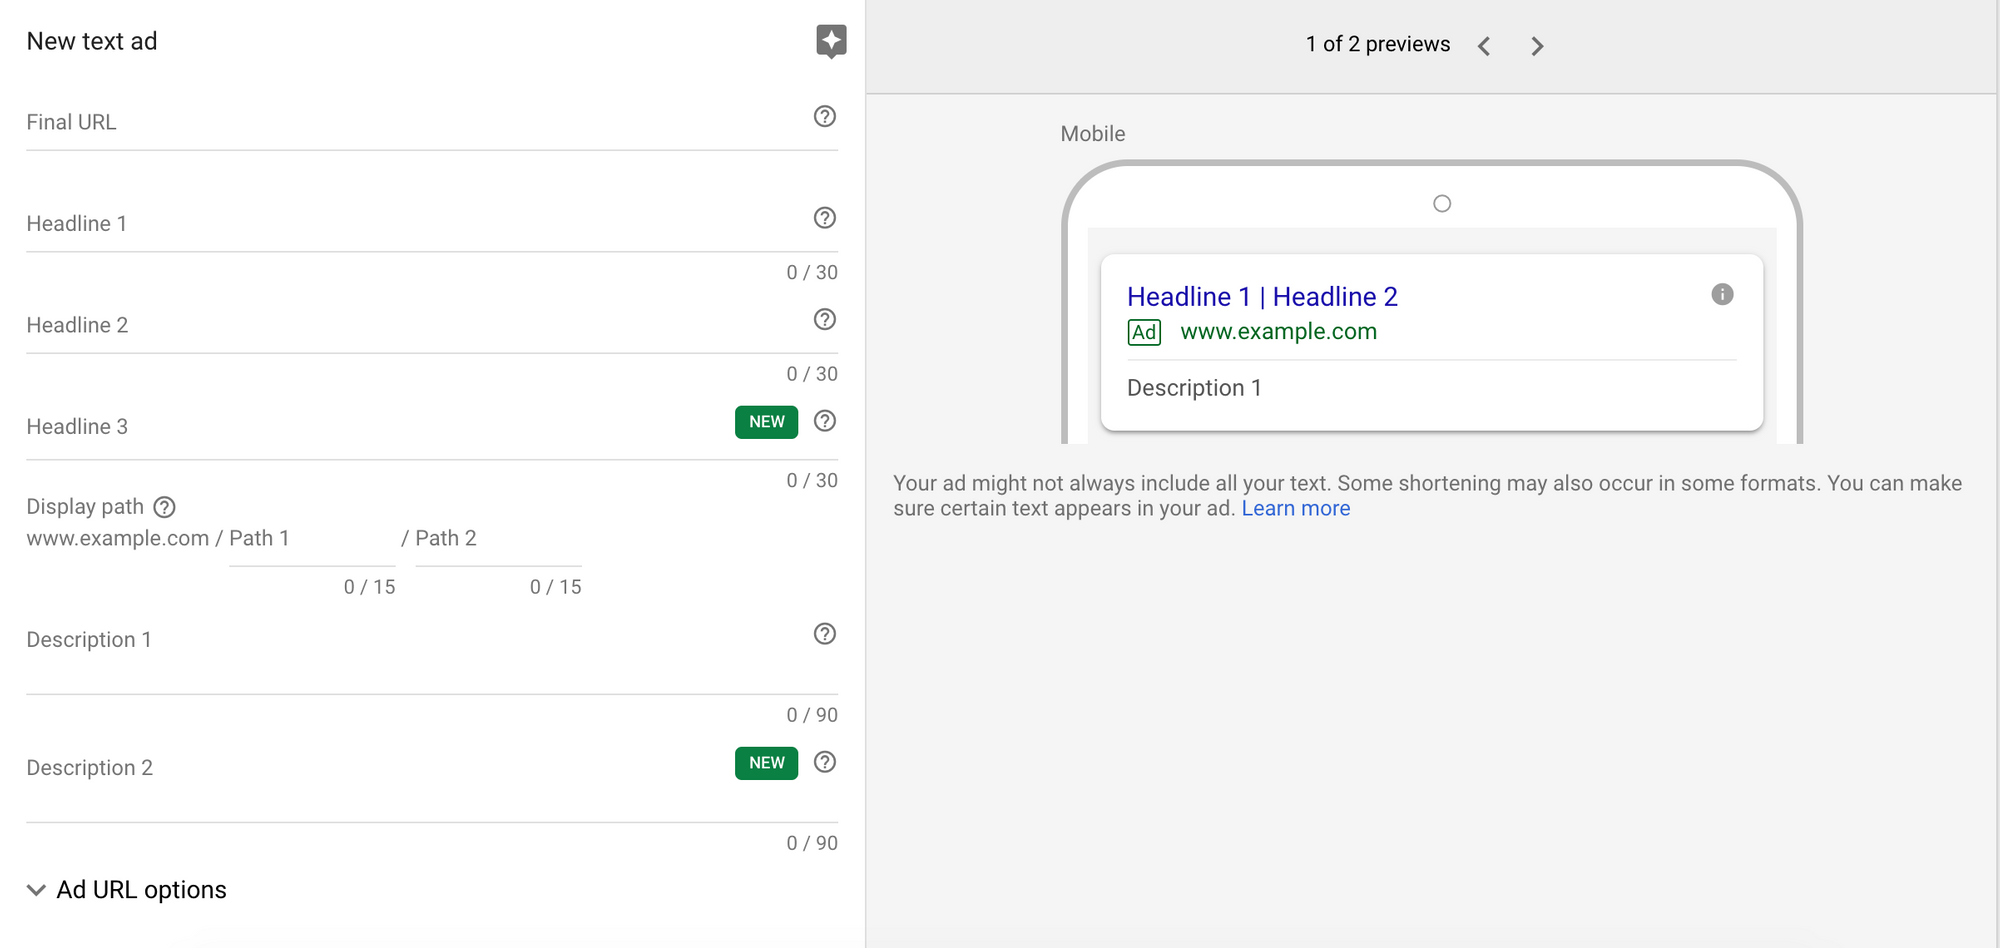
- The Final URL is where you enter the actual URL where you want the ad to take your user to.
- In Headline 1, Headline 2 and Headline 3, enter a suitable headline for the ad. Make sure you include your target keyword in it to maintain a good quality score.
- Under Display Path, write the URL you want to be displayed on your ad. Include the keyword in here as well. Be precise with this URL.
- In Description 1, Write a POWERFUL hook for your product. Take a look at your competitors’ ads to get inspiration for this.
- Description 2 should have a powerful CTA which asks the user to take action.
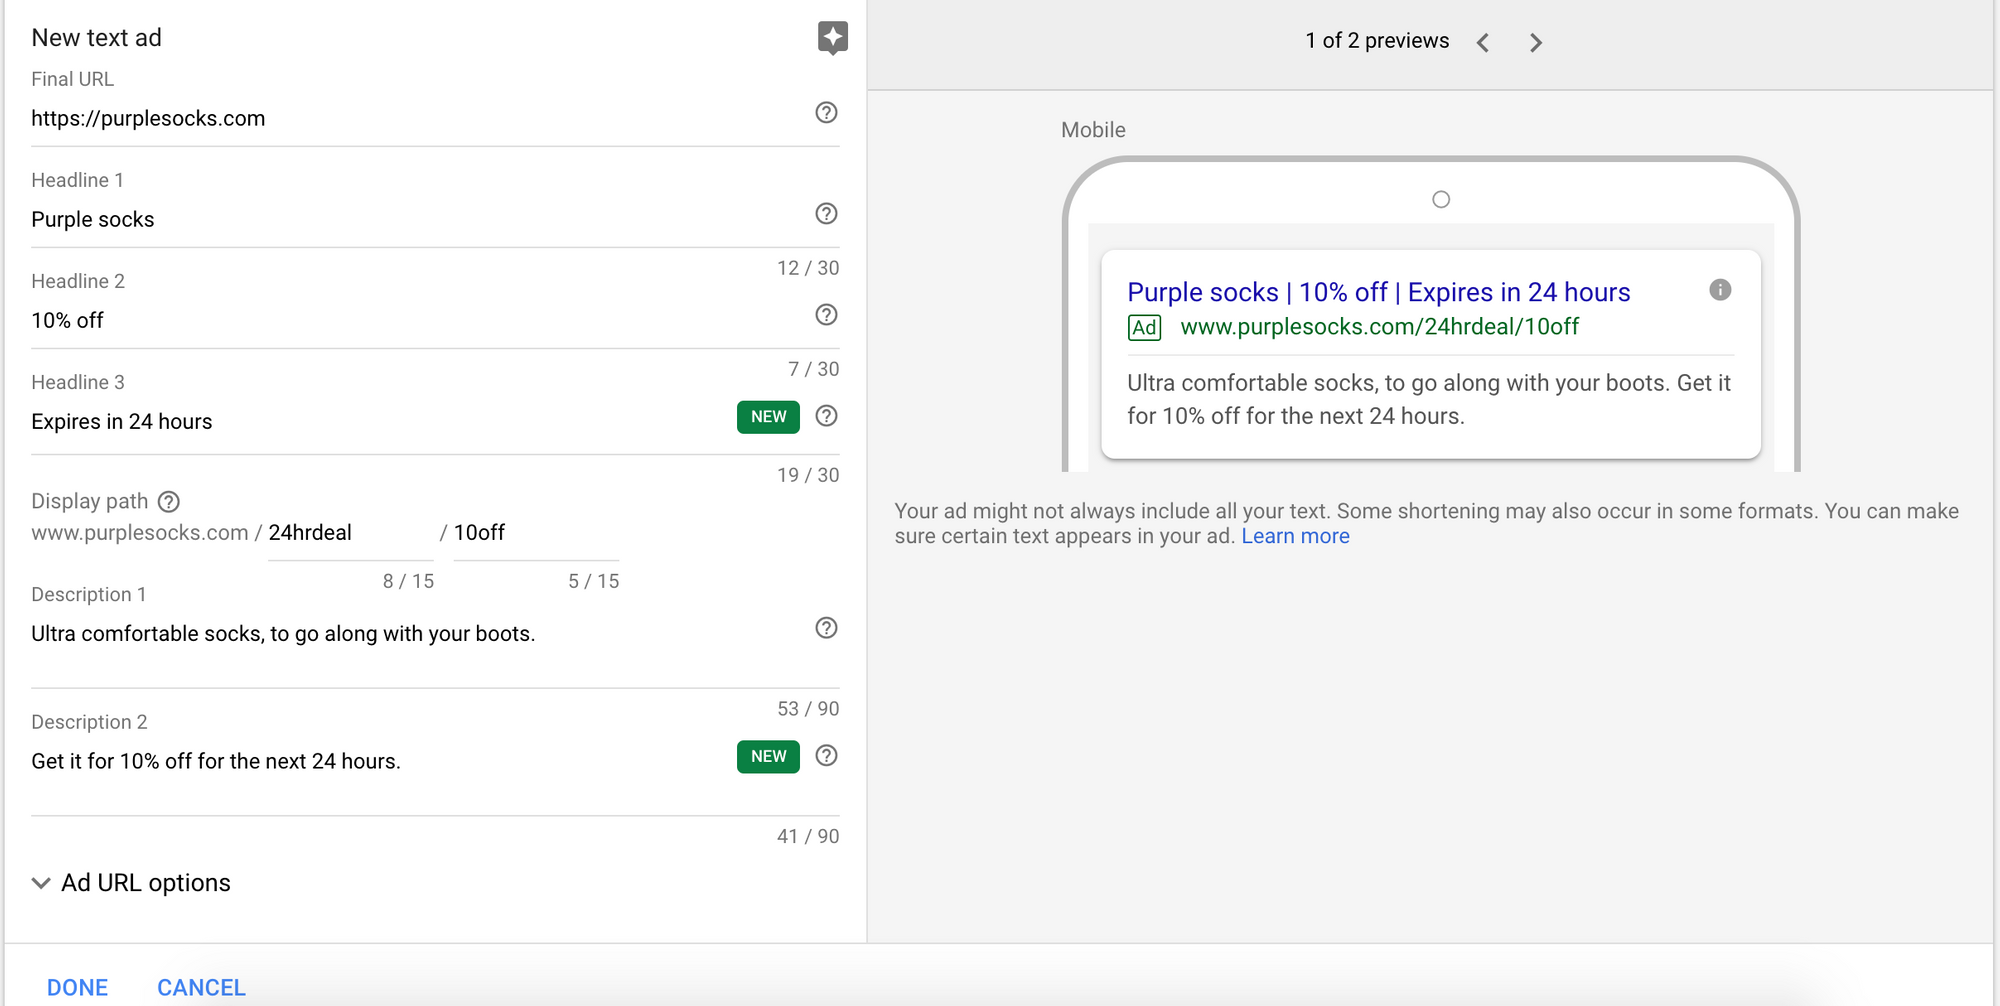
Click on Done and press Save and Continue.
This will take you to a Confirmation Screen, where you simply need to click Continue to Campaign.
Now you can go to your campaign screen and see your campaign.
Yep. You’re done with your very own Google Ad. Give yourself a pat on the back. You’ve made it this far into the guide and you’ve actually taken action to better your skills and your business.
Handing it over to you
I hope this ultimate guide helped you to get a solid understanding of Google Ads, and gave you the confidence to run Ad Campaigns with ease.
Now I’d like to hear from you.
Which chapter of this guide did you find the most helpful?
Or maybe you have a strategy to share that will help other readers.
Let me know by leaving a comment below.
