I work with SaaS companies who are in the midst of scaling up.
That means a couple of things: they’ve nailed down product or market fit, they’ve been around for a few years, a handful of people in the company have done everything to get to this point, and they’ve (finally) got some seed or series-A funding that allows them to hire some help.
That funding also brings a mandate to grow revenue. Investors want a return on their money. And they’d like to see it yesterday.
While most companies in this position understand the value of strong content, they haven’t had the time or the resources to actually create anything. They’ve been relying heavily on a salesperson, some word of mouth, and referrals.
But now they’re ready to build a content team and an inbound strategy. They want to turn on the machine, throw up a few eBooks, and watch the leads pour in.
Except it doesn’t quite work that way. Content without the strategy part is a huge waste of time. While the strategy is a separate beast—one I won’t be tackling here—I can show you a way to do a little of both at the same time. If you’re creating your first content funnel, you can incorporate a little strategy into your content creation. Let’s look at how to make that happen.
1. Do Customer Research
This is the part everyone tries to skip. They assume that because they exist and have customers, they already know everything they need to know. That’s a quick way to head down the wrong path.

Now, I can write a whole post about how you should handle customer research, but that’s not our focus today. So here’s the gist: send out some surveys to existing customers asking them what problems you solve and what they like best about your product or service.
Do some data mining from forums and discussion boards. Use Google search or AnswerthePublic to see what people are searching for. Talk to your sales team. And at the very least, nail down the three to five overarching steps people take to become customers, write one detailed buyer persona, and get your team to agree on a unique value proposition.
2. Create Your Lead Magnet First
A lead magnet can take many forms—video, eBook, white paper, infographic—but the medium isn’t really what’s important yet.
What you should be most concerned with at this point is your buyer’s level of awareness. In case you’re unfamiliar with this concept, here’s a scale for reference:
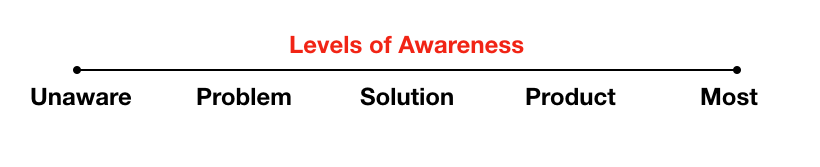
You’re not guessing at this, by the way. It comes from prior experience with customers and the research you’ve done in Step 1.
My guess, however, is that if you’re building your first content funnel—but you’re an established business—your customers are somewhere in the Problem/Solution aware zone. This is good because now you know exactly what to talk about: their problems. Or more importantly, how you solve them.
Now that you know what your customers are thinking about, you can start brainstorming relevant topics.
- How does your business or product solve these big problems?
- What context do you need to create around this problem?
- What specific issues can you point to? How much do customers already know about the problem or solution?
- How much do you need to tell them?
- Which keywords or phrases do you need to include to show them you understand?
- What tone will you strike?
Notice none of this has anything to do with your company or the format of the lead magnet yet.
Keep everything focused on your customer’s needs. Then decide which medium will resonate most with them to deliver this information. Explainer video? E-book? ROI calculator? These decisions are based on the content, not the other way around.
3. Build a Landing Page
You build a landing page; you don’t just create one. That means you use a framework and methodically think through every level of messaging a customer needs to see. This is where something like Joanna Wiebe’s messaging hierarchy can help.
But let’s back up a minute here and discuss the purpose of a landing page to begin with.
A landing page is like a turnstile in a train station. A user must pay a small fee to get through to the other side. And on the other side is the highly valuable lead magnet you created in Step 2. In theory, what you’ve created is so valuable, the visitor is willing to give you a name and email address (permission) just to get it.
Here are some landing page basics to keep in mind.
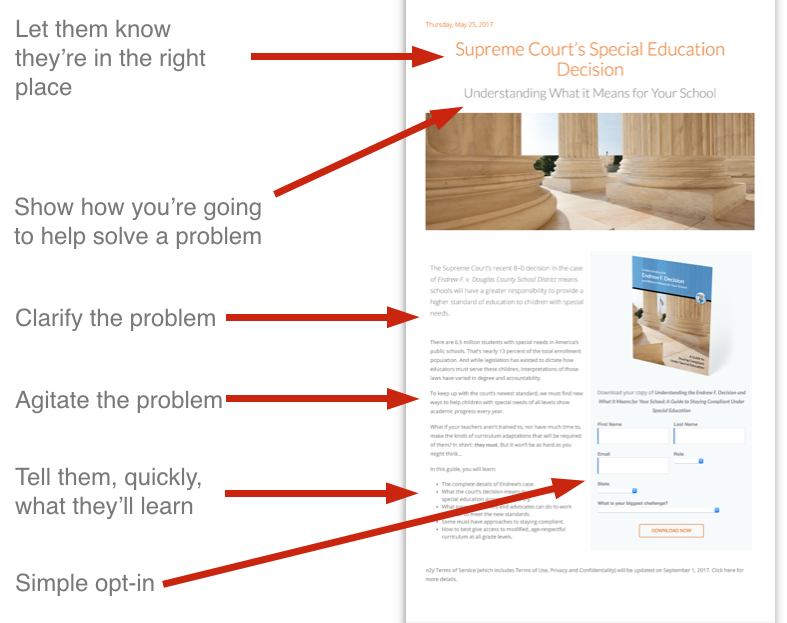
- The headline should match the visitor’s expectations. That means you have to consider what messaging got them here and match it. Any inconsistencies and they’ll bounce.
- Tell them exactly one thing to do. Don’t link out to any other content, and don’t ask them to do two or more things.
- How much information do you need to provide to connect their expectations with what you want them to do? Give them that; that’s how much you write.
- Use bullets to draw out the benefits of whatever is in the lead magnet. Go high level.
- No navigation menus. This page should be the only place they can go. Don’t make it easy for them to go elsewhere. They either opt-in or they don’t.
- Keep the opt-in form simple. Name and email address should be enough for now. You can ask about company size, interests, pets, first loves, and whatever else you want to know, later.
- Your copy should follow a simple formula: clarify why they’re here, agitate their problem, tell them what they get. Like this:
4. Write a Blog Post
If you’ve done the legwork of conducting customer research, writing the lead magnet, and building the landing page, this part should be easy.
Spin up a draft based on the most enticing information from the lead magnet and landing page. Provide some valuable information to readers, but don’t give them everything. Use this post as a taster—an appetizer, if you will—of what’s to come in the bigger lead magnet.
And don’t make the post sales-y or sound like marketing. Just write a really helpful, valuable post that happens to have a link or banner at the end telling readers to check out your other great content (*ahem, lead magnet, ahem*).
Next, promote it everywhere you can. Channel partners, PPC ads, social media channels, network, and especially through email—which happen to be our next step.
5. Email Your List
Okay, okay; I’m making a huge assumption here (that you have a list), but at this point, you should at least have customers. Now, I’m not encouraging you to spam them. If they haven’t given you consent to email them, don’t. There are other ways to reach them, and you shouldn’t ruin any goodwill with promo emails.
But if you do have a list to email, keep this really simple. This email has one job to do: get the reader to click to the blog post or the landing page.
I’d suggest sending them to the blog post. This way, they’re not coming to your landing page cold, and you won’t give them that not-so-faint aroma of blatant marketing.
Like the blog itself, this email shouldn’t be sales-y or sound at all like you’re marketing to them. Just let them know you’ve got something great that you think will help them and they should check it out. Here are a few things to remember about this email.
- Keep it short.
- It’s not about the email itself but the click through to the blog post.
- You don’t have to tell them everything.
- Give a couple of chances to click (i.e., one link, on button/graphic)—both going to one place. This helps catch the email skimmers.
- Treat the subject line like a headline, focused on what they’re getting.
- Sign off from one person. No one likes emails from “The [company] team.”
6. Write Social Media Promo Pieces
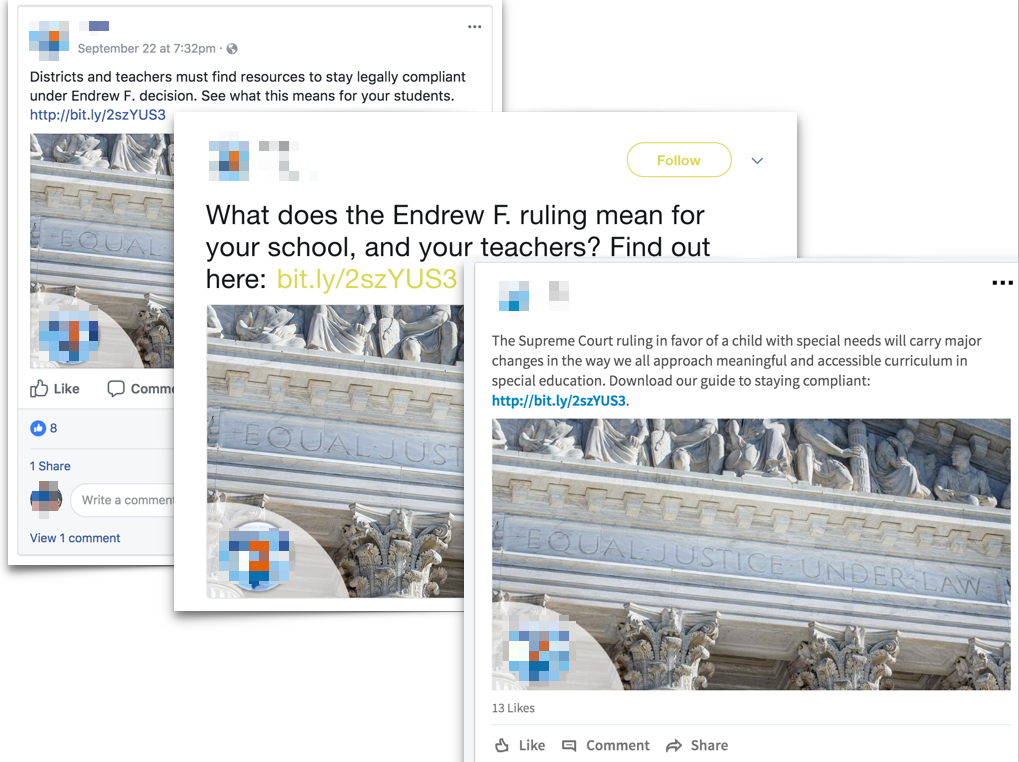
There are basically three main players here: Facebook, Twitter, and LinkedIn. Without going into a whole thing about social media strategies, I’d say one thing here: Keep these posts consistent with one another. Use similar, benefits-focused language and use the same picture.
You’ll want to test which approaches work best on each platform (i.e., language, images, CTAs), but you’ll need to, first, decide whether you’re promoting the blog post or the lead magnet itself.
If you’re promoting the blog post, speak to the major benefits of reading the post, then link out to that (use a service like Bit.ly to shorten links). If you’re promoting the lead magnet, you’ll want to tell people, immediately, what they’re going to get by downloading it. Speak to a pain point, but make sure what you’re promoting matches with where they’re landing (see Step 3). Here’s an example of what I’m talking about (using the same campaign I used above):
Key Takeaways
I’ve talked about the importance of consistency before. The same holds true when creating your first lead gen funnel. If you approach your content creation in the right order, you’ll have a little strategy baked in.
I like to think of this entire process—writing the lead magnet first—as working backward. Once you’ve got a deep understanding of the lead magnet, everything else falls in line. This is why it’s a little dangerous to have multiple people working on multiple pieces at the same time. Having one person create everything maintains consistency and bakes in inherent value.
If you approach the creation of your first in the order I’ve laid out here, you can be confident everything is aligned, greatly improving your chances of positive results. Now that you have a clear strategy, what are you waiting for? Get to it! And let me know how it goes.